Examples for Module Arrangements with Needle Actions
Module Arrangement with Needle Actions
- Modules are applied to the Module Arrangements without their specific pattern color. In general, they are expanded with the color in which they are entered in the pattern.
- Needle actions or the colors of needle actions will be applied to the Module Arrangement. They are entered at the right of the structure modules.
If there are shape modules as well, the needle actions are entered at the left of the shape modules for the right hand side. - With knitting needle actions, only the color is inserted into the Module Arrangement. The needle actions remain transparent. Needle actions also remain transparent in the search area.
- Unless otherwise defined in the MA, the color segments of the Module Arrangement are automatically expanded by the “Separate Technical Rows” processing rule.
- Non knitting needle actions as casting-off or transferring e.g, are inserted into the Module Arrangement without color only.
- In the Module Arrangement, the needle actions like casting-off and transferring are compensated with the remaining needle actions of the modules and are resolved accordingly when expanding. In the design pattern, any needle actions can be drawn into the same row, that are not compatible. When expanding they are resolved, as specified in the Module Arrangement.
Procedure
- Design Pattern is created:
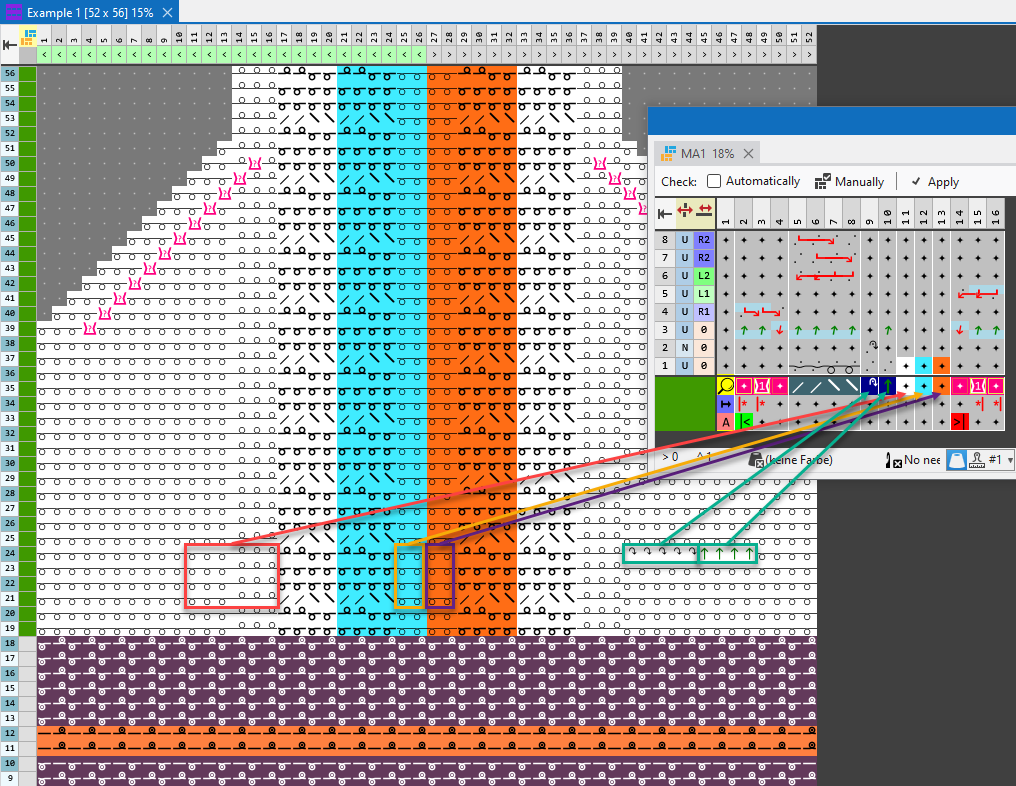
Example: Cable stitch 2x2 <, narrowing edge, 3 colored, with needle actions for knitting and not knitting
- 109
- In the Row control column, select the rows where the Create Module Arrangement... is to be used.
- 110
- Position the cursor in the pattern area.
- 111
- Open the context menu with RMB and select Selection / Create Module Arrangement... .
- The Module Arrangement will get open.
- 112
- Change the transfer sequences with the
 Move drawing tool.
 It will not be checked whether the moved transfer action matches the transferring row that will be overwritten. The user himself is responsible for the result.
- 113
- Check the generated Module Arrangement regarding its correctness of the module structure with the
 Manually button.
The transfer sequence will not be checked regarding its correctness.
- 114
- Then apply the changes with the
 Apply button.
- or –
Close the Module Arrangement and confirm the query with Save. - Module Arrangement is saved locally in the
 MA tool window.
 - 115
- Enter the generated Module Arrangement in the desired rows of the design pattern.
- The Module Arrangement is expanded by the technical processing.
 The color segments of the Module Arrangement have no effect in rows with entered CA. The CA has priority in that case.
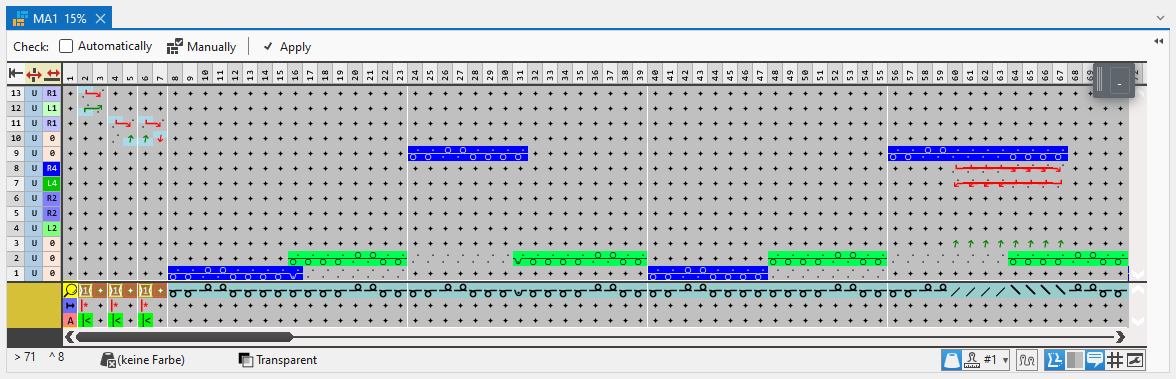
Module Arrangement with Additional Rows
- Add additional rows to the sequence using a Module Arrangement.
Procedure
- Design Pattern is created:
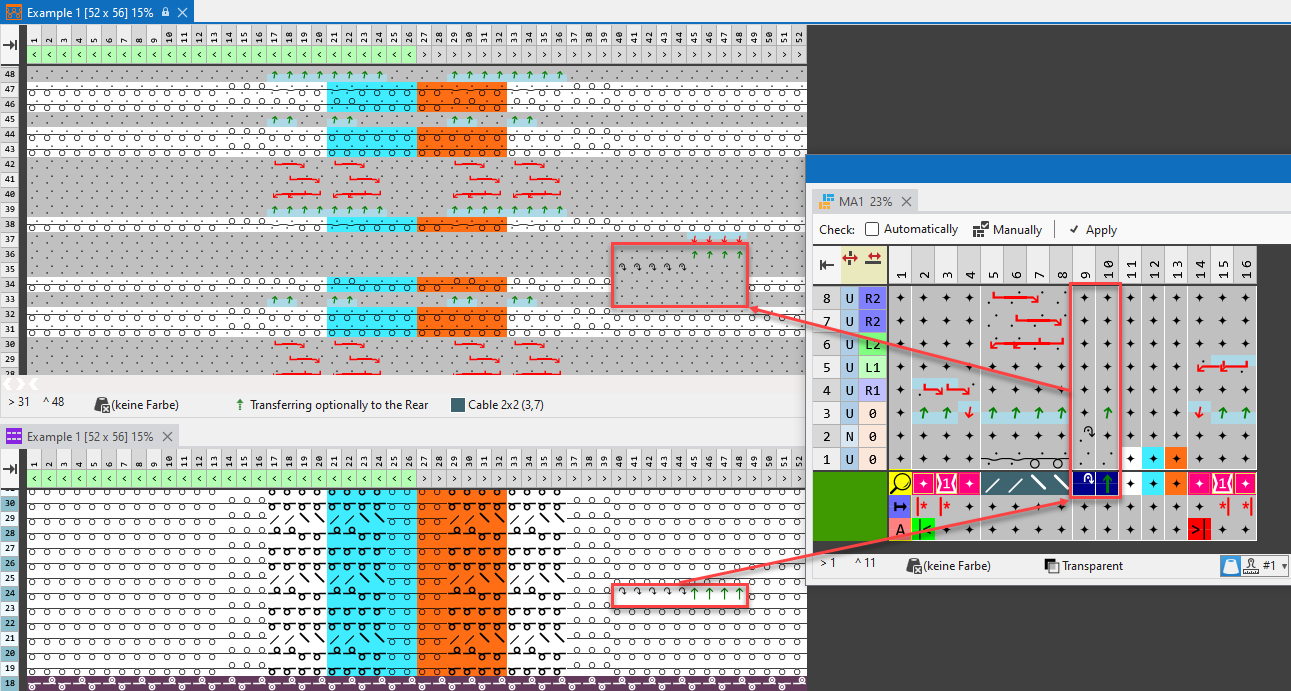
Example: Cable stitch 2x2 <, narrowing edge, 2 colored, with needle actions for knitting and not knitting
- 116
- In the Row control column, select the rows where the Create Module Arrangement... is to be used.
- 117
- Position the cursor in the pattern area.
- 118
- Open the context menu with RMB and select Selection / Create Module Arrangement... .
- The Module Arrangement will get open.

- 119
- With RMB on row 1, enter a row above it two times and fill with the symbol for transparent.
- 120
- In the Light Blue column on the rows 1, 2 and 3, draw-in Rear Stitch with Transfer, in the colors Light Blue, Yellow, and Green.
- 121
- Check the generated Module Arrangement regarding its correctness of the module structure with the Manually button.
- 122
- Then apply the changes with the Apply button.
- or –
Close the Module Arrangement and confirm the query with Save. - Module Arrangement is saved locally in the MA tool window.
- 123
- Enter the generated Module Arrangement in the desired rows of the design pattern.
- The Module Arrangement is expanded by the technical processing.
- The additional rows of the color segment Light Blue are only entered in columns where no module is drawn-in.
The color segments of the Module Arrangement have no effect in rows with entered CA. The CA has priority in that case.
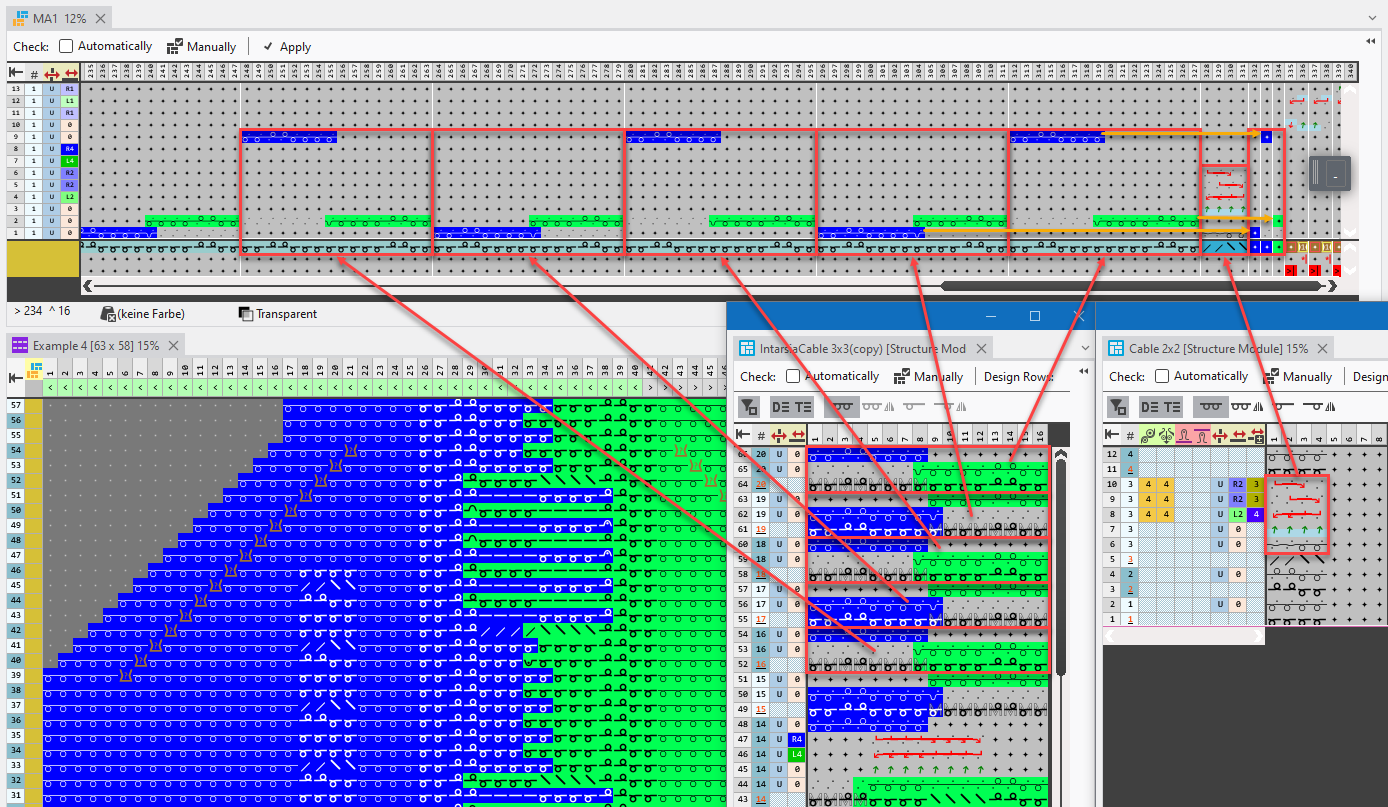
Module Arrangement with Intarsia Cable
- With modules with Intarsia cycle, all pattern rows are represented as separate segments in the Module Arrangement.
- The color sequence in the segments correspond to the different situations in the module. In this example, blue is knitted first and then green in the first pattern row of the module. In the second pattern row, green is knitted first and then blue.
As a result, the first knitting row is blue, the second green and the third is blue again in the processing area of the Module Arrangement. This way both situations are considered and represented. (Blue-Green color sequence: knitting rows 1+2 / Green-Blue color sequence: knitting rows 2+3) - 3 color segments are also generated through the alternating color sequence in the module, one for the first row knitting in blue, a second for the second row knitting in blue and the third for the row knitting in green.
Procedure
- Design pattern with module for Intarsia cable, cable 2x2 <, narrowing edge and two colored needle actions is created.
- 124
- In the Row control column, select the rows where the Create Module Arrangement... is to be used.
- 125
- Position the cursor in the pattern area.
- 126
- Open the context menu with RMB and select Selection / Create Module Arrangement... .
- The Module Arrangement will get open.
- 127
- Change the transfer sequences or knitting ranges with the Move drawing tool.
It will not be checked whether the moved transfer action matches the transferring row that will be overwritten. The user himself is responsible for the result.
- 128
- Check the generated Module Arrangement regarding its correctness of the module structure with the Manually button.
The transfer or knitting sequence will not be checked regarding its correctness.
- 129
- Then apply the changes with the Apply button.
- or –
Close the Module Arrangement and confirm the query with Save. - Module Arrangement is saved locally in the MA tool window.
- 130
- Enter the generated Module Arrangement in the desired rows of the design pattern.
- The Module Arrangement is expanded by the technical processing.
- With more than one color segment for a color (for example: color Blue), the color segment that is on the same row is used when expanding, like the area knitted beside it in the module segment.
- Colorless knitting rows, like the one of the 2x2 cable, conform to the color area they are placed in in the pattern when expanding, or the assigned color segment for needle actions in the Module Arrangement.
The color segments of the Module Arrangement have no effect in rows with entered CA. The CA has priority in that case.
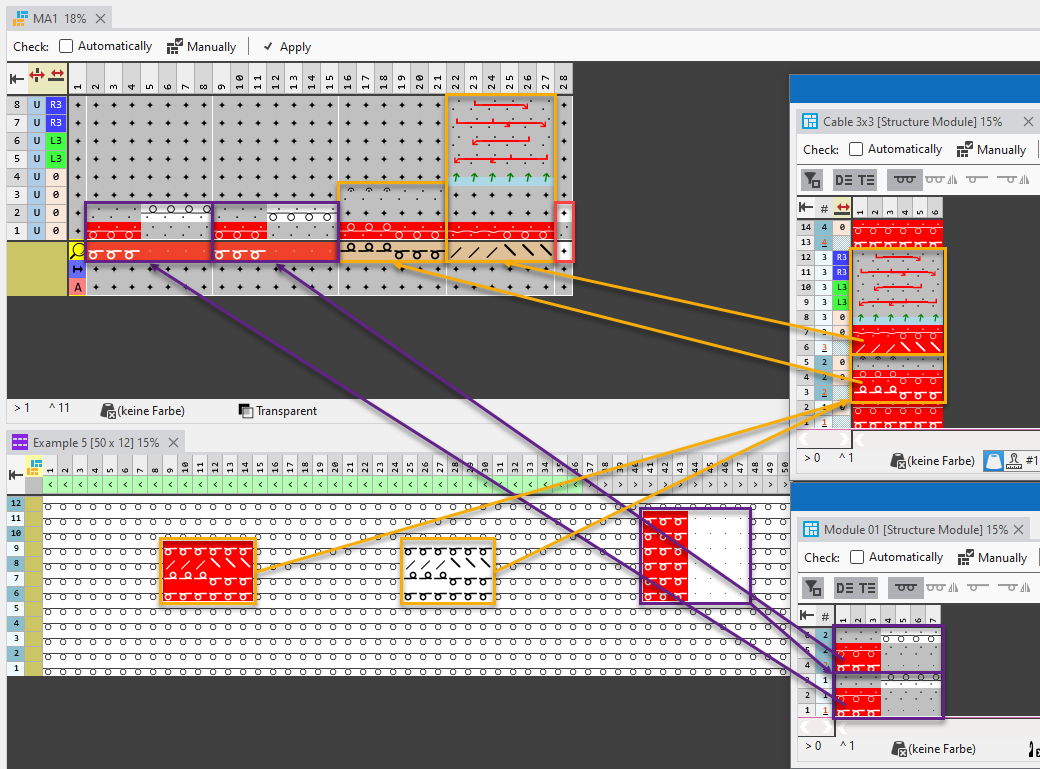
Module Arrangement with multi-row colored modules
- In the pattern there are two multi-row, colored modules drawn-in, that are applied into the Module Arrangement.
A red 3x3 cable which is drawn-in once colored and then white, and a 2 pattern rows high, two colored module.
Procedure
- Design Pattern is created:
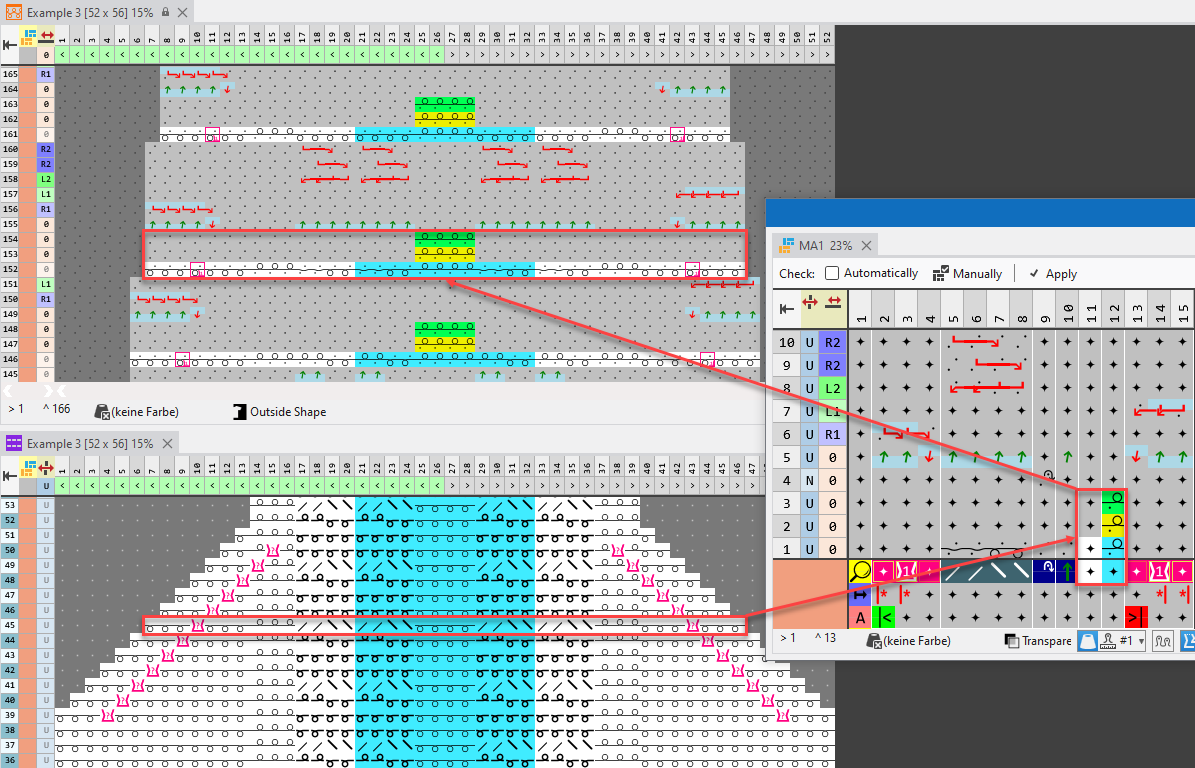
Example: Cable 3x2< red, Cable 3x2< white, two colored module.
- 131
- In the Row control column, select the rows where the Create Module Arrangement... is to be used.
- 132
- Position the cursor in the pattern area.
- 133
- Open the context menu with RMB and select Selection / Create Module Arrangement... .
- The Module Arrangement will get open.
- The two colored module consists of two pattern rows. This way, two segments are created in the Module Arrangement, one for each pattern row.
- The red Cable 3x2< consists of four pattern rows, but only two of them contain technical rows with not knitting symbols. This way, a segment is created for each of these two rows in the Module Arrangement.
- Apart from the modules, only white needle actions can be found in the pattern. That is also why only a white color segment is created in the Module Arrangement.

- 134
- Change the transfer sequences or knitting ranges with the Move drawing tool.
It will not be checked whether the moved transfer action matches the transferring row that will be overwritten. The user himself is responsible for the result.
- 135
- Check the generated Module Arrangement regarding its correctness of the module structure with the Manually button.
The transfer or knitting sequence will not be checked regarding its correctness.
- 136
- Then apply the changes with the Apply button.
- or –
Close the Module Arrangement and confirm the query with Save. - Module Arrangement is saved locally in the MA tool window.
- 137
- Enter the generated Module Arrangement in the desired rows of the design pattern.
- The Module Arrangement is expanded by the technical processing.
- Depending on where the Cable 3x2< was entered in his color Red in the pattern, it will also be expanded like the color adjustment specified in the Module Arrangement.
- Depending on where theCable 3x2< was entered in White in the pattern, it is considered as a colorless module when expanding. The rows are expanded corresponding to the needle actions color segment for white.
The color segments of the Module Arrangement have no effect in rows with entered CA. The CA has priority in this case.