Step by Step to Training Pattern
- 1
- Creating a pattern project with one pattern and the desired settings.
- 2
- To draw select any desired drawing tool under the Drawing Tools group.
- 3
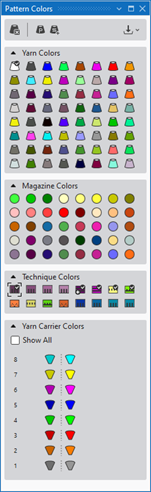
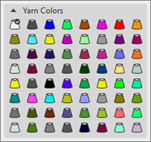
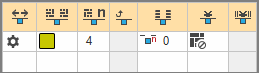
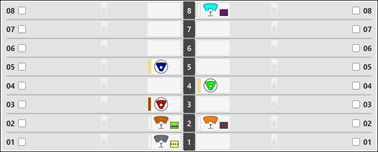
- In the Pattern Colors tool window select the desired pattern color from the Yarn Colors color palette:
- Yarn Colors:
-
 : The yarn carriers are not automatically placed on the yarn carrier rails.
The yarn carrier home position is determined in the Technical Processing.
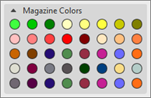
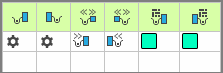
- Magazine Colors
-
: The yarn carriers are not automatically placed on the yarn carrier rails.
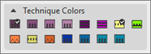
The yarn carrier home position is determined in the Technical Processing. - Technique Colors (do not use to create a design pattern)
-
: Yarn carriers are automatically placed on the yarn carrier rails due to STOLL default settings and are taken into account during the determination of the yarn carrier home position during the Technical Processing.
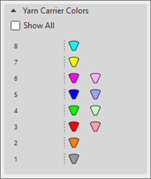
- Yarn Carrier Colors
-
: Yarn carriers are automatically assigned to a yarn carrier rail and remain unchanged during the determination of the yarn carrier home position during the Technical Processing.
|
|
|
|
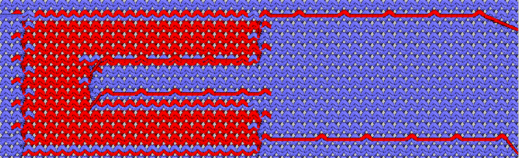
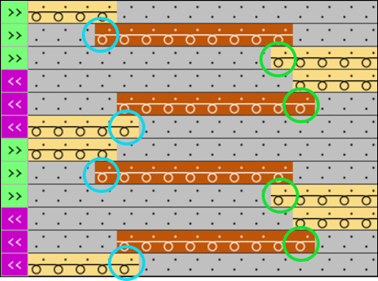
For drawing the design pattern, with it several yarn carriers may be necessary for each yarn color.
| |
|
For drawing the design pattern, with it one yarn carrier is used for each magazine color.
| |
|
Draw the design pattern by yarn colors or magazine colors in order to get common yarn carrier home positions (order related data) for all the pattern within the order. | |
|
|
For drawing the design pattern, with a yarn carrier already positioned on the corresponding rail for each yarn carrier color in use.
Result:
|
|
Technique Colors for creating or changing technical modules.
| |


- 4
- Draw the motif with the desired yarn color.
: When drawing the motif pay attention if necessary to even numbered heights of the color areas!
- 5
- Click the
 Start button under Preview in the Yarn Carriers ribbon.
 - The document window is opened as view and the Yarn Carriers ribbon appears.
- 6
- Open the Yarn Carriers tool window.
In Yarn Carriers group -> Show Yarn Carriers
 - The Yarn Carriers tool window appears with the Available Yarns and Yarn Carriers tab active.
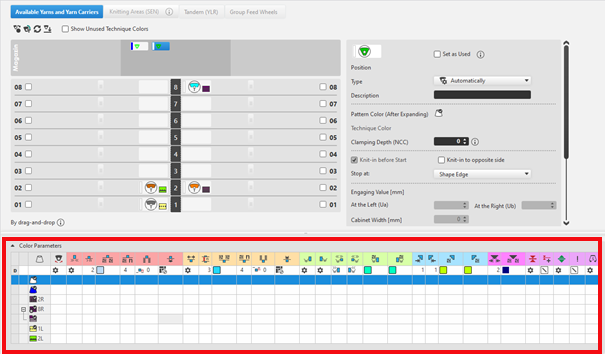
:
For each color in the pattern color tables used in the design pattern, a color area is created in the color parameter table. This means that you can make only one preset for this color area.
For pattern related, different changes of a color area sub-colors must be created. You have to draw them manually in the design pattern at the point to be changed. Then, other specifications can be set in the color parameter table.
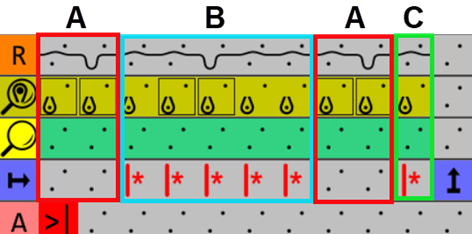
Structure and column headers of the Color Parameters table:
Group 1: General / Table header:
-
1st row:
All the symbols identifying the table columns -
2nd Row 'D'
Default settings for the respective column
Settings from the STOLL file - cannot be modified at the moment
: Default settings are applied from a STOLL file and cannot be modified at the moment.
These are automatically applied to all colors without specifications.
|
| ||
|
Group 1: General | ||
|
| ||
|
1. Column |
Entry D for the definition of the 2nd row of the table | |
|
2. Column |
Display for available sub-colors | |
|
|
Color |
Display of all the colors used in a project
|
|
|
Yarn carrier knits a multiple system color |
Specifications with multi-system knitting |
|
|
Yarn carrier knits a plating color |
Specifications with plating |
|
|
Swivel |
Settings for the swivelling of intarsia yarn carriers or of autarkic yarn carriers |
|
|
Quantity of Rows for Knitting-out, SEN edge and clamping |
Specify the maximum distance between the color fields of the yarn carrier.
|


|
Group 2: Knitting-in | ||
|
| ||
|
|
Starting Direction |
Specification of the knitting direction for the first row of a color (color area) |
|
|
Quantity of columns without knitting-in |
Quantity of columns (needles) without Knitting-In module |
|
|
Module for Knitting-in |
Specification of the knitting mode for knitting-in
|
|
|
Width of repetition for knitting-in |
Presetting of the module width in total for the knitting mode of feeding-in the yarn carrier
|
|
|
Moving Rows for Cast-off |
Column appears automatically if a module for knitting-in with casting-off is used |
|
|
Reihen-Offset für Einstricken / Knoten |
Knitting-in of the yarn carrier by x rows before the beginning of the color area
|
|
|
Knot or Binding at Start |
Presetting a module for knot / binding at start of a color area without / with knitting-in. |
|
|
Column-offset for Knitting-in with a Knot |
Move the position of a knot (module) by x columns to the left or right.
|

: The direction of knitting-in of a yarn carrier is always carried out from last position.
|
Group 3: Knitting-out | ||
|
| ||
|
|
Direction of the Knitting-out |
Preset of the direction for knitting-out of the yarn carrier at the end of a color area |
|
|
Module for Knitting-out |
Preset of the knitting mode (module) for knitting-out
|
|
|
Width of repetition for knitting-out |
Presetting of the module width in total for the knitting mode of feeding-in the yarn carrier
|
|
|
Moving Rows for Cast-off |
Column appears automatically if a module for knitting-out with casting-off is used |
|
|
Row-offset for Knitting-out |
Knitting-out of the yarn carrier by x rows after the end of the color area
|
|
|
Knot or Binding at End |
Presetting a module for knot / binding at end of a color area without or with knitting-out. |
|
|
Column-offset for Knitting-out with a Knot |
Move the position of a knot (module) by x columns to the left or right.
|
|
Group 4 : Intarsia Binding | ||
|
| ||
|
|
Intarsia Binding at the Left |
Presetting of a binding or no binding at the left border of the color area |
|
|
Intarsia Binding at the Right |
Presetting of a binding or no binding at the right border of the color area |
|
|
Direction of the Intarsia Binding at the Left |
Specification for inserting the Binding module at the left border of the color area depending on the carriage direction
|
|
|
Direction of the Intarsia Binding at the Right |
Specification for inserting the module Binding at the right border of the color are depending on the carriage direction
|
|
|
Module for Intarsia Binding at the Left |
Presetting of the knitting mode for binding at the left border of the color area |
|
|
Module for Intarsia Binding at the Right |
Presetting of the knitting mode for binding at the right border of the color area |


|
Group 5: Border Processing | ||
|
| ||
|
|
Allowed stepping without border processing at the left |
Maximum number of needles when widening at the left border of the color area without automatic border processing.
|
|
|
Allowed stepping without border processing at the right |
Maximum number of needles when widening at the right border of the color area without automatic border processing.
|
|
|
Module for Border Processing at the Left |
Presetting of the knitting mode for the border processing (feeding) in case of large widenings (stepping) of the color area
|
|
|
Module for Border Processing at the Right |
Presetting of the knitting mode for the border processing (feeding) in case of large widenings (stepping) of the color area
|
- 7
- Carry out
 Technical
Processing if necessary.
Technical
Processing if necessary.
: After carrying out the Technical
Processing you are able to view and weigh up the automatic processing, if corrections / optimizations are necessary.
- 8
- Back to the
 Design Pattern to make pattern-related changes.
 - 9
- Open the Yarn Carriers tool window again for this purpose.
- 10
- Make the desired changes in the following groups:
- Group Knitting-in
- Control of a yarn carrier at the start of a color area
Explanation 'Knitting-in':
The yarn carrier is at the fabric selvedge and must be brought into the fabric to knit at the beginning of its color field.
- Default setting: Using Intarsia yarn carriers (swivelling)
- To knit-in the yarn carriers there are different technical modules available in the
 Knit Explorer.
 - For knitting-in the yarn carriers from the fabric selvedge, the shortest distance (way) to the color field is always used by default.: Regarding the knitting technique, many options are available.
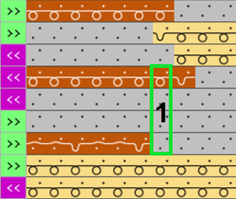
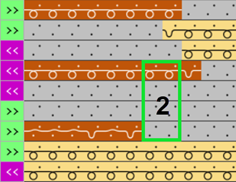
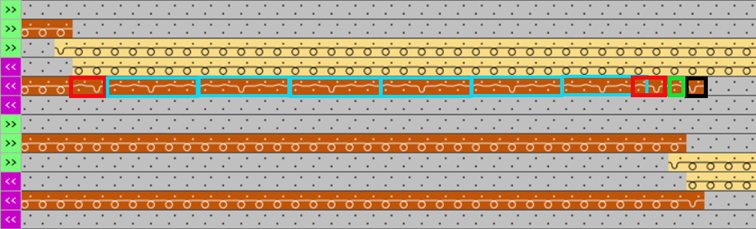
- If there are various color areas of the same color available in the design pattern, then the yarn carrier is knitted-out at the end of the color area and then knitted-in again from its last position.
|
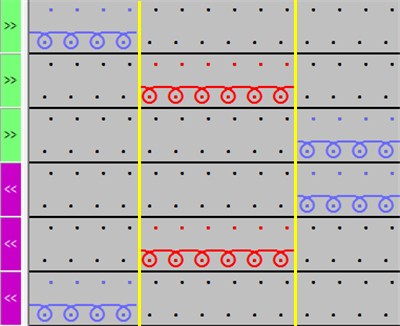
Example with the Knitting-in Float-Tuck, Binding Tuck technical module | |
|
Front Side of Fabric |
Back Side of Fabric |
|
|
|
|
Result: Knitting-in and knitting-out with tuck and float is only visible on the fabric back.
| |
|
Knitting-in | ||
|
| ||
|
|
Starting Direction |
Specification of the knitting direction for the first row of a color (color area) |
|
|
Quantity of columns without knitting-in |
Quantity of columns (needles) without Knitting-In module |
|
|
Module for Knitting-in |
Specification of the knitting mode for knitting-in
|
|
|
Width of repetition for knitting-in |
Presetting of the module width in total for the knitting mode of feeding-in the yarn carrier
|
|
|
Moving Rows for Cast-off |
Column appears automatically if a module for knitting-in with casting-off is used |
|
|
Reihen-Offset für Einstricken / Knoten |
Knitting-in of the yarn carrier by x rows before the beginning of the color area
|
|
|
Knot or Binding at Start |
Presetting a module for knot / binding at start of a color area without knitting-in.
|
|
|
Column-offset for Knitting-in with a Knot |
Move the position of a knot (module) by x columns to the left or right.
|
: The direction of knitting-in of a yarn carrier is always carried out from last position.
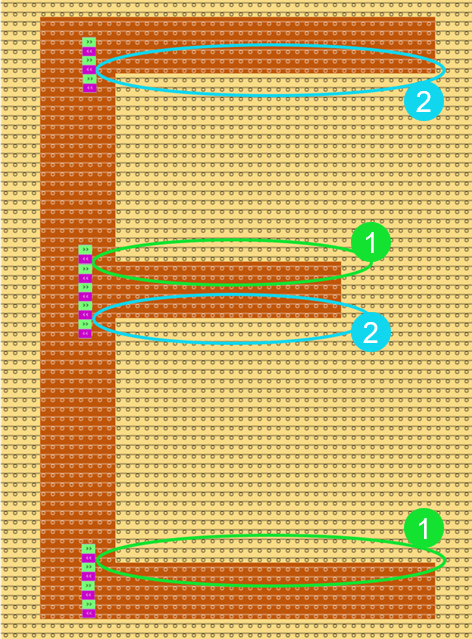
Direction of knitting-in yarn carriers:
The knitting-in direction of a yarn carrier is specified by the home position of the yarn carriers.
- Yarn carrier is on the left side in the clamping and cutting device -> the yarn carrier is knitted from the left to the fabric selvedge.
- Yarn carrier is on the right side in the clamping and cutting device -> the yarn carrier is knitted from the right to the fabric selvedge.
: The direction of knitting-in of a yarn carrier is always carried out from last position.
Two possibilities in the Yarn Carriers tool window:
- In the magazine move the yarn carrier manually from 'undefined' to the desired side (left / right) of the magazine.
|
|
|
|
Automatic |
Manually |
|
Yarn carriers are positioned by default in the 'undefined' area in the magazine.
Result:
Rule:
|
Place the yarn carrier manually with LMB to the left or right in the magazine.
Result:
|
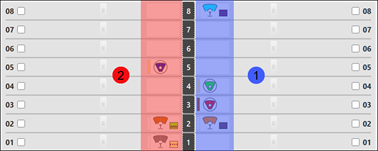
- Move the yarn carriers allocated to the yarn carrier rails to the desired rail side.
|
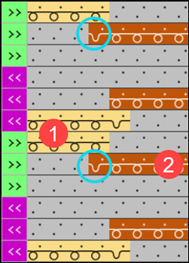
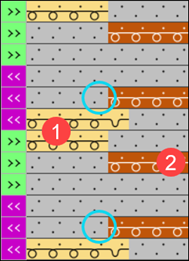
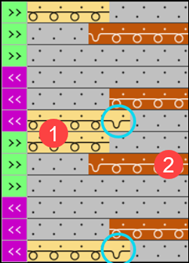
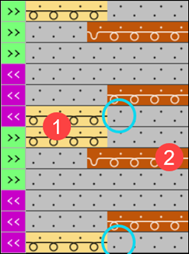
Example 1 |
Example 2 | |
|
|
| |
|
1 |
Yarn carrier on the right side of the yarn carrier rails |
Yarn carrier 3A right was manually moved to the left side.
|
|
2 |
Yarn carrier on the left side of the yarn carrier rails | |
|
| ||
: The direction of knitting-in of a yarn carrier is always carried out from last position.
Preset in Starting Direction column:
The following Intarsia process is used by default for the processing with the Technical Processing.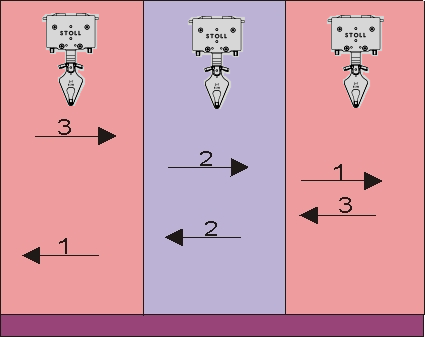
: This even processing results in a beautiful, even fabric image with the highest machine run time, which is why the yarn carriers are also grouped. This way the run time is reduced.
 Starting Direction column:
- To change the knitting direction of the first stitch row of a color field: The change influences the 'even' Intarsia processing.
Preset with Quantity of columns without knitting-in:
 Quantity of columns without knitting-in column:
|
|
A |
Distance of the color field from the fabric selvedge in needles (columns), where no module is entered to be knit-in.
|

Preset in Module for Knitting-in and Width of repetition for knitting-in column:
- These two columns work together.
If a corresponding module is selected in the Module for Knitting-in column, then the
  Width of repetition for knitting-in column is active or displayed.
 - The technical module for knitting-in consists of 2 pieces of information:
- Binding
- Repetition
|
Example | |
|
| |
|
1 |
Binding |
|
2 |
Repetition |
|
|
Selection of the desired technical module for the knitting-in Example: Knitting-in Float-Tuck, Binding Tuck
Technical module consists of two parts:
|
|
|
Specification of the module width for the repetition, which as such is repeated up to the fabric selvedge. Example: 4 |

Preset in Moving Rows for Cast-off column:
- The Width of repetition for knitting-in column and the
 Moving Rows for Cast-off column are active, if in the Module for Knitting-in column a corresponding knitting-in module with casting-off is selected.
 - The technical module for knitting-in with casting-off consists of 3 pieces of information:
- Binding
- Repetition
- Casting-off after x pattern rows
|
Example | |
|
| |
|
1 |
Binding |
|
2 |
Repetition |
|
3 |
Number of pattern rows for the cast-off |
|
|
Selection of the desired technical module for the knitting-in Example: Tuck and Cast-off stitch, Knitting-in
Technical module consists of three parts:
|
|
|
Specification of the module width for the repetition, which as such is repeated up to the fabric selvedge. Example: 8 |
|
|
Specification after how many pattern rows the tuck is to be cast-off. Default setting: 1 (pattern row) Example: 2
|
Preset in Reihen-Offset für Einstricken / Knoten column:
 Reihen-Offset für Einstricken / Knoten column to move the knit-in row.
|
Standard behavior when knitting-in a yarn carrier to their color field |
Use of the column
|
|
|
|
|
Yarn carriers are knit-in by default in the first knitting row of a color field. |
Example: 2 pattern rows The yarn carrier is knit-in 2 pattern rows before the start of the color field.
|

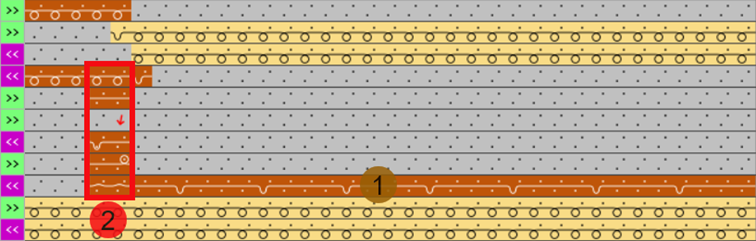
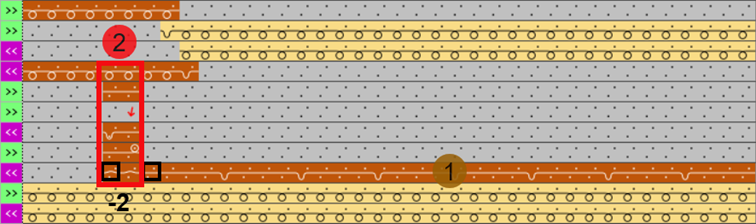
Preset in Knot or Binding at Start and Column-offset for Knitting-in with a Knot column:
These two columns work together, which means that if a corresponding module is selected in the  Knot or Binding at Start column, then the
  Column-offset for Knitting-in with a Knot column is active or displayed.
|
Example without column offset (default) | ||
|
| ||
|
1 |
|
Module for the knitting-in |
|
2 |
|
Selection e.g. of the Knot, Tuck, Start, Knitting-in module |
|
|
No entry in this Column-offset for Knitting-in with a Knot column | |
|
| ||
|
Example with column offset | ||
|
| ||
|
1 |
|
Module for the knitting-in |
|
2 |
|
Selection of the Knot, Tuck, Start, Knitting-in module |
|
|
Entry of a value in this Column-offset for Knitting-in with a Knot column Example: -2 | |
- Group Knitting-out
- Control of a yarn carrier at the end of a color area
Explanation 'Knitting-out':
At the end of a color area, the yarn carrier is brought from the fabric to the fabric selvedge (knitted-out).
- To knit-out the yarn carriers there are different technical modules available in the Knit Explorer.
- The knitting-out (direction) of the yarn carriers is entered into the pattern according to the following points:
- Pattern structure
- Even Intarsia procedure
- Yarn carrier positions
|
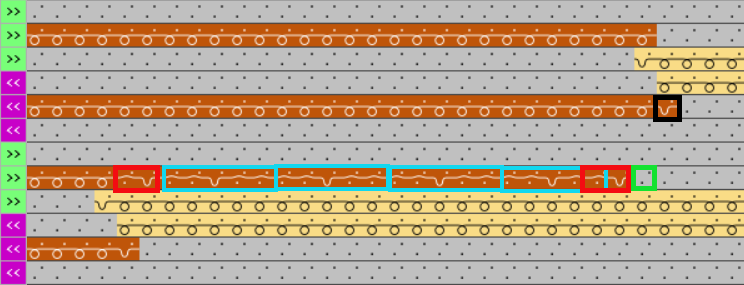
Example with the Knitting-out Tuck-Float, Binding Tuck technical module | |
|
Front Side of Fabric |
Back Side of Fabric |
|
|
|
|
Result: Knitting-in and knitting-out with tuck and float is only visible on the fabric back.
| |
|
Knitting-out | ||
|
| ||
|
|
Direction of the Knitting-out |
Preset of the direction for knitting-out of the yarn carrier at the end of a color area |
|
|
Quantity of Pattern Rows for Knitting-out |
Preset of the distance of color areas from which on knitting-out starts. |
|
|
Module for Knitting-out |
Preset of the knitting mode (module) for knitting-out
|
|
|
Width of repetition for knitting-out |
Presetting of the module width in total for the knitting mode of feeding-in the yarn carrier
|
|
|
Moving Rows for Cast-off |
Column appears automatically if a module for knitting-out with casting-off is used |
|
|
Row-offset for Knitting-out |
Knitting-out of the yarn carrier by x rows after the end of the color area
|
|
|
Knot or Binding at End |
Presetting a module for knot / binding at end of a color area.
|
|
|
Column-offset for Knitting-out with a Knot |
Move the position of a knot (module) by x columns to the left or right.
|
Preset in Direction of the Knitting-out column:
: With the Technical
Processing, the yarn carriers are calculated and knitted-out automatically according to the pattern.
-
 Direction of the Knitting-out column, to manually influence the automatic calculation of the knitting-out.
: The manual change of the direction of the knitting-out of a color field influences the processing of the following pattern rows in the basic pattern.
Preset with Quantity of Pattern Rows for Knitting-out:
 Quantity of Rows for Knitting-out, SEN edge and clamping column in group 1 - General
|
|
A |
Preset of a distance between two color fields of a yarn carrier in pattern rows Default setting (A) 3 (pattern rows) Result:
|

Preset in Module for Knitting-out and Width of repetition for knitting-out column:
- These two columns work together.
If a corresponding module is selected in the Module for Knitting-out column, then the
  Width of repetition for knitting-out column is active or displayed.
 - The technical module for knitting-out consists of 2 pieces of information:
- Binding
- Repetition
|
| |
|
|
Selection of the desired technical module for the knitting-out
Technical module consists of two parts:
|
|
|
Specification of the module width for the repetition, which as such is repeated up to the fabric selvedge. |
Preset in Moving Rows for Cast-off column when knitting-out:
- The Width of repetition for knitting-out column and the
 Moving Rows for Cast-off column are active, if in the Module for Knitting-out column a corresponding knitting-out module with casting-off is selected.
 - The technical module for knitting-out with casting-off consists of 3 pieces of information:
- Binding
- Repetition
- Casting-off after x pattern rows
|
| |
|
|
Selection of the desired technical module for the knitting-out Example: Tuck and Cast-off stitch, Knitting-out
Technical module consists of three parts:
|
|
|
Specification of the module width for the repetition, which as such is repeated up to the fabric selvedge. Example: 8 |
|
|
Specification after how many pattern rows is to be cast-off. Default setting: 1 (pattern row) Example: 2
|
Preset in Row-offset for Knitting-out column:
 Row-offset for Knitting-out column to move the knit-out row.
|
Standard behavior when knitting-out a yarn carrier from their color field |
Use of the column
|
|
|
|
|
Yarn carriers are knit-out by default in the last knitting row of a color field. |
Example: 2 pattern rows The yarn carrier is knit-out 2 pattern rows after the end of the color field.
|
Preset in Knot or Binding at End and Column-offset for Knitting-out with a Knot column:
These two columns work together, which means that if a corresponding module is selected in the  Knot or Binding at End column, then the
  Column-offset for Knitting-out with a Knot column is active or displayed.
|
Example without column offset (default) | ||
|
| ||
|
12 |
|
Module for Knitting-out |
|
2 |
|
Selection of the Knot, Tuck, End module |
|
|
No entry in the Column-offset for Knitting-out with a Knot | |
|
| ||
|
Example with column offset | ||
|
| ||
|
13 |
|
Module for Knitting-out |
|
2 |
|
Selection of the Knot, Tuck, End module |
|
|
Entry of a value in the Column-offset for Knitting-out with a Knot column Example: -2 | |
- Group Intarsia Binding
- Connection between two neighboring color areas
Explanation 'Intarsia Binding':
Two neighboring knitting areas (color areas) are connected with each other, with the help of the 'Intarsia Binding'.
- For the Intarsia binding there are different technical modules available in the Knit Explorer.
- Each color area has a left border and a right border, that can be edited independently from one another.
- The Intarsia binding is entered corresponding to the carriage direction.
|
Intarsia Binding | ||
|
| ||
|
|
Intarsia Binding at the Left |
Presetting of a binding or no binding at the left border of the color area |
|
|
Intarsia Binding at the Right |
Presetting of a binding or no binding at the right border of the color area |
|
|
Direction of the Intarsia Binding at the Left |
Specification for inserting the Binding module at the left border of the color area depending on the carriage direction
|
|
|
Direction of the Intarsia Binding at the Right |
Specification for inserting the module Binding at the right border of the color are depending on the carriage direction
|
|
|
Module for Intarsia Binding at the Left |
Presetting of the knitting mode for binding at the left border of the color area |
|
|
Module for Intarsia Binding at the Right |
Presetting of the knitting mode for binding at the right border of the color area |
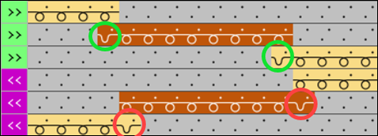
'Intarsia Binding at the Left' for the left selvedge of a color field:
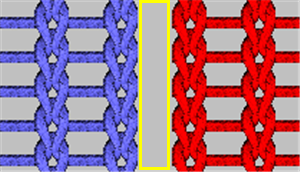
Connection at the left selvedge of a color field to their neighboring left color field. Each color field is connected with the neighboring color field. This results in a closed selvedge between the two color fields.
: By default, all color fields are automatically ( ) connected with the Front tuck, Intarsia binding module.
Use of the  Intarsia Binding at the Left column to make the following settings:
-
 Binding ON : a Intarsia binding at the left of the color field edge will be entered
 -
 Binding OFF : no Intarsia binding at the left of the color field edge will be entered
 -
Automatically : Default Setting
-
 Default : Resetting to default (see preset in the 2nd row 'D' of the color parameters table)
|
|
At the left selvedge of the color field ((2)) a Intarsia binding is entered. |
|
|
NO Intarsia binding is entered at the left selvedge of the color field ((2)). |
'Intarsia Binding at the Right' for the right selvedge of a color field:
Connection at the right selvedge of a color field to their neighboring right color field. Each color field is connected with the neighboring color field. This results in a closed selvedge between the two color fields.
: By default, all color fields are automatically () connected with the Front tuck, Intarsia binding module.
Use of the  Intarsia Binding at the Right column to make the following settings:
-
 Binding ON : a Intarsia binding at the right will be entered
 -
 Binding OFF : no Intarsia binding at the right will be entered
 -
Automatically : Default Setting
-
Default : Resetting to default (see preset in the 2nd row 'D' of the color parameters table)
|
|
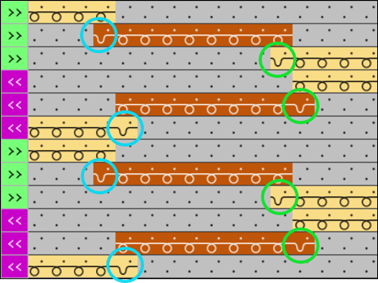
At the right selvedge of the color field ((1)) a Intarsia binding is entered. | |
|
|
At the right selvedge of the color field ((1)) NO Intarsia binding is entered. | |
|
| ||
|
Example: NO Intarsia binding between two color fields | ||
|
|
| |
Direction of the Intarsia Binding at the Left for the left selvedge of a color field:
The module for the Intarsia binding is entered depending on the carriage stroke.
- Enter module according to the carriage direction at the start of a knitting row
- - or -
- Enter module according to the carriage stroke direction at the end of a knitting row
|
| ||
|
|
Binding with Knitting-in |
Default Setting |
| ||
|
|
Binding with Knitting-out |
|
| ||
|
|
Default |
Resetting to default (see preset in the 2nd row 'D' of the color parameters table) |

'Direction of the Intarsia Binding at the Right' for the right selvedge of a color field:
The module for the Intarsia binding is entered depending on the carriage stroke.
- Enter module according to the carriage direction at the start of a knitting row
- - or -
- Enter module according to the carriage stroke direction at the end of a knitting row
|
| ||
|
|
Binding with Knitting-out |
|
| ||
|
|
Binding with Knitting-in |
Default Setting |
| ||
|
|
Default |
Resetting to default (see preset in the 2nd row 'D' of the color parameters table) |
Preset in 'Module for Intarsia Binding at the Left' and 'Module for Intarsia Binding at the Right' column:
- For the Intarsia binding there are different technical modules available in the Knit Explorer.
- Binding with tuck
- Binding with stitch
- No binding (= vertical opening)
- Column
 Module for Intarsia Binding at the Left:
Selection of the module to be used at the left border of the color field -
 Module for Intarsia Binding at the Right column.
Selection of the module to be used at the right border of the color field - Variable module allocation at the left and right color field border
: Combination possibilities of the different bindings:
There are many options how the types of bindings at the color field selvedges
can be combined, where the right and left color field selvedge may also
differ from one another.
|
Example: Module Front tuck, Intarsia binding (Standard) | |
|
|
|
|
| |
|
Example: Module Front stitch, Intarsia binding | |
|
|
|
|
|
Front Side of Fabric |

- Group Border Processing
- Control (positioning) of the yarn carrier at the border of a color area
Explanation 'Border Processing':
The concept 'Border processing' describes the processing of the steps at the left / right border of a color area (edge) depending on the carriage stroke direction. The yarn carrier is positioned according to the shape for the following knitting row, with the help of the border processing.
- For the Border Processing there are different technical modules available in the Knit Explorer.
-
Feed:
The concept 'Feed' describes the positioning of a yarn carrier regarding the following knitting row of its own color field. For this, there are different options regarding the knitting technique. - Each color area can be edited differently at the left / at the right.
- The modules are entered according to the carriage direction.
|
Group: Border Processing | ||
|
| ||
|
|
Allowed stepping without border processing at the left |
Maximum number of needles when widening at the left border of the color area without automatic border processing.
|
|
|
Allowed stepping without border processing at the right |
Maximum number of needles when widening at the right border of the color area without automatic border processing.
|
|
|
Module for Border Processing at the Left |
Presetting of the knitting mode for the border processing (feeding) in case of large widenings (stepping) of the color area
|
|
|
Module for Border Processing at the Right |
Presetting of the knitting mode for the border processing (feeding) in case of large widenings (stepping) of the color area
|
Allowed stepping without border processing at the left and Allowed stepping without border processing at the right for the borders of a color field:
'Allowed stepping' describes the number of needles, where the module for the border processing is not entered.
: Default value with 'allowed stepping' at the left and right is 1 needle.
-
 Allowed stepping without border processing at the left
 -
 Allowed stepping without border processing at the right
|
Examples
| |
|
|
Allowed stepping: 1 needle (standard) |
|
|
Allowed stepping: 2 needles |
|
|
Allowed stepping: ≥ 3 needles
The yarn carrier is kicked and then with the module for knitting-in is fed to the following knitting row. |

Selection Module for Border Processing at the Left and Module for Border Processing at the Right for the borders of a color field:
For the border processing of a color area there are different knitting techniques available as technical modules.
: The Tuck, --v--, Border processing technical module is used by default.
-
 Module for Border Processing at the Left
 -
 Module for Border Processing at the Right
|
Examples for Module for Border Processing at the Right | |
|
| |
|
14 |
Border processing in the carriage stroke from right to left
|
|
2 |
Border processing in the carriage stroke from left to right
|
|
|
Black marking = Intarsia binding |
|
About the procedure based on the technical module for border processing at the right Tuck, --v--, Border processing | |
|
| |
|
A |
The information is entered 1 time each at the start and end of the knitting row |
|
B |
The information is entered x times according to the step width.
|
|
C |
The information is entered x times according to the preset under Allowed stepping without border processing at the right. |
- 11
-
Start Technical Processing:
-
 Show symbol view after technical processing, to check the changes.
- 12
- Generate
 Sintral.
 - 13
- Start the
 Sintral Check.
 - 14
-
 Extract the knitting program.
 - A program for the knitting machine will be created: CMS530. Exercise_Pattern.zip.
- Load knitting program into the machine.
 : The extracted file "CMS530.Exercise_Pattern.zip" can be loaded onto the machine with an USB stick or via Ethernet.