Step by Step to Pattern-8
- A pattern project with one pattern and the desired settings is created.
- The image was reduced to 3 colors in the Image Import dialog box and was saved on the clipboard as a pattern element.
- 1
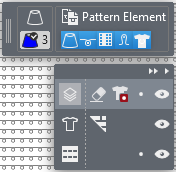
- Select the
 tab in the Pattern Elements tool window.
 - 2
- Position the cursor in the tool window.
- 3
- Open the context menu with RMB.
- 4
- Using Insert (Ctrl+V) save the image from the clipboard in the tool window.
- Image with name and image size is displayed.
- 5
- Select image.
 : Modify the pattern element (image), if desired, to avoid unnecessary knit-in and knit-out rows!
- 6
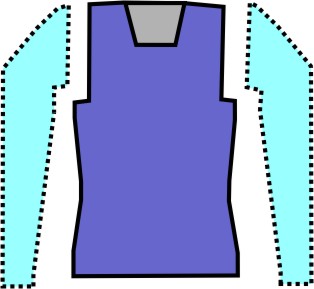
- Position image in the
 Design Pattern.
: If necessary for the better positioning of the image, save the shape in advance in Design Pattern (floating).
- 7
- To create a project-related lined shape, in the tool window change to the
 Shapes tab.
 - 8
- Open the context menu with RMB and select Create New Shape of Size M....
- The New Lined Shape tool window is opened.
- 9
- Make the desired entries:
- Shape Name: Any
- Input Format: Stitch
- 10
- Confirm with the OK key.
- The new lined shape (basic shape) is graphically displayed in the Shapes tab and in a new document window
 as rectangle.
: Default attributes are used for the shape edges of the lined shape.
Menu File -> Options -> Lined Shape -> Options for New Lined Shape
- 11
- To create a lined shape based on the displayed rectangle in the ribbon Shape Editing under Properties, click the Line Table button.
- or -
Use the graphic displayed in the document window.
: The method (table or graphic) to create a project-related lined shape is freely eligible, since the views are always updated simultaneously.
- 12
- Insert new shape lines in the table and enter the desired values for the basic shape.
- Standard attributes from configuration are assigned to those shape lines.
Example: Lined shape for Pattern-8
|
Basic Shape: Front without neckline |
|
|

Rules for creating a shape for the knitting mode SJ:
Example Front:
|
Shape Attributes |
Rules / possible settings |
|---|---|
|
Knitting Mode: |
Single Jersey |
|
Step width of widening |
1 needle (stitch) per knitting row |
|
Step height of widening |
As desired |
|
Quantity of rows without shape modification |
As desired |
|
Step width when narrowing |
1 - 3 needles (stitches) |
|
Step height when narrowing |
As desired |
|
Fading-out Width |
As desired |
|
Knitting mode for fading-out |
Front Stitch with Transfer |
|
Binding-off width: |
Stepping > 3 stitches |
|
Binding-off methods |
Binding-off, Structure, Single Jersey
|
- 13
- Allocate the desired attributes to the shape lines of the shape.
- 14
- In the Shapes tool window select the created shape with LMB.
- 15
- Open the context menu -> Position Shape -> select Pattern name.
- The shape is floating in the Design Pattern.
- 16
- To position the shape in the Editing Layers user control, change from the
 Edit Pattern Layer
to the
Edit Pattern Layer
to the  Edit Lined Shape Layer (Y)
.
Edit Lined Shape Layer (Y)
.
- 17
- If necessary, use
 to position the floating shape in the Design Pattern.
 - 18
- Using the Editing Layers user control, change back from the Edit Lined Shape Layer (Y)
to the Edit Pattern Layer
.
- 19
- In the
 control column, create a row selection over the whole height of the image.
 - 20
- Position cursor in the image area.
- 21
- Open the context menu with RMB.
- 22
- Under Selection -> select Create Jacquard....
- The Create Jacquard dialog box appears.

- 23
- Make the desired settings:
- Jacquard Module
- Desired Jacquard module for the fabric back
-
 Jacquards
 -
Colors: Minimum per row and column (yarn bridges) : Jacquard module will only be inserted in the area of the motif.
- Jacquard Back:
-
Smaller width by : Number of needles by which the rear side is inserted narrower on each side compared to the image front.
- Stitch Length:
-
Used by the module : Presets for stitch lengths are entered from the module of the Jacquard module in the design pattern.
- 24
- Apply the presets with the Create Jacquard button into the design pattern.
- The selected Jacquard module is displayed in the Design Pattern.
- 25
- For further presets, open the dialog box in the ribbon under Configuration ->
 Configuration.
 - 26
- In the Configuration dialog box, select the Jacquard tab.
- 27
- Under the Jacquard Transition -> Intarsia Jacquard section, make the desired settings.
|
| ||
|
1 |
Suppress Picking-up a Single Needle | |
|
|
Default Setting
| |
|
|
With Jacquard rows where the rear side starts with only one needle, the selected technical module for the net pick-up is entered. | |
|
2 |
Selection of the desired technical module for net pick-up. | |


- 28
- Open the Yarn Carriers tool window to edit the presets for the yarn carriers.
- 29
- In the Color Parameters table make the desired changes in the following groups:
- Knitting-in and Out
- Intarsia Binding
- 30
- Make the desired changes in the following control columns:
- Stitch Length (NP)
- Main Take-down (WMF)
- Speed (MSEC)
- 31
- Start the
 Technical
Processing.
Technical
Processing. - 32
- Generate
 Sintral.
 - 33
- Execute
 Sintral Check.
 - 34
-
 Extract the knitting program.
 - A program for the knitting machine will be created: CMS530.Pattern-8.zip
- 35
- Load knitting program into the machine.
 : The extracted file CMS530.Pattern-8.zip can be loaded onto the machine with an USB stick or via Ethernet.