What was new in CREATE PLUS V2.2
Fully Fashion via Raster-Shape
Beside many minor improvements, there is a complex item for creating fully fashion patterns:
The Raster-Shape
Beside the lined shape, you can create a fully fashion fabric independently to it.
New tools are available in order to edit an existing raster-shape quickly.
We recommend an update training via Microsoft Teams by the STOLL Academy. If desired, please contact training@stoll.com.
- Modify by Buscar y sustituir datos de forma rasterizada
- The Borde de forma tab of the Buscar y sustituir datos de forma rasterizada tool window allows quick modification of the Raster-Shape.
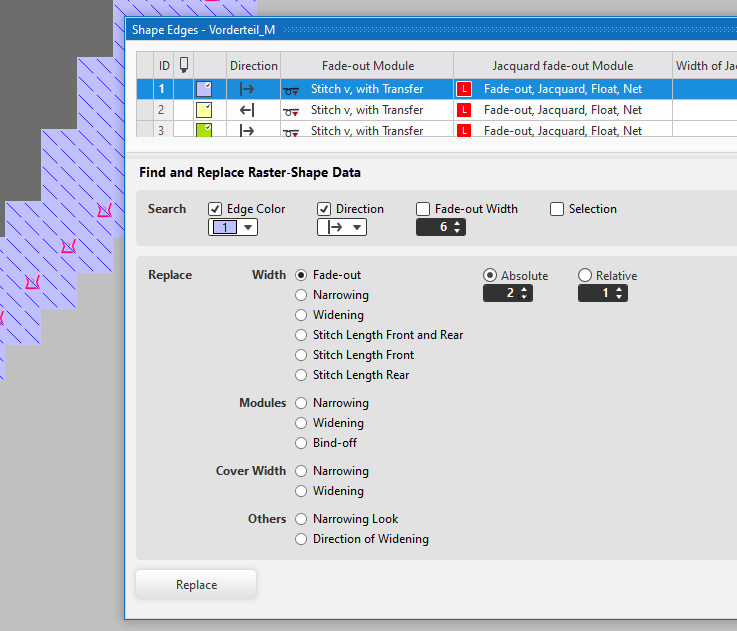
- Apply the data (color, direction) to the Buscar section by picking within the Raster-Shape (F7), or by selecting in the table.
- Select one of the criteria for the modification in the Atributos section and apply it to the Raster-Shape by the button.
- You can easily replace widening modules, narrowing modules or binding-off modules as well.
- The module (picked by F7 in the shape edge) will automatically be applied to the Atributos section (Módulo de forma en el cursor field).
- You can replace the module at the shape edge of within the whole fabric piece.
Deactivate the Color de canto check box in order to replace within the whole fabric piece. - New and Changed Key Combinations
- The different behavior of the plus and minus keys is fixed.
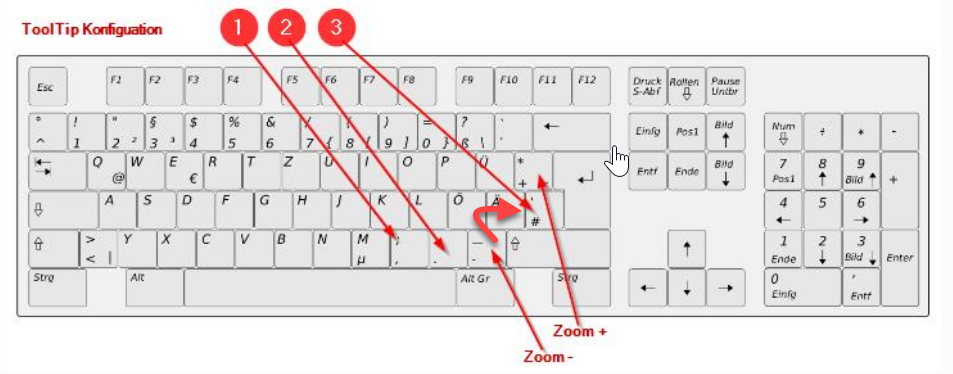
- Up to now:
Minus key for the Vista de control in the Información rápida - New:
# key for the Vista de control in the Información rápida -

Already with version 2.2.7 :
Data Backup of Private Files / Automatic Backup
- Content of the Data Backup:
Copia de seguridad para los elementos de tisaje, hilos, máquinas propias y layouts de impresión de cortes de dimensiones. -
Copia de seguridad de datos
tab
Página principal → Opciones -
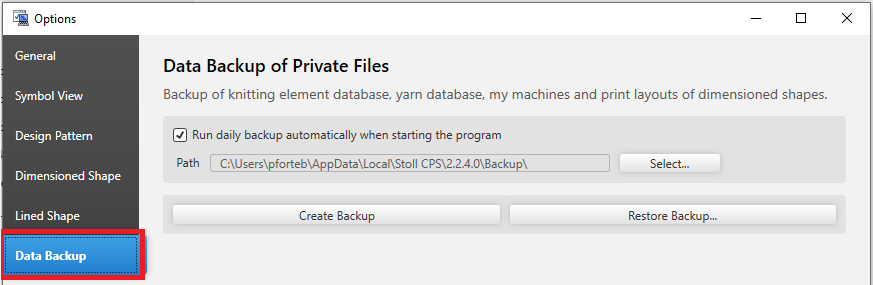
- The automatic data backup will be done once a day.
 Ejecutar copia de seguridad diariamente en el primer arranque de programa de forma automática
- You can start the data backup manually as often as you like.
Crear copia de seguridad... - Data Backup
Symbol View / View
In addition to Desactivar fondo, the Desactivar el primer plano option is available now. Import for the raster-shape; therefore available within the status bar.
- Up to now:
Display available only for the background and only by theConfigurar vista.... -
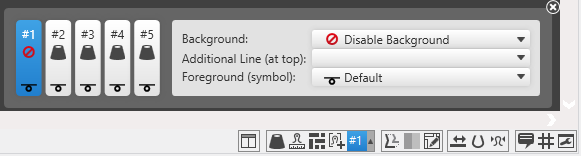
- New view with background or foreground disabled by the status bar.
Corrección de longitud de mallas en grupos (NPGK) button of the configurable view #1. -
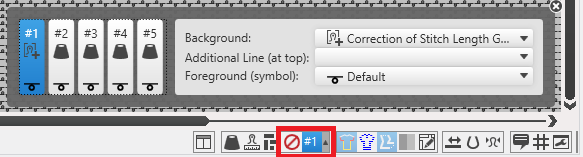
-
Note:
With another view of #1, reset to STOLL default.
You will find the function in the context menu of the status bar.
Restablecer la representación para muestras de diseño al estándar de STOLL
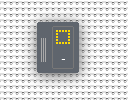
Module Selection by Path Navigation
Unified and extended view of the knitting element navigation (breadcrumb):
Restrictions are canceled.
Here as example Configuración:
- Comb thread module within V2.1
-

- Restricted navigation among both of the directories of the STOLL module database.
- Comb thread module within V2.2
-
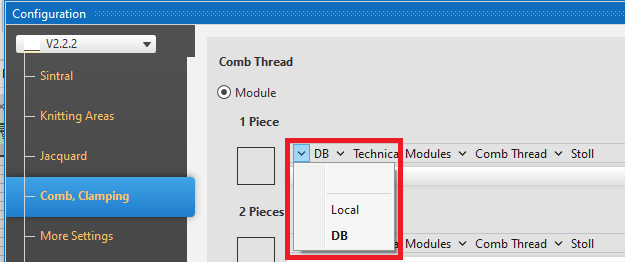
- Unrestricted navigation to all items of the STOLL module database or of the pattern.
-
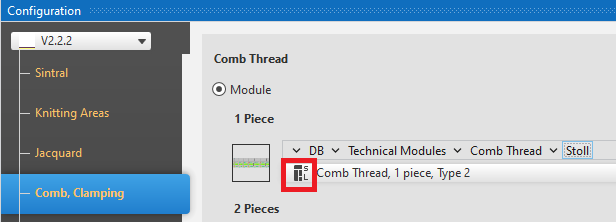
After the technical processing, the STOLL module (S) is shown belonging to the pattern as localized (L).
Symbol View / Drawing and Modifying
- Keyboard commands of the Varita mágica drawing tool
- New function for selecting by the magic wand
- Developed in order to edit the raster-shape (see below)
- The selection will be extended to the whole row if you create a selection by the magic wand and keep the SHIFT key pressed.
-

- Selection of the blue area by magic wand (SHIFT + click of left mouse button)
- Selection without SHIFT key:
-

- Selection of the blue area by magic wand (click of left mouse button)
- Hiding drawing attributes temporarily (keyboard command)
- Up to now:
If there were drawing attributes on the user control and you wanted to create a selection beforehand, then you had to remove the drawing attributes and select them again after the selection had been created. - New:
Keeping the ^ key pressed, you can disable the selected attributes. -
 Selection
 - Press and hold the ^ key
- Execute the action (create new selection)
- Release the ^ key
- By the ^ key, you can recall the attributes which you had deselected by ESC.
- Function Escalar
-
 Escalar of the Modificar ribbon group.
 -
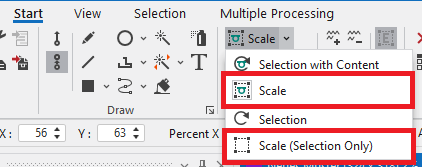
- You can scale the size of a selection or of a selected pattern element by this function.
Symbol View / Ir a
- The dialog box is extended by the following options:
- Go to Columna
- Go to Aguja
- Go to N° de línea Jacquard
- Go to Número de línea Sintral
-
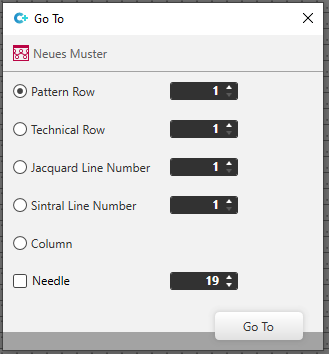
- Call-up of the function by the context menu of the view or by the CTRL + T keys.
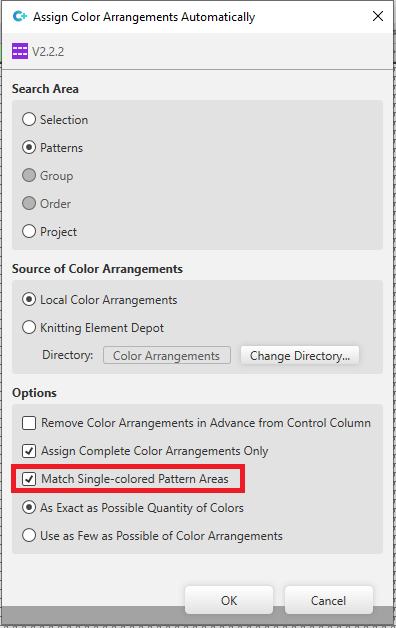
Symbol View / Assigning Color Arrangements Automatically
- If the Tener en cuenta sectores de muestra de un color option is enabled in the Asignar Color Arrangements automáticamente dialog box, the function regards pattern areas with a single color.
-
Importar imagen
Context menu of the Partes de muestra tool window
- Yarn carrier color may occur in the created pattern element by the import as the colors of picture are related to the pattern colors by the RGB values.
-
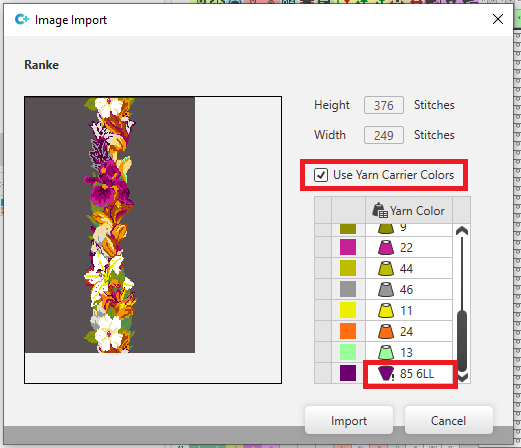
- You can exclude the use of yarn carrier colors by
 Utilizar colores de guiahilos.
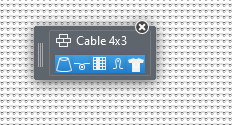
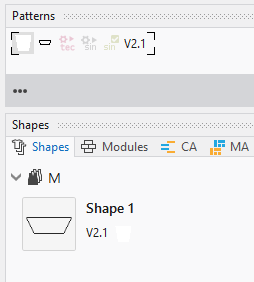
Fully Fashion / Lined Shape
The Recortar corte function is omitted. The feature of creating a raster-shape (see below) replaces this function.
New graphical tools are available to edit the shape.
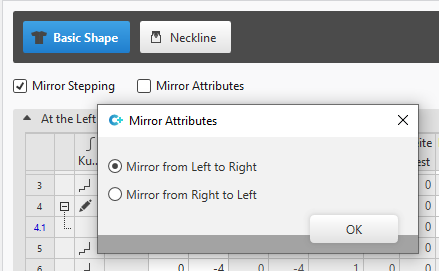
- Tabla de líneas / Reflejar
- You can select the side of the source when mirroring the stepping and / or the attributes.
- reflejar de izquierda a derecha
- reflejar de derecha a izquierda
-
- Display of shapes in the tool windows
- Lined shapes of the Pasos input format are marked in the Cortes tool window.
-
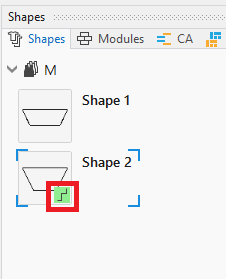
- The display of a pattern with pending shape in the Muestra tool window has changed.
- Up to now:
-
- New
-

- A common symbol without concrete contour represents the pending shape.
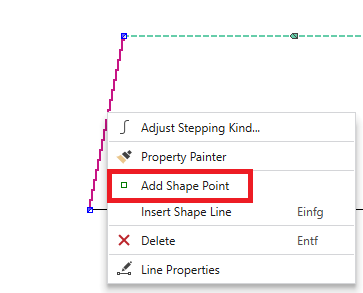
Relevant buttons only appear according to the state of processing of the pattern. - Graphical Editing
- You can edit lined shapes (beside the Pasos input format) graphically with the new tools.
- If the Editar capa de corte de líneas (Y) mode is enabled, these new tools are also available for the pending shape directly on the pattern.
- Moving the shape point by the left mouse button
- Adding a shape point at the cursor position
-
- Moving by the arrow keys of the keyboard
- Moving a shape point is modified.
The following shape points will no longer be moved accordingly; they will keep their positions. - Tip: Select the all shape points you want to move.
- Improvement of moving marking points, shape elements and knitting ranges:
Activating the button of the status bar is required now.
 -
- Multiple selection is possible now.
Fully Fashion / Raster-shape
The new procedure creating fully fashion patterns independently from a pending lined shape.
A raster-shape contains shape edges and shape markings.
The procedures of raster-shape and pending lined shape cannot be mixed up.
With import from M1plus (starting with version 7.5), a fully fashion pattern will always be created as raster-shape.
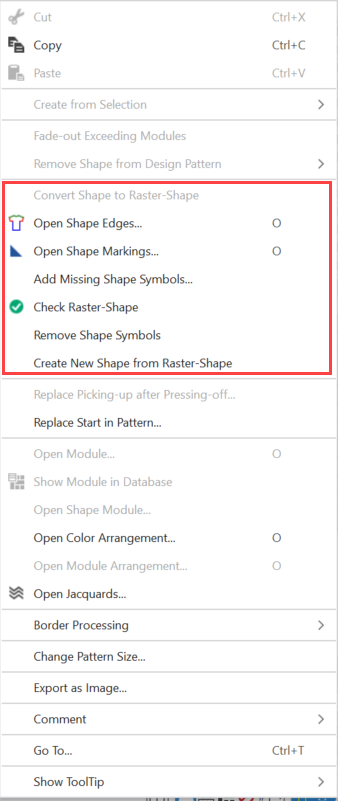
- Raster-shape / Shape Symbols
- You will find the shape symbols for editing the raster-shape in the Acciones de la aguja tool window.
Needle Actions -

-
 Fuera de la forma
 -
 Dentro de la forma
 -
 Bordes de forma (F2)
 -
 Marcas de forma
 -
 Alinear a la izquierda
 -
 Alinear a la derecha
 -
 Tejer con inserción
 -
 Separación
 -
 Rellenar escote
 -
 Rellenar escote
 -
 Ocultar
 -
 Longitud de mallas en el borde de forma delante
 -
 Longitud de mallas en el borde de forma atrás
 -
 Eliminar datos del corte
 - If the shape symbols are not mutually exclusive, you have a multiple selection by the CTRL key.
- You can no longer insert the Fuera de la forma needle action into the pattern.
-
Note 1:
The selected shape symbol overwrites the existing shape symbols when inserting it into the pattern.
You can enter the shape symbol in addition by the CTRL key pressed.
You can remove the shape symbol by the CTRL-ALT key. -
Note 2:
Eliminar datos del corte Removes all shape symbols and the edge colors.
If you selectEliminar datos del corte in combination with another shape symbol, only the selected shape symbol will be removed from the pattern. -
Note 3:
The same logic is now used for the do not sink symbols as well. - Raster-shape / View
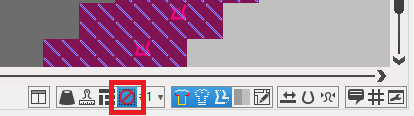
- You can toggle the shape edges (at the left of image) and shape symbols (at the right of the image) by both of the new button of the status bar.
- Note: Use the F2 key to toggle both buttons together.
-

- Combined with the new buttons Desactivar fondo / Desactivar el primer plano, the pattern will be displayed in its raster-shape.
-
- Raster-shape / Context Menu
- Special items for the raster-shape are available in the context menu of the symbol view of the pattern.
-
-
Convertir corte a forma rasterizada
The data of the lined shape of a pattern with pending shape will converted to a raster-shape. - Abrir bordes de forma... and Abrir marcas de forma... display the tool windows of the same names.
-
Comprobar forma rasterizada
Errors are reported as warnings. -
Quitar forma rasterizada
Removes all shape symbols from the pattern.
After it, you can position a lined shape again. - Now, the functions Completar símbolos de forma faltantes and Generar nuevo corte de la forma rasterizada... apply to the raster-shape.
- Raster-shape / Creating
- Converting a pending lined shape creates automatically a complete raster-shape.
- If there is no lined shape available for the pattern, create the raster-shape manually by drawing-in the Fuera de la forma areas, the shape edges, the shape symbols and the markings.
All drawing tools are available for it. - In the Borde de forma tool window, you create, edit and select for drawing, the shape edge and its knitting technique for fading-out or its special stitch length.
-
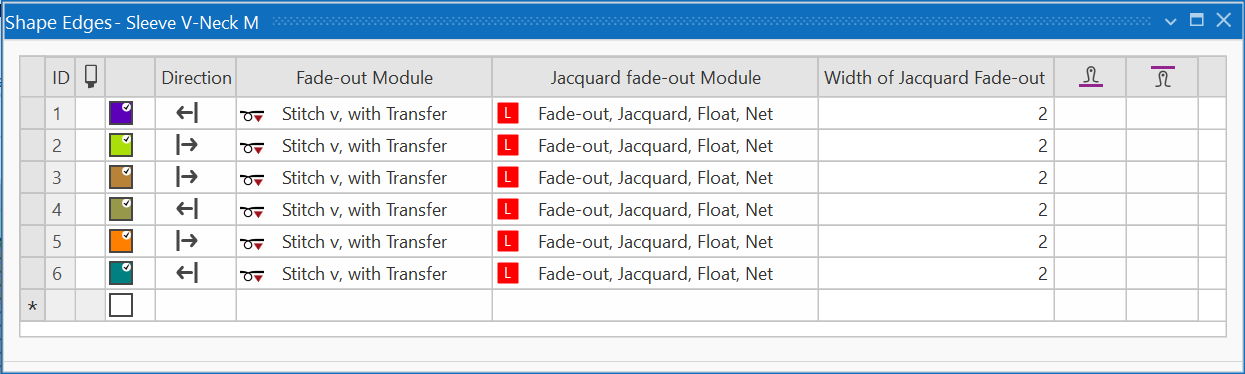
- In the Dirección column, you specify the side of the fabric piece for the shape edge.
The upright line represents Fuera de la forma.
The direction is important for modules greater 1x1 used for fading-out. - In the Marcas de forma tool window, you create, edit and select for drawing, the shape markings and their knitting technique, their anchor points and distances.
-
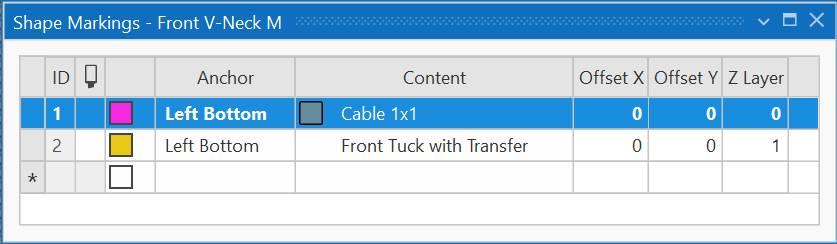
- In the Capa Z column, you can specify the order if overlaying knitting techniques of different shape markings occur.
The example shows the needle action above the cable module. - Note: Shape edges and shape markings in use are shown in the Símbolos de forma section of the Acciones de la aguja tool window.
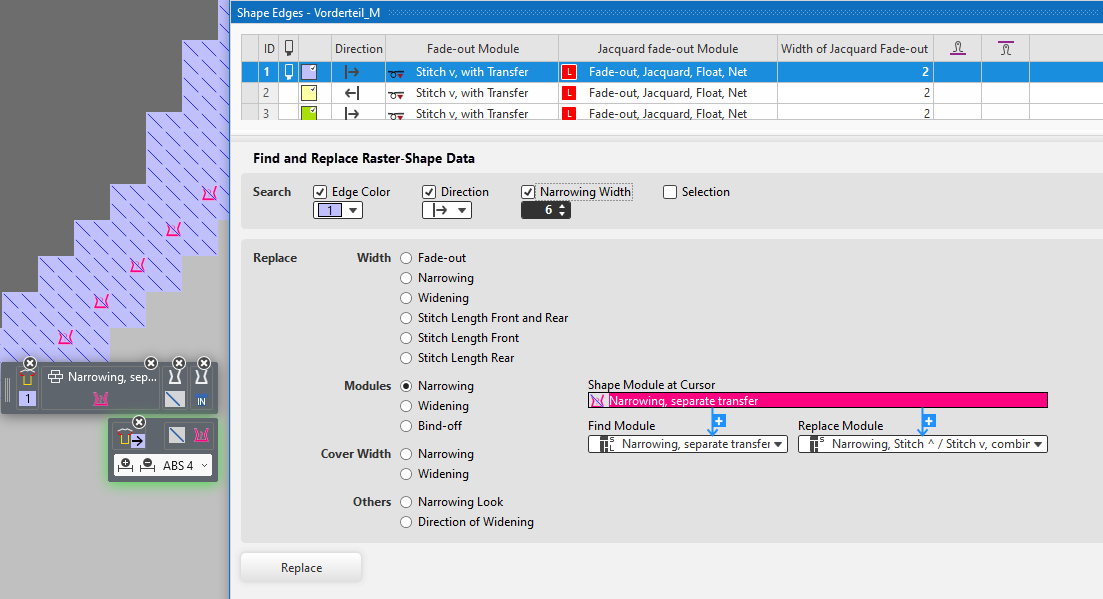
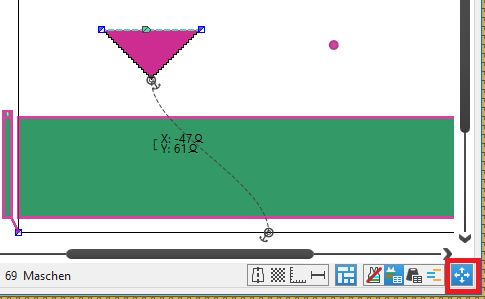
- Raster-Shape / Modifying
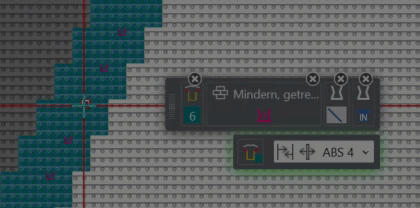
- A new tool has been developed in order to edit the raster-shape graphically and quickly. This appears at the user control if a edge color with shape symbol is selected.
- Modifying a Shape Edge
-
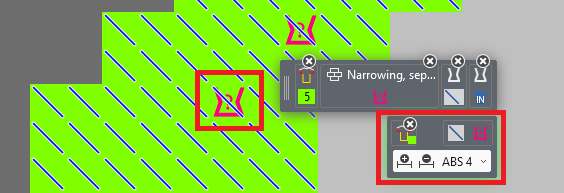
- By the F7 key at the cursor position (left marking of the image), the shape data will be applied to the user control and the tool appears (right marking of the image).
- Meaning starting from the left:
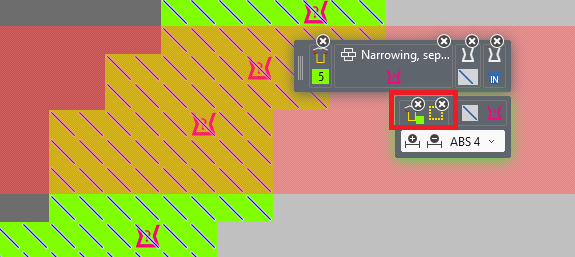
Tool applies to shape color #5 / widen the shape edbe by 1 / reduce the shape edge by 1 / set the shape edge to the selected width - The shape symbol will be shifted according to the selection.
- The narrowing shape symbol will be kept untouched if you remove it from the selection (with the small x).
Only the narrowing shape symbol will be modified if you remove the fading-out shape symbol. - Repeated tapping the F7 key at cursor position:
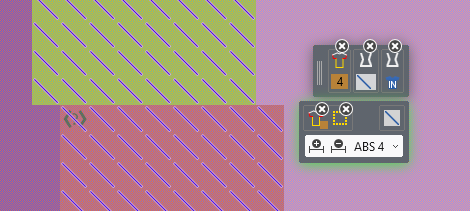
- Modifying within selection
- Selection via shape edge:
Shape edge #5 will be modified within the selection. - Switching off the selection icon by the small x button activates the shape edge in total.
-
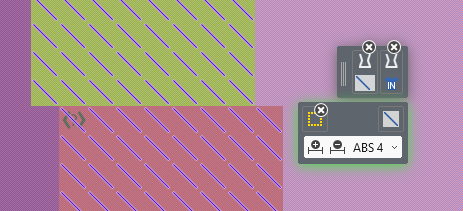
- Selection of several shape edges:
The shown shape edge will be modified within the selection. You can switch to the other shape edge by picking its color with F6 (color under the cursor) -
- Switching off the edge color by the small x button activates all shape edges within the selection.
-
-

You can modify both sides of the shape in common by a row selection.
You can make the row selection quickly by the magic wand and the pressed SHIFT key.
You can create each new selection without deselecting the shape attributes.
Therefore, press the ^ key.
Knitting Program
ASCON device for the yarn length control is supported.
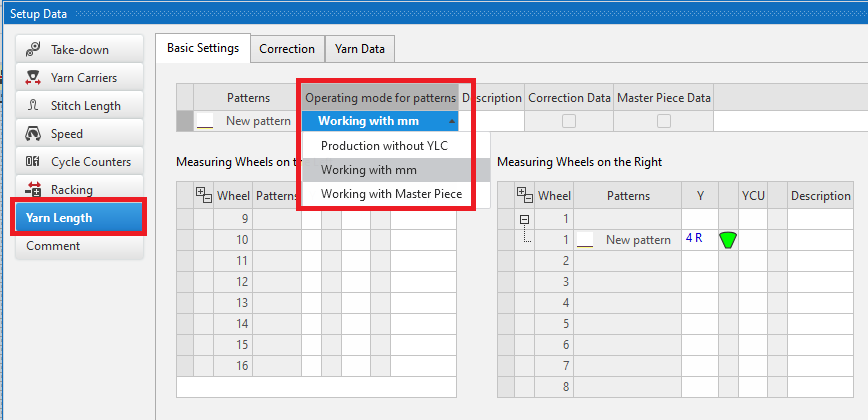
- Yarn Length Control (YLC)
- Select the operating mode in Configuración / Más ajustes.
-
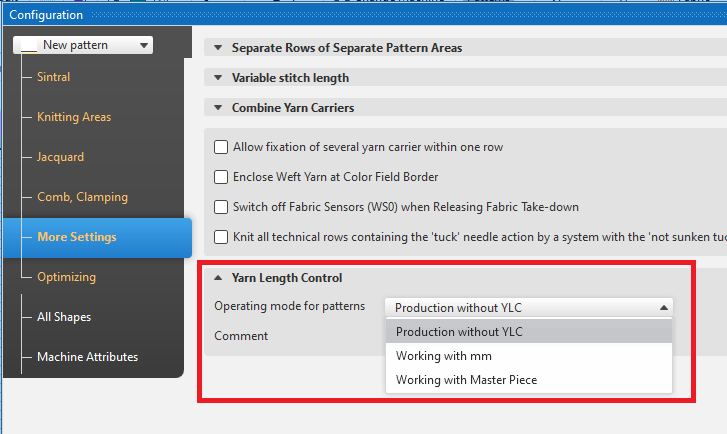
- Selecting an operating mode makes the
 Control de la longitud del hilo (YLC) control column available.
 -
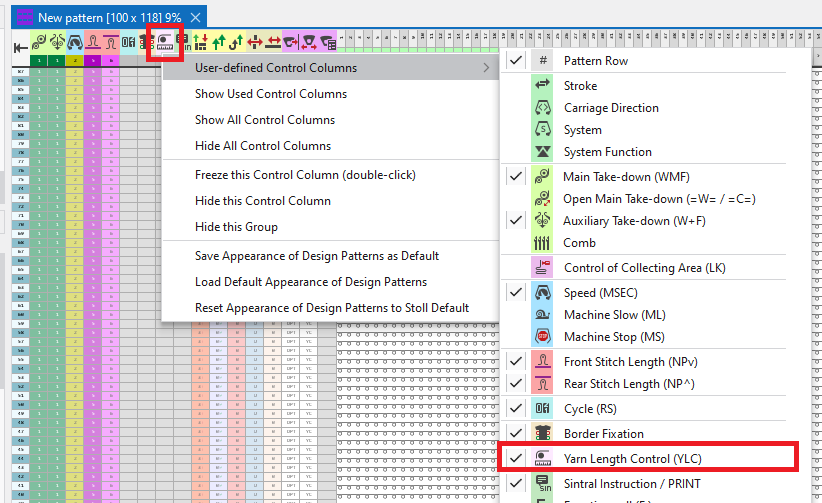
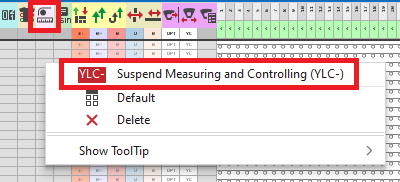
- You can exclude individual pattern areas from measuring and controlling via the control column.
-
- You allocate the yarn carriers to the measuring wheels in the Guiahilos tool window of the preview of yarn carriers.
-
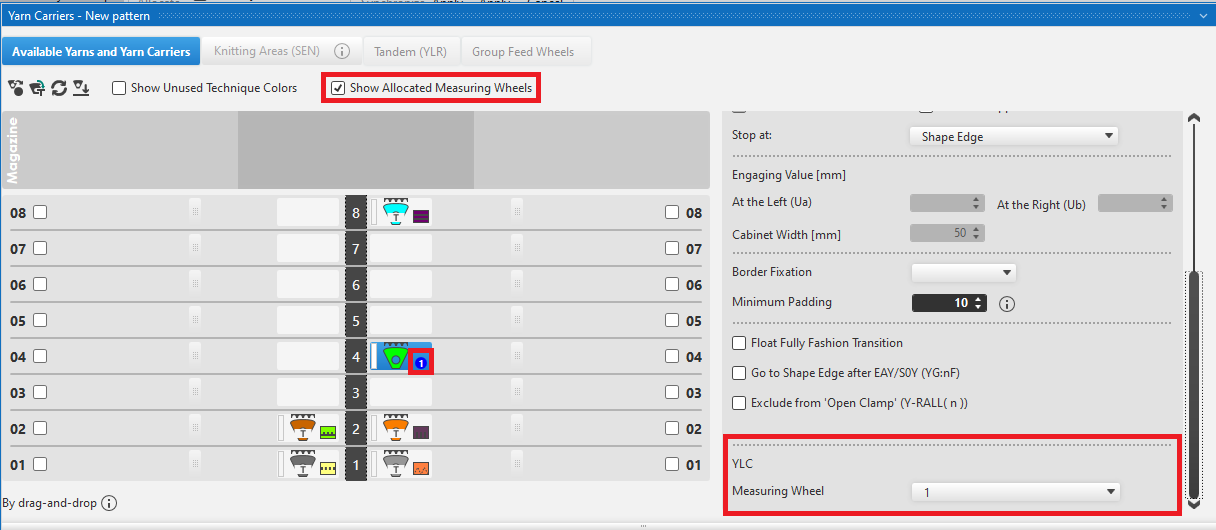
- After the allocation, the data will be applied to theLongitud del hilo tab of the Setup Data tool window.
-
-
Note:
You can select the operation mode directly in the Setup data as well. The selected operation mode will be adjusted between Setup data and configuration and vice versa.
500 indices for stitch lengths (NP)
Maximum number raised from 250 to 500.
- Stitch length (setup data) in Datos Setup
- Ajustes de las levas de formación / Longitud de mallas in Sintral
Sintral function Peine ON/OFF (RS17) extended by S0YCR0
-
RS17=1 IF#100=1 RS17=0 IF RS17=1 YD YC S0YCR0 -
S0YCR0
Empty courses until all yarn carriers are at the area of use (SEN or #L, #R) - Avoids a machine stop (MS) if the piece counter gets the value 1 (IF #100=1).
- With Pinzar al final del tejido en la función de desprendimiento (RS17=0) applies:
- Pasadas de protección, S0YCR0, con desprendimiento module no longer required.
- Pasadas de protección, con desprendimiento module is sufficient under Pasadas de protección / con desprender
- Protection Rows (Configuración / Sectores de tisaje )
Clamping (Configuración / Peine, pinzado )
You can find the news of the previous releases in the Ayuda para CREATE (F1) help.