Working with the Stitch Length (NP) Tab
I. Open stitch length tab and select or change an entry:
-
 Dessin de conception is selected.
- 1
- In the Accueil ribbon in the Paramètre group or under
 Tool Windows
  open the selection list and select
  Données Setup.
 - The Données Setup tool window appears.
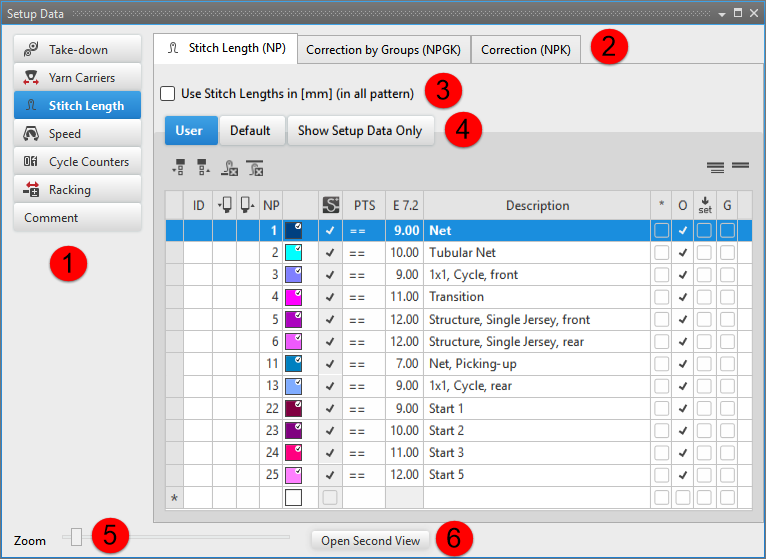
|
| |||
|
1 |
All sections of Machine Parameters appear in Setup | ||
|
2 |
Tabs for additional machine parameters | ||
|
3 |
|
Use stitch length values in the STOLL default unit | |
|
|
Use stitch length values in millimeters | ||
|
4 |
Tabs | ||
|
Utilisateur |
| ||
|
Par défaut |
All the stitch lengths of the STOLL template | ||
|
Afficher uniquement les données de Setup |
All the stitch lengths used in the pattern
| ||
|
5 |
Zoom |
Zoom in or out | |
|
6 |
Ouvrir la deuxième vue |
Opening an additional Données Setup tool window. | |

 : These data will be saved to the setup file.
- 2
- Select the
 Longueur de la maille section.
 - 3
- Select the Longueur de la maille (NP) / Par défaut tab.
- 4
- Select the desired stitch length in the
 or
or  column of the table and insert it in the control column.
-
 Longueur de la maille avant (NPv)
Click the stitch length in the column. -
 Longueur de la maille arrière (NP^)
Click the stitch length in the column. -
Longueur de la maille avant (NPv) and Longueur de la maille arrière (NP^)
Click the stitch lengths with the CTRL key in the and columns.
Result:
The default settings in the control columns of these design rows will be overwritten.
Options in the toolbar
|
|
Selecting the default value to enter in the |
|
|
Selecting the default value to enter in the |
|
|
Deleting entry in the |
|
|
Deleting entry in the |
|
|
Show Pattern-related Values |
|
|
Hide Pattern-related Values |


Column labels of the stitch length tool window
|
Column |
Display |
|---|---|
|
ID / IDv / ID^ |
Consecutive numbering and sorting of the entries |
|
|
Selecting stitch length to enter for the front needle bed |
|
|
Selecting stitch length to enter for the rear needle bed |
|
NP |
Display of the index for the indirect (NPn=1-500) or direct (D) stitch length allocation |
|
Colors |
Display of colors to enter in the control columns |
|
PTS |
Specification for NPJ or PTS (Power Tension Setting). |
|
Gauge E |
List of stitch length values depending on the gauges of the selected machine |
|
Column |
Display | |
|---|---|---|
|
Description |
Comment on the use of the entry. | |
|
* |
|
Entry is not defined as favorite, meaning the entry is only within the Par défaut table available. |
|
|
Entry is defined as favorite, meaning the entry is available within the Utilisateur table or directly via the context menu of the control columns. | |
|
O |
|
Value cannot be overwritten (Overwrite) by a value of another table. |
|
|
Value can be overwritten (Overwrite) by a value of another table. (Standard) | |
|
|
|
The entry will not be applied to the Setup data
|
|
|
The entry will be applied to the Setup data.
| |
|
G |
|
All settings of the Par défaut or Utilisateur table are STOLL defaults (STOLL Template).
|
|
|
These settings of the Par défaut or Utilisateur table are now User Standards (User-Template)
| |

 : All entries used in the pattern are applied by default to the Setup data.
II. Specify favorites:
- Dessin de conception is selected.
- 1
- Open the Données Setup tool window.
- 2
- Select the Longueur de la maille section.
- 3
- Select the Longueur de la maille (NP) / Par défaut tab.
- 4
- Mark the desired entry in the column
 .
. - 5
- Close the tool window with
 .
.
- The selected entry will be displayed in the context menu and can be inserted in the design pattern for the front or rear stitch length.
III. Add a new entry in the stitch length tab:
New entries can only be added in the Utilisateur tab.
- Dessin de conception is selected.
- 1
- Open the Données Setup tool window.
- 2
- Select the Longueur de la maille section.
- 3
- Select the Longueur de la maille (NP) / Utilisateur tab.
- 4
- Set the cursor in the left table column to the row.
- 5
- Call up the Ajouter une ligne... context menu.
- A new entry will be added at the end of the table.
- 6
- Make the desired specifications in the columns of the new entry.
- 7
- Close the table with .
- Changes are saved to the table and are available in the project for each order and for all of its individual patterns.
The changes will be saved to the *.spf file when saving the project.
IV. Add entry of the Stitch Lengths (NP) tab to the pattern:
-
Dessin de conception is selected.
- The control columns for Front Stitch Length and Rear Stitch Length are displayed.
- 1
- Open the Données Setup tool window.
- 2
- Select the Longueur de la maille section.
- 3
- Select the Longueur de la maille (NP) / Utilisateur tab.
- 4
- Select the desired stitch length in the or column:
- Entry in control column: Click the stitch length in the column.
- Entry in control column: Click the stitch length in the column.
- Entry in and control columns: Click the stitch lengths with the CTRL key in the and columns.
- 5
- The stitch length is entered in the control column.