Border Processing for Intarsia Jacquard
- Correction of the border of the motif depending on the carriage direction
- Correction of the Jacquard at its end - net ending
I. The ways of border processing with Intarsia Jacquards (yarn bridges):
Border Processing
Due to the drawing and the inserted jacquard back, adjustments to the back of the jacquard may be necessary at the border regarding the carriage direction.
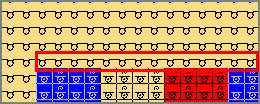
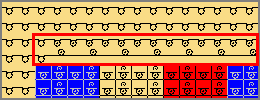
Example:

- The border processing depends on the carriage direction
- The borders of the left and right will be corrected according to the carriage direction.
- The inserted jacquard back is repeatedly inserted up to the quantity of needles, which is entered under allowed stepping.
Procedures
- A Jacquard back is applied to the a selected Jacquard area.
- 1
- Open the context menu in the pattern area.
- 2
- Select Elaborazione del bordo per Jacquard entro intarsio....
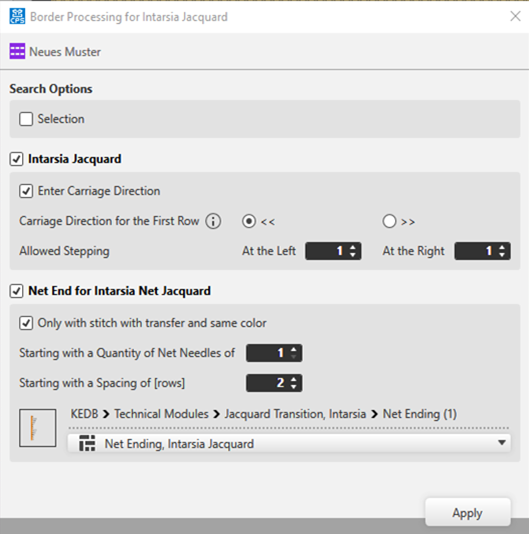
- The Elaborazione del bordo per Jacquard entro intarsio dialog box appears.
We recommend to do the border processing and the net end following each other as the pattern will be modified by the border processing.
This change may require inserting a Net ending module.
|
| |||
|
Elaborazione del bordo per Jacquard entro intarsio - pattern name | |||
|
Search Options | |||
|
|
Edit the border processing of the Jacquard areas within the whole pattern. | ||
|
|
Border processing only of the Jacquard fields within a selected area | ||
|
Jacquard entro intarsio | |||
|
|
Default setting: | ||
|
|
The border processing of the Intarsia Jacquard motif will not be carried out. | ||
|
|
Registra direzione carro | ||
|
|
The carriage directions will be applied to the control column of the pattern. | ||
|
|
The carriage directions will be not applied to the control column of the pattern. | ||
|
Direzione del carro del primo rango | |||
|
|
Carriage direction to the left for the first row of the Jacquard field | ||
|
|
Carriage direction to the right for the first row of the Jacquard field | ||
|
Scalatura permessa | |||
|
A sinistra |
|
Setting of allowed stepping by needles at the left border | |
|
destra |
|
Setting of allowed stepping by needles at the right border | |
|
| |||

 : Multiple selection is possible.
 <<
<<

|
Completamento di rete per Jacquard a rete con intarsio | |||
|
|
Default setting: | ||
|
|
No Net ending module will be inserted at the end of the inserted Jacquard back. | ||
|
|
| ||
|
|
The following requirements have to be fulfilled:
| ||
|
| |||
|
| |||
|
|
|
A partire da un numero di aghi pari a Net Stitches |
Specify the quantity of net stitches at the Jacquard back from which the selected module is to be inserted.
|
|
|
A partire da una distanza intermedia di [ranghi] |
Quantity of SJ rows interrupting the Jacquard (space)
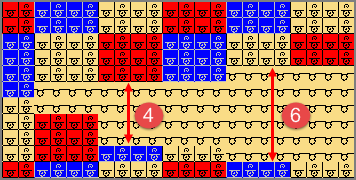
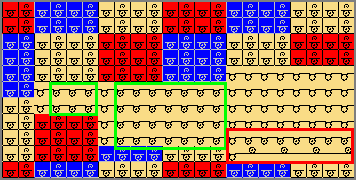
Example: without net ending
Example:Preset 5 [rows]
| |
|
Selection of the module for net ending
| |||

- 3
- Make the desired settings under
 Jacquard entro intarsio.
 - 4
- Disable the
 Completamento di rete per Jacquard a rete con intarsio function.
 - 5
- Apply the settings to the pattern with the Applica button.
- The dialog box will not be closed.
- 6
- Disable the Jacquard entro intarsio function.
- 7
- Make the desired settings under Completamento di rete per Jacquard a rete con intarsio.
- 8
- Apply the settings to the pattern with the Applica button.
- The dialog box will not be closed.
- 9
- Close the dialog box with X.
Inserting the module for the net ending avoids the transferred stitches to shine through.