Working with the main take-down (WMF) Tab
I. Open main take-down (WMF) tab and select / change the entry:
 Amostra de desenho is selected.
- The
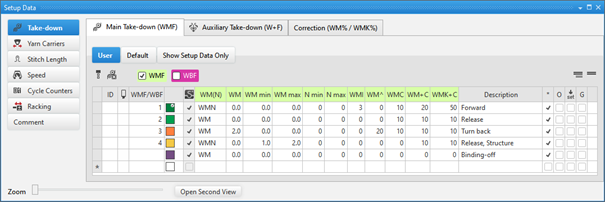
 Estirador principal (WMF) control column is displayed.
- 1
- Open the Dados de setup tool window.
Início ribbon -> Tool Windows
  ->
->  Dados de setup selection menu
- or -
Parameter ribbon group-> Dados de setup. - The Dados de setup tool window appears.
- 2
- Select the Estiragem section.
- 3
- Estirador principal (WMF) / Predefinição tab
- or -
Select Usuário. - 4
- Select the desired main take-down value in the
 column and enter it in the control column.
- The default setting in the control column will be overwritten in these design rows.
Options in the toolbar
|
| Selecting the default value to enter in the control column | |
| Deleting an entry in the control column | |
WMF |
| Hide the display of the columns wit the main take-down values for the Multiflex take-down |
| Show the display of the columns wit the main take-down values for the Multiflex take-down | |
WBF |
| Hide the display of the columns wit the take-down values for the belt take-down |
| Show the display of the columns wit the take-down values for the belt take-down | |
| Show Pattern-related Values | |
| Hide Pattern-related Values | |


Column labels of the main take-down (WMF) tool window
|
Column | Display | |
|---|---|---|
ID / IDv / ID^ | Running numbering and sorting of the entries | |
| Selecting the main take-down value to enter it in the control column | |
WMF / WBF | Index for indirect allocation of the fabric take-down value for the main take-down Multiflex or belt take-down | |
Color | Display of colors to enter in the control columns | |
WM(N) | WM | Fabric take-down value when this is not changed in accordance with the quantity of needles. |
WMN | Fabric take-down value when this is changed in accordance with the quantity of needles (fabric width). | |
WM | Fabric take-down value when this is not changed in accordance with the quantity of needles. | |
WM min | Fabric take-down value for minimum fabric width | |
WM max | Fabric take-down value for maximum fabric width | |
N min | Quantity of needles for minimum fabric width | |
N max | Quantity of needles for maximum fabric width | |
WMI | Fabric take-down impulse value | |
WM^ | Specification of a number of degrees for the reverse rotation of the take-down | |
WMC | Value for the sensitivity of the stop motion control of the main take-down | |
WM+C | Specification of the system number for the fabric take-down control | |
WMK+C | Specification of the system number for comb monitoring | |
|
Column |
Display | |
|---|---|---|
|
Description |
Comment on the use of the entry. | |
|
* |
|
Entry is not defined as favorite, meaning the entry is only within the Predefinição table available. |
|
|
Entry is defined as favorite, meaning the entry is available within the Usuário table or directly via the context menu of the control columns. | |
|
O |
|
Value cannot be overwritten (Overwrite) by a value of another table. |
|
|
Value can be overwritten (Overwrite) by a value of another table. (Standard) | |
|
|
|
The entry will not be applied to the Setup data
|
|
|
The entry will be applied to the Setup data.
| |
|
G |
|
All settings of the Predefinição or Usuário table are STOLL defaults (STOLL Template).
|
|
|
These settings of the Predefinição or Usuário table are now User Standards (User-Template)
| |

 : All entries used in the pattern are applied by default to the Setup data.
II. Specify favorites:
- Amostra de desenho is selected.
- 1
- Open the Dados de setup tool window.
- 2
- Select the Estiragem section.
- 3
- Select the Estirador principal (WMF) / Predefinição tab.
- 4
- Mark the desired entry of the table in the * column as
 .
. - 5
- Close the tool window with
 .
.
- The selected entry will be displayed in the context menu and can be inserted in the design pattern for the main take-down.
III. Add a new entry in the main take-down (WMF) tab:
New entries can only be added in the Usuário tab.
- Amostra de desenho is selected.
- 1
- Open the Dados de setup tool window.
- 2
- Select the Estiragem section.
- 3
- Select the Estirador principal (WMF) / Usuário tab.
- 4
- Set the cursor in the left table column to the row.
- 5
- Call up the Adicionar linha context menu.
- A new entry will be added at the end of the table.
- 6
- Make the desired specifications in the columns of the new entry.
- 7
- Close the table with .
- Changes are saved to the table and are available in the project for each order and for all of its individual patterns.
The changes will be saved to the *.spf file when saving the project.
IV. Add entry of the Main take-down (WMF) tab to the pattern:
- Amostra de desenho is selected.
- The Estirador principal (WMF) control column is displayed.
- 1
- Open the Dados de setup tool window.
- 2
- Select the Estiragem section.
- 3
- Select the Estirador principal (WMF) / Usuário tab.
- 4
- Select the desired main take-down value in the column.
- 5
- Enter the selected main take-down value in the control column.
More optional control columns:
-
 Abrir estirador principal (=W= / =C=)
 -
 Pente
Pente