Step by Step to Pattern-6
- 1
- A pattern project with one pattern and the desired settings is created.
- 2
- Select an existing pattern element in the
 Knit Explorer -> Depósito de elementos de tricotagem -> Partes de amostra -> Partes de amostra, todas as agulhas -> Partes de amostra, Jacquard to draw.
- or -
Draw a private motif in the basic pattern with Cores de fio and save as pattern element. - 3
- Draw the desired 2 and 3 color Jacquard areas with the corresponding pattern element over the entire working width (Block Jacquard) into the basic pattern.
- 4
- Generate a row selection over the desired area e.g. area (1) for Jacquard, fio flutuante.
- 5
- Positioning the cursor in the pattern area.
- 6
- Call-up the Seleção / Criar um Jacquard... context menu.
- The Gerar Jacquard [Nova amostra] dialog box appears.
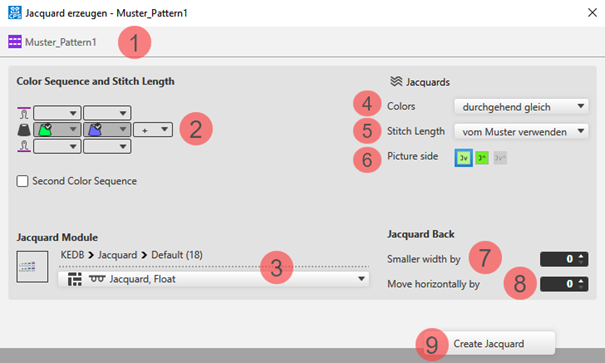
Description to the dialog box
|
| |||
|
1 |
Display of the active document window | ||
|
2 |
Seqüência de cores e graduação | ||
|
|
Display or edit box for the stitch length per color / rear system
| ||
|
|
Display of the used colors in the selection in the color sequence from the left | ||
|
|
Display or edit box for the stitch length per color / front system
| ||
|
Segunda seqüência de cores | |||
|
|
|
Default Setting | |
|
|
Definition of the color sequence for the second pattern row is possible
| ||
|
3 |
Módulo de Jacquard | ||
|
|
Displays the selected Jacquard module.
| ||
|
Display of the path of the selected directory in the Knit Explorer | |||
|
Selection list | |||
|
| |||
|
4 |
Cores |
Selection list for the knitting sequence of the colors
| |
|
5 |
Graduação |
Selection list for the stitch length
| |
|
6 |
Face da imagem |
Selecting the desired face of picture of Jacquard
| |
|
Avesso do Jacquard | |||
|
7 |
mais estreito em |
Specification in case of Jacquard with yarn bridges, by how many needles the back side is to be narrower then the face of picture | |
|
8 |
deslocar horizontalmente em |
Specification by needles for shifting the Jacquard horizontally | |
|
9 |
Gerar Jacquard |
The presets made in the dialog box will be applied to the pattern. | |


 for selecting the desired Jacquard module in the specified directory
Changing the default settings for Block Jacquard:
 : A module for net pick-up and net ending are assigned by default to each area with Block Jacquard in the Projecto de amostra.
Possibilities for changing the module allocation:
- In Configuração -> Jacquard tab -> Block-Jacquard section: Changes will apply to all patterns of the Projecto de amostra .
- Select
 Jacquards in the ribbon.: Individual change regarding the desired Jacquard area
 - Select the context menu -> Abrir Jacquards...
: Individual change regarding the desired Jacquard area
- 7
- Make the desired presets in the Gerar Jacquard [Nova amostra] dialog box.
- 8
- Apply the presets to the pattern with the Gerar Jacquard button.
- 9
- Continue:
Create the next row selection for a new Jacquard area.
- or –
Exit working in the dialog box by Fechar.
- The different Jacquards are displayed with different symbols in the pattern and are listed in the Jacquards tool window for another edit.
Direct selection of a Jacquard module in the pattern:
- In the pattern there are Jacquard modules in use.
- 1
- Position the cursor in a Jacquard area with an inserted Jacquard module.
- 2
- Apply the Jacquard module with the F5 key.
- 3
- Enter the selected Jacquard module via the control columns in the entire pattern width or only in an area within the pattern.
- The selected Jacquard module is inserted in the pattern and in the Jacquards table.
: Pay attention whether the exact same colors are in use in the area to be entered or not!
- Used exactly the same colors -> The Jacquard areas will be grouped in the table.
- Used different colors -> A new entry is added in the table.
Selection of a Jacquard module in the Jacquard table:
- In the pattern there are Jacquard modules in use.
- All the Jacquard modules in use are contained in the table.
- 1
- In the Início ribbon under Parâmetros, open the Jacquards tool window with .
- 2
- Select the desired Jacquard in the Jacquards tool window in the
 column.: Pay attention to the Jacquard colors in use!
 - 3
- Enter the selected Jacquard module via the control columns in the entire pattern width or only in an area within the pattern.
- The following message appears:
Na área onde você desenhou existe pelo menos uma cor que não está contida no Jacquard da tabela. Área é conectada com um Jacquard apropriado. Se não existir nenhum, um novo Jacquard será gerado. - 4
- Confirm message with:
-
OK
-> A new Jacquard with the missing color is created in the table. -
Cancelar
-> No Jacquard module will be inserted.
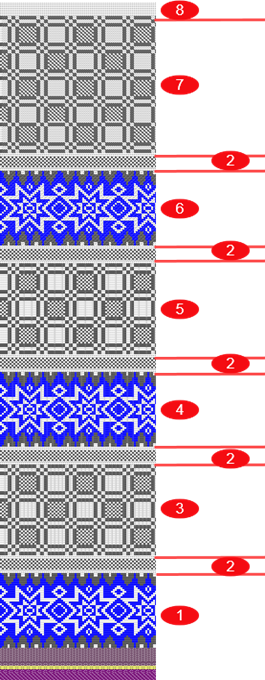
Used Jacquards in Pattern-6
|
|
1 |
Jacquard, fio flutuante |
|
|
1 row single jersey 1 row double jersey (for shaft) | |
|
2 |
Jacquard, Fio flutuante sem transferência
| |
|
|
2 rows single jersey | |
|
3 |
Jacquard, rede 1x1 | |
|
|
1 row single jersey 1 row double jersey | |
|
2 |
Jacquard, Fio flutuante sem transferência
| |
|
|
2 rows single jersey | |
|
4 |
Jacquard, rede 1x2 | |
|
|
1 row single jersey 1 row double jersey | |
|
2 |
Jacquard, Fio flutuante sem transferência
| |
|
|
2 rows single jersey | |
|
5 |
Jacquard, rede 1x3 | |
|
|
1 row single jersey 1 row double jersey | |
|
2 |
Jacquard, Fio flutuante sem transferência
| |
|
|
2 rows single jersey | |
|
6 |
Picô Jacquard | |
|
|
1 row single jersey 1 row double jersey | |
|
2 |
Jacquard, Fio flutuante sem transferência | |
|
|
2 rows single jersey | |
|
7 |
Listras Jacquard | |
|
8 |
Any number of rows single jersey | |
|
| ||
- 10
- To process inserted Jacquards, open the selection list in the Início ribbon at
 Janela de ferramentas and select Jacquards.
- or -
Open the context menu in the Jacquard area in the pattern and click . und Abrir Jacquards...
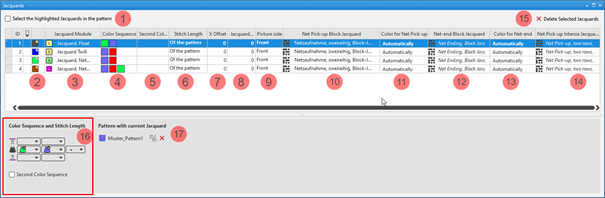
. - The Jacquards tool window is opened.
- 11
- Make the desired changes in the table.
Edit inserted Jacquards:
- In the pattern there are areas with inserted Jacquard modules.
- 1
- In the Início ribbon under Parâmetros, open the Jacquards tool window with .
- or -
Open the context menu in the Jacquard area in the pattern and click . und Abrir Jacquards...
. - The Jacquards tool window is opened.
|
| |||
|
1 |
Selecionar as entradas das tabelas selecionados na amostra | ||
|
|
The Jacquards selected in the table are not displayed as selection in the pattern. | ||
|
|
The Jacquards selected in the table are displayed as selection in the pattern. | ||
|
ID |
Consecutive numbering of the Jacquard areas | ||
|
2 |
|
For drawing a Jacquard module in the pattern
| |
|
|
Index Color: Use in the search area of a Color Arrangement with the marking 'Jq'
| ||
|
3 |
Módulo de Jacquard
| ||
|
4 |
Seqüência de cores Display for the color sequence for the first and second pattern row if | ||
|
5 |
Segunda seqüência de cores Display for the color sequence for the second pattern row if | ||
|
6 |
Graduação Specification for the stitch length which is to be used in the pattern:
| ||
|
7 |
Offset de X Value in needles for the horizontal offset of a Jacquard module | ||
|
8 |
Avesso mais estreito Input value in needles, regarding how many needles the Jacquard back side is to be narrower in relation to the picture side when inserted. | ||
|
9 |
Face da imagem
| ||
|
10 |
Início de rede Jacquard de bloco Display of the knitting elements in use for the net pick-up with continuous Jacquards (Block Jacquard). | ||
|
11 |
Cor de início de rede Specification of the color (yarn carrier) which is used for the net pick-up knitting element. | ||
|
12 |
Fim de rede Jacquard de bloco Display of the knitting elements in use for the net ending with continuous Jacquards (Block Jacquard). | ||
|
13 |
Cor de fim de rede Specification of the color (yarn carrier) which is used for the knitting element | ||
|
14 |
Início de rede Jacquard em intarsia Display of the knitting elements in use for the net pick-up with Intarsia with Jacquard back (placed Jacquard back). | ||
|
15 |
Eliminar Jacquards selecionados |
The selected Jacquard is deleted in all the pattern where it is in use.
| |
|
16 |
Seqüência de cores e graduação | ||
|
|
Display or edit box for the stitch length per color / system for rear needle bed
| ||
|
|
Display of the color sequence from the left for the Jacquard area selected in the table | ||
|
|
Display or edit box for the stitch length per color / system for front needle bed
| ||
|
|
Adicionar nova cor... | ||
|
Segunda seqüência de cores | |||
|
|
|
Default Setting | |
|
|
Definition of the color sequence for the second pattern row is possible.
| ||
|
17 |
Amostra com atual Jacquard List of the patterns, where the Jacquard selected in the table is in use.
| ||
|
|
Ungroup the grouped Jacquard areas.
| ||
|
|
The inserted Jacquard module will be removed from the area in the pattern or pattern element.
Result:
| ||

 (
(


- 2
- Select the Jacquard to be changed in the table.
- 3
- Activate
 Selecionar as entradas das tabelas selecionados na amostra if necessary.
 - The Jacquard selected in the table will be displayed as a row selection in the design pattern.
- 4
- Make the desired changes in the tool window.
- 5
- Close the tool window with X.
- The changes will be applied to the pattern.
Normally, in a Jacquard area, the number of colors found in the design pattern are knitted on the Jacquard back. In special cases it is necessary to knit in an additional thread (color = yarn carrier) on the Jacquard back.
An additional color is added to the Jacquard area for this purpose.
Addition of an additional color:
: The colors identified with  knit only on the Jacquard back.
- In the pattern there are Jacquard modules in use.
- All the Jacquard modules in use are contained in the table.
- The Jacquards tool window is open.
- 1
- Select a Jacquard in the first column of the Jacquards tool window.
- The color sequence is displayed in the tool window under Seqüência de cores e graduação.
- 2
- Select an additional color in the
 edit box at the end of the displayed color sequence using the selection list from the Cores da amostra tool window.
- The additional color is added to the color sequence and identified with .
Deleting an additional color marked with :
: The colors identified with knit only on the Jacquard back.
- In the pattern there are Jacquard modules in use.
- All the Jacquard modules in use are contained in the table.
- The Jacquards tool window is open.
- 3
- Select a Jacquard with additional colors in the first column of the Jacquards tool window.
- The color sequence is displayed in the tool window under Seqüência de cores e graduação.
- 4
- Position the cursor on the additional color -> click the Remover cor context menu.
- The additional color is removed from the color sequence.
- 12
- To create a project-related lined shape, select the
 Cortes tab in the tool window.
 - 13
- Open the context menu with RMB and select Criar novo corte em tamanho M....
- The Novo corte de linhas tool window appears.
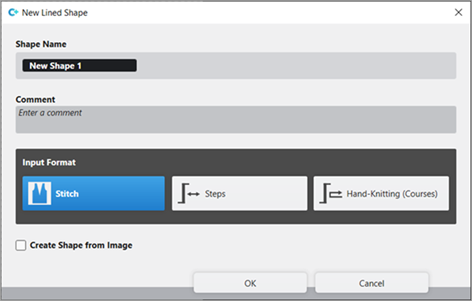
- 14
- Make the desired entries:
- Nome de corte : Any
- Formato de entrada : Stitch
- 15
- Confirm with the OK key.
- The new lined shape (basic shape) is graphically displayed in the Cortes tab and in a new document window
 as rectangle.
: Default attributes are used for the shape edges of the lined shape.
Menu Arquivo -> Opções -> Corte de linhas -> Opções para o novo corte de linhas
- 16
- To create a lined shape based on the displayed rectangle in the ribbon Edição de corte under Propriedades, click the Tabela de linhas button.
- or -
Use the graphic displayed in the document window.
: The method (table or graphic) to create a project-related lined shape is freely eligible, since the views are always updated simultaneously.
- 17
- Open Tabela de linhas in the ribbon.
- The table Corte de linhas with the values of the rectangular shape is displayed.
- 18
- Insert new shape lines in the table and enter the desired values for the basic shape.
- Standard attributes from configuration are assigned to those shape lines.
Example: Lined shape for 'Pattern-6'
|
Basic Shape: Front |
|
|
Rules for creating a shape for the jacquard knitting mode with different backs:
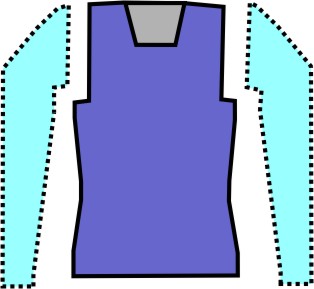
Example Front:
|
Shape Attributes |
Rules / possible settings |
|---|---|
|
Knitting Mode: |
Different color jacquards |
|
Step width of widening |
1 Stitch |
|
Step height of widening |
As desired |
|
Quantity of rows without shape modification |
As desired |
|
Step width when narrowing |
Single-jersey Jacquards (float): 1-3 stitches Double Jersey Jacquards (Stripe, Twill, Net): 1 Stitch |
|
Step height when narrowing |
As desired |
|
Fading-out Width |
As desired Standard: 2 needles
|
|
Knitting mode for fading-out |
Module Ocultar, Jacquard, Fio flutuante, Rede |
|
Binding-off width: |
Single-jersey Jacquards: from 4 stitches Double Jersey Jacquards:from 2 stitches |
|
Binding-off methods |
Single-jersey Jacquards:
Double Jersey Jacquards:
|
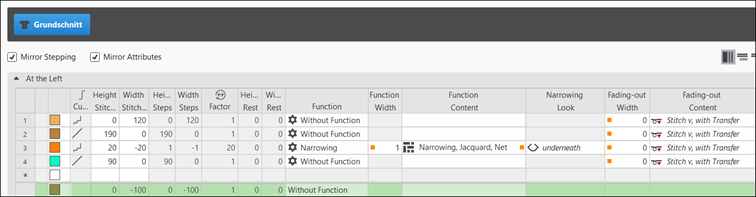
- 19
- Allocate the desired attributes to the shape lines:
- Fade-out width: Set value to 0, since the different Jacquard areas are not to be hidden with Malha v, com transferência.
- Function width: Set value to 1
- Function content: Module Minguar, Jacquard, rede
: To fade-out with patterns with Jacquards, a corresponding Ocultar, Jacquard, Fio flutuante, Rede module is used.
- 20
- Check shape lines, attributes and if desired make corrections.
- 21
- In the document window, select the desired shape line with the graphic shape presentation.
- 22
- Position cursor on the selected shape line.
- 23
- Select LMB ->
 Propriedades de linha context menu.
 - The Propriedades de linha tool window is opened for the selected shape line.
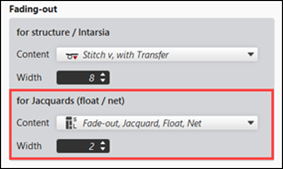
- 24
- Make the following entries under the para Jacquards (fio flutuante / rede) section:
- Content: Select Ocultar, Jacquard, Fio flutuante, Rede Fade-out Module.
- Width: specify the desired fade-out width.
- Default setting: 2 Needles wide
Attention: The fade-out width is also executed in the rows of the net pick-up and the net ending.
- 25
- In the Cortes tool window select the created shape with LMB.
- 26
- Open the context menu -> Posicionar corte -> select Pattern name.
- The shape is floating in the selected basic pattern.
- 27
- Position the shape in the document window with the
 button.
 - 28
-
 Start Technical Processing:
-
 Show symbol view after technical processing.
- 29
- Generate
 Sintral.
 - 30
- Start the
 Controle Sintral.
 - 31
-
 Extrair the knitting program.
 - A program for the knitting machine will be created: CMS530.Pattern-6.zip.
- Load knitting program into the machine.
 : The extracted file "CMS530.Pattern-6.zip" can be loaded onto the machine with an USB stick or via Ethernet.