Example 2: Color Arrangement for 'Combining yarn carriers'
The yarn carriers are to be combined with this Color Arrangement CA2, to reduce the production time.
Create the Color Arrangement CA2:
- The pattern project of pattern Pattern-7 is open.
- Pattern in
 Amostra de desenho is active.
 : Colors from the Cores de fio table were used to draw the basic pattern.
- 1
- If necessary, save the pattern project under a new name.
- 2
- In the Fileira de amostra control column, select the first two pattern rows.
- 3
- Position the cursor in the pattern area.
- 4
- Open the context menu and select Seleção
/
 Criar um Color Arrangement...
.
Criar um Color Arrangement...
.
- or -
Click directly the button in the ribbon. - The Color Arrangement Editor appears with the original 'Default knitting process' of both selected pattern rows.
|
|
|
|
|
Result after technical processing
|
|
|
|
The colors (= yarn carrier) from the 'processing area' of the CA are processed according to the number of knitting systems of the selected machine.
|
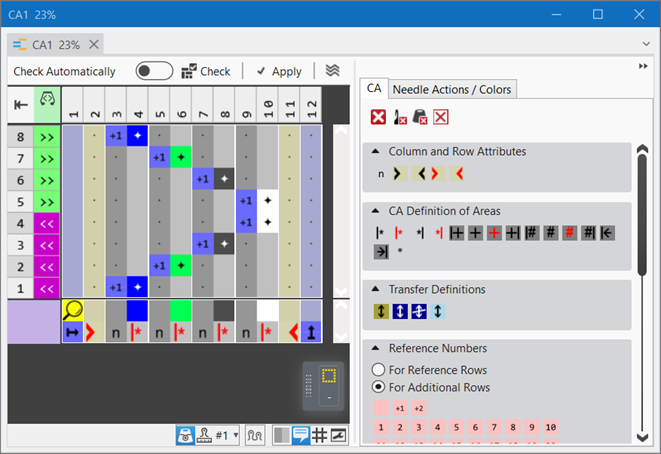
 symbol (default entry) repeats the needle action from the source row in the entire color area from the left to the right
 symbol, the corresponding needle action from the source row of the design pattern is read out and knitted according to the search color.
- 5
- Select
 Mover drawing tool.
 - 6
- Define the desired function in the ribbon
- or -
Open the pop-up window with the Ctrl + Space bar button. - Pop-up window appears.
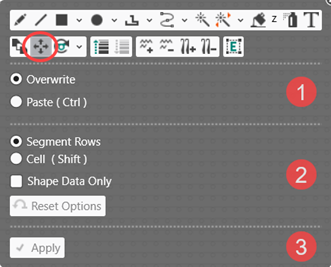
|
1 |
Select modes for the Mover drawing tool
| ||
|
|
Substituir mode active
| ||
|
or | |||
|
|
Inserir mode (Ctrl) active
| ||
|
2 |
Selection for the selected Substituir / Inserir mode
| ||
|
|
Fileira de segmento |
| |
|
|
Célula (SHIFT) |
Overwriting or Inserting a cell (pixel) | |
|
|
Só dados da forma |
All data at the cursor position is overwritten or inserted. | |
|
|
Only the shape data at the cursor position is overwritten or inserted.
| ||
|
3 |
The | ||


- 7
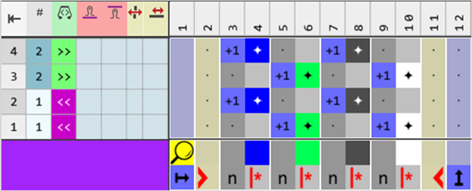
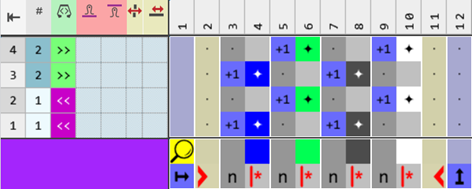
- With the Fileira de segmento selection in the Substituir mode, move the entries in the processing area into the desired position.
|
Example explaining ‚Combine Yarn Carriers‘
|
|
CA2-1
|
|
CA2-1
|
- 8
- Check the generated Color Arrangement on correct entries with the
 Verificar button.: The technical knitting technique and the necessary distances cannot be checked!
 - 9
- If necessary, in case of a Color Arrangement already used in the design pattern, apply the changes to the basic pattern with the
 Aceitar button.
- or -
Close the tool window with button.
 - 10
- Close the prompt with the desired button:
-
Save: Color Arrangement is saved locally in the
 CA tool window.
 - Reject: The changes will not be saved.
-
Copy: The changed Color Arrangement is saved as copy in the CA tool window.
- 11
- Enter the generated Color Arrangement via the
 control column into the desired rows of the design pattern.
Options to enter the Color Arrangement in the 'Color Arrangement' control column:
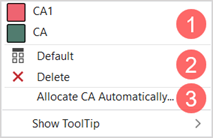
- Select the desired CA in the tool window in the CA tab
-
Color Arrangement control column: Open the context menu with RMB.
|
| ||
|
1 |
List of all generated Color Arrangements in the pattern project
| |
|
2 |
|
CA entry is replaced with the default setting |
|
|
CA entry is deleted | |
|
3 |
Assign Color Arrangements Automatically
| |


|
| ||
|
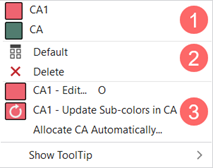
1 |
List of all generated Color Arrangements in the pattern project
| |
|
2 |
|
CA entry is replaced with the default setting |
|
|
CA entry is deleted | |
|
3 |
CA1 – Editar...
| |
|
CA1 – Atualizar subcor no CA
| ||
|
Atribuir automaticamente Color Arrangements
| ||
- 12
-
 Start Technical Processing
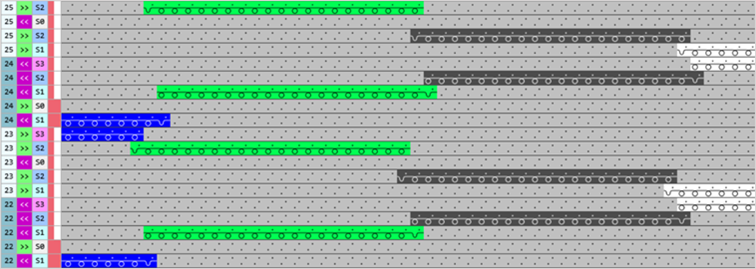
 - The Color Arrangement is expanded by the technical processing.
|
Result after technical processing |
|
|
CA2-1
|
|
CA2-2
|


- 13
- Generate
 Sintral.
 - 14
- Start the
 Controle Sintral.
 - 15
-
 Extrair the knitting program.
 - 16
- Load knitting program into the machine.