Step by Step to Pattern-8
- A pattern project with one pattern and the desired settings is created.
- The image was reduced to 3 colors in the Importação de imagem dialog box and was saved on the clipboard as a pattern element.
- 1
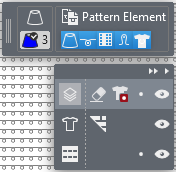
- Select the
 tab in the Partes de amostra tool window.
 - 2
- Position the cursor in the tool window.
- 3
- Open the context menu with RMB.
- 4
- Using Insert (Ctrl+V) save the image from the clipboard in the tool window.
- Image with name and image size is displayed.
- 5
- Select image.
 : Modify the pattern element (image), if desired, to avoid unnecessary knit-in and knit-out rows!
- 6
- Position image in the
 Amostra de desenho.
: If necessary for the better positioning of the image, save the shape in advance in Amostra de desenho (floating).
- 7
- To create a project-related lined shape, in the tool window change to the
 Cortes tab.
 - 8
- Open the context menu with RMB and select Criar novo corte em tamanho M....
- The Novo corte de linhas tool window is opened.
- 9
- Make the desired entries:
- Nome de corte: Any
- Formato de entrada: Stitch
- 10
- Confirm with the OK key.
- The new lined shape (basic shape) is graphically displayed in the Cortes tab and in a new document window
 as rectangle.
: Default attributes are used for the shape edges of the lined shape.
Menu Arquivo -> Opções -> Corte de linhas -> Opções para o novo corte de linhas
- 11
- To create a lined shape based on the displayed rectangle in the ribbon Edição de corte under Propriedades, click the Tabela de linhas button.
- or -
Use the graphic displayed in the document window.
: The method (table or graphic) to create a project-related lined shape is freely eligible, since the views are always updated simultaneously.
- 12
- Insert new shape lines in the table and enter the desired values for the basic shape.
- Standard attributes from configuration are assigned to those shape lines.
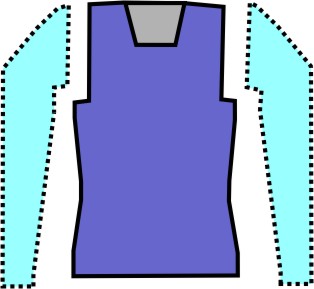
Example: Lined shape for Pattern-8
|
Basic Shape: Front without neckline |
|
|
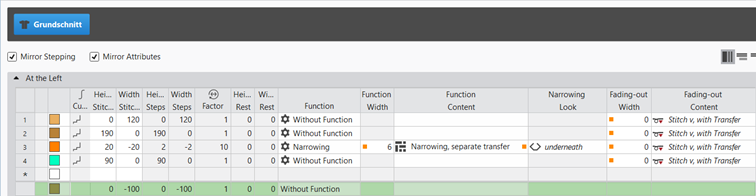
Rules for creating a shape for the knitting mode SJ:
Example Front:
|
Shape Attributes |
Rules / possible settings |
|---|---|
|
Knitting Mode: |
Single Jersey |
|
Step width of widening |
1 needle (stitch) per knitting row |
|
Step height of widening |
As desired |
|
Quantity of rows without shape modification |
As desired |
|
Step width when narrowing |
1 - 3 needles (stitches) |
|
Step height when narrowing |
As desired |
|
Fading-out Width |
As desired |
|
Knitting mode for fading-out |
Front Stitch with Transfer |
|
Binding-off width: |
Stepping > 3 stitches |
|
Binding-off methods |
Binding-off, Structure, Single Jersey
|
- 13
- Allocate the desired attributes to the shape lines of the shape.
- 14
- In the Cortes tool window select the created shape with LMB.
- 15
- Open the context menu -> Posicionar corte -> select Pattern name.
- The shape is floating in the Amostra de desenho.
- 16
- To position the shape in the Editing Layers user control, change from the
 Editar camada de amostra
to the
Editar camada de amostra
to the  Editar camada de corte de linhas (Y)
.
Editar camada de corte de linhas (Y)
.
- 17
- If necessary, use
 to position the floating shape in the Amostra de desenho.
 - 18
- Using the Editing Layers user control, change back from the Editar camada de corte de linhas (Y)
to the Editar camada de amostra
.
- 19
- In the
 control column, create a row selection over the whole height of the image.
 - 20
- Position cursor in the image area.
- 21
- Open the context menu with RMB.
- 22
- Under Seleção -> select Criar um Jacquard....
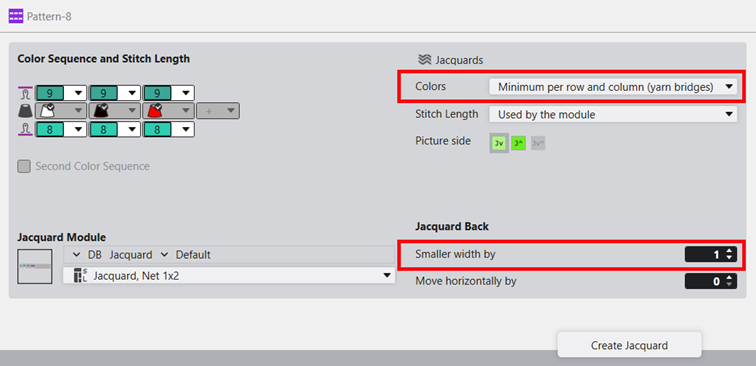
- The Gerar Jacquard dialog box appears.
- 23
- Make the desired settings:
- Módulo de Jacquard
- Desired Jacquard module for the fabric back
-
 Jacquards
 -
Cores: mínimo por fileira e coluna (pontes de fio) : Jacquard module will only be inserted in the area of the motif.
- Avesso do Jacquard:
-
mais estreito em : Number of needles by which the rear side is inserted narrower on each side compared to the image front.
- Graduação:
-
do módulo : Presets for stitch lengths are entered from the module of the Jacquard module in the design pattern.
- 24
- Apply the presets with the Gerar Jacquard button into the design pattern.
- The selected Jacquard module is displayed in the Amostra de desenho.
- 25
- For further presets, open the dialog box in the ribbon under Configuração ->
 Configuração.
 - 26
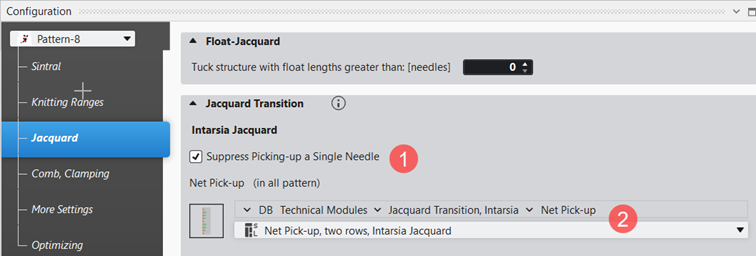
- In the Configuração dialog box, select the Jacquard tab.
- 27
- Under the Transição de Jacquard -> Jacquard em intarsia section, make the desired settings.
|
| ||
|
1 |
Suprimir início de uma só agulha | |
|
|
Default Setting
| |
|
|
With Jacquard rows where the rear side starts with only one needle, the selected technical module for the net pick-up is entered. | |
|
2 |
Selection of the desired technical module for net pick-up. | |


- 28
- Open the Guia-fios tool window to edit the presets for the yarn carriers.
- 29
- In the Parâmetros de cor table make the desired changes in the following groups:
- Entrar-sair tecendo
- Conexão intarsia
- 30
- Make the desired changes in the following control columns:
- Graduação (NP)
- Estirador principal (WMF)
- Velocidade (MSEC)
- 31
- Start the
 Processamento
técnico.
Processamento
técnico. - 32
- Generate
 Sintral.
 - 33
- Execute
 Controle Sintral.
 - 34
-
 Extrair the knitting program.
 - A program for the knitting machine will be created: CMS530.Pattern-8.zip
- 35
- Load knitting program into the machine.
 : The extracted file CMS530.Pattern-8.zip can be loaded onto the machine with an USB stick or via Ethernet.