Working with 'Within Shape' Shape Element
You can add information to shapes via a 'Within Shape' shape element which will be applied to all copies of it.
- The image is reduced to the desired quantity of colors.
- A pattern project with one pattern and the desired settings is created.
- The image is available as pattern element in the
 Partes de amostra tool window
 - The basic shape of 'Pattern-8' is created and can be imported.
- 1
- Import the Front of 'Pattern-8' shape into the pattern project.
- 2
- Open the
 Cortes tab.
 - 3
- Open the shape by double-clicking.
- The basic shape is graphically displayed in the
 document window.
 - 4
- In the line table, position the cursor in the area next to the
 Corte base button -> open the context menu by RMB and select Adicionar novo elemento de corte....
- or -
Position the cursor in the document window within the basic shape, open the context menu with the RMB and select Adicionar novo elemento de corte.... - 5
- In the selection menu select the desired shape element
 Dentro da forma -> Simétrico.
 - 6
- Adjust the Dentro da forma in the line table or in the document window by size and outline in order to insert the pattern element (image).
- 7
- Put the cursor on the shape element Dentro da forma within the line table or within its area in the document window.
- 8
- Position the shape element with the Âncora no elemento de corte within the basic shape.
- 9
- Open the context menu with RMB and select Propriedades do elemento de corte.
- The Propriedades do elemento de corte tool window is displayed.
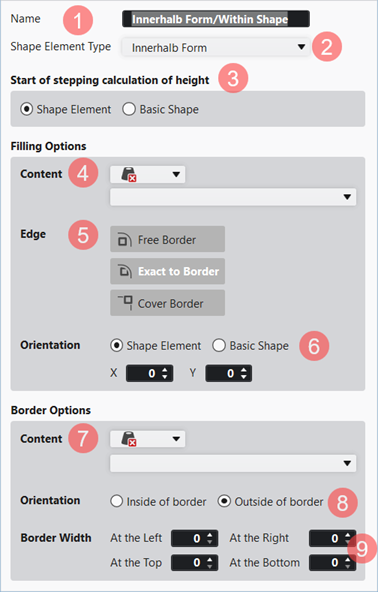
| 1 | Name of the selected shape element | ||||
2 | The Shape Element Type determines its behavior | |||||
3 | Start of stepping calculation of height | |||||
| Elemento de corte | The reference point for calculating the height stepping of a line is at the bottom left of the shape element. | ||||
| Corte base | The reference point for calculating the height stepping of a line is at the bottom left of the basic shape. | ||||
| ||||||
| Filling Options | |||||
4 | Conteúdo |
| Selecting the desired pattern color to fill the shape element | |||
| Selecting the desired knitting element (knitting mode) to fill the shape element | |||||
5 | Ourela |
| Ourela livre | The selected knitting element is only entered into the cutting element as a complete unit. | ||
| Ourela exacta | The selected knitting element is entered into the cutting element as a complete unit.
| ||||
| Sobrepor ourela | The selected knitting element is entered into the cutting element as a complete unit. | ||||
6 | Alinhamento |
| Elemento de corte | Positioning of the selected knitting element when filling the shape element. Startpoint for filling: lower left corner of the shape element | ||
| Corte base | Positioning of the selected knitting element when filling the basic shape. Startpoint for filling: lower left corner of the basic shape | ||||
Specifications at X / Y: | You can move the knitting element within the shape element or basic shape in the x and y directions. | |||||
| ||||||
| Border Options | |||||
7 | Conteúdo |
| Selecting the desired pattern color for border processing of the shape element | |||
| Selecting the desired knitting element for border processing of the shape element
| |||||
8 | Alinhamento |
| Ourela interior | Insert of the selected knitting element at the edge of the shape element inwards
| ||
| Ourela exterior | Insert of the selected knitting element at the edge of the shape element outwards
| ||||
9 | Largura de ourela | Entry of the desired border width at the left, right, top and bottom edge of the shape element | ||||


- 10
- Select the desired pattern element under Opções de preenchimento -> Conteúdo in the empty selection panel:
- Pattern Element withoout Jacquard: You have to enter the desired Jacquard (yarn bridges) later in the design pattern.
- Pattern Element with Jacquard: Desired Jacquard (yarn bridges) was inserted into the pattern element.
- 11
- Close the Propriedades do elemento de corte tool window.
- 12
- Open and position shape the shape in the
 Amostra de desenho document window.
 : If the basic pattern is too small for the positioning of the shape, then the size of the basic pattern will be automatically adjusted to the size of the shape.
 : This adjustment always takes place with Malha à frente com transferência .
- 13
- If necessary, add the desired Jacquard to the pattern element shown in the design pattern.
- 14
-
Start the
 Processamento
técnico.
Processamento
técnico. - 15
-
Generate
 Sintral.
 - 16
-
Execute
 Controle Sintral.
 - 17
-
 Extrair the knitting program.
 - A program for the knitting machine will be created: CMS530.Pattern-8.zip.
- 18
- Load knitting program into the machine.
: The extracted file CMS530.Pattern-8.zip can be loaded onto the machine with an USB stick or via Ethernet.