Example 6: Color Arrangement to change the Intarsia binding (border processing) at the color field edge
With this Color Arrangement CA6 the Intarsia binding (border processing) is to be changed at the color field edge.
 : A Color Arrangement is only necessary in this situation, when the Intarsia binding is not available in the Knit Explorer as a 'Technical module' knitting element.
Create the Color Arrangement CA6:
- The pattern project of pattern Pattern-7 is open.
- Pattern in
 Tasarım deseni is active.
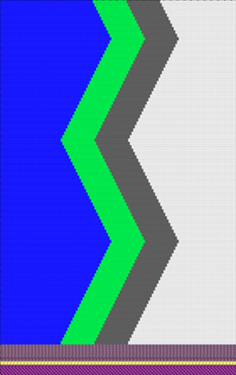 : Colors from the İplik renkleri table were used to draw the basic pattern.
- 1
- If necessary, save the pattern project under a new name.
- 2
- In the Desen sırası control column, select the first 2 pattern rows.
- 3
- Position the cursor in the pattern area.
- 4
- Open the context menu and select Seçimden oluştur /
 Color Arrangement.
- or -
Click directly the button in the ribbon. - The Color Arrangement Editor with the original 'Default knitting process' of the 2 selected pattern rows is opened.
|
|
|
|
|
Result after technical processing
|
|
|
|
The colors (= yarn carrier) from the 'processing area' of the CA are processed according to the number of knitting systems of the selected machine.
|

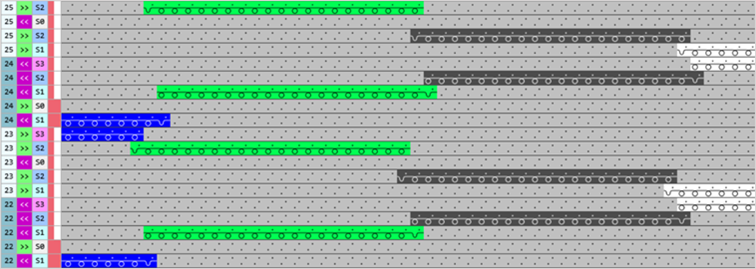
 symbol, the corresponding needle action from the source row of the design pattern is read out and knitted according to the search color.
- 5
- Position the cursor on the column selection bar.
- 6
- Select the color column in the color segment of the yarn color #5 (green) with LMB.
- 7
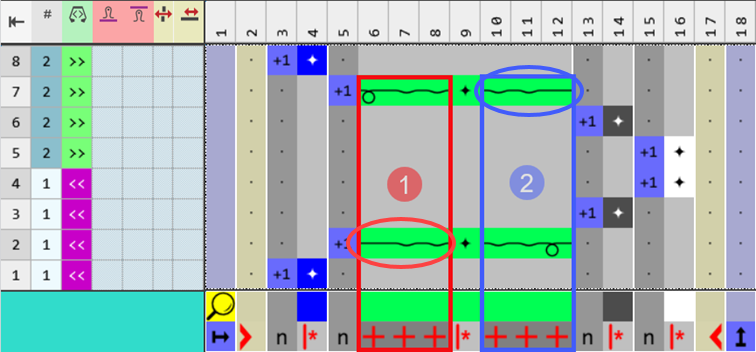
- Position the cursor at the position ((1)).
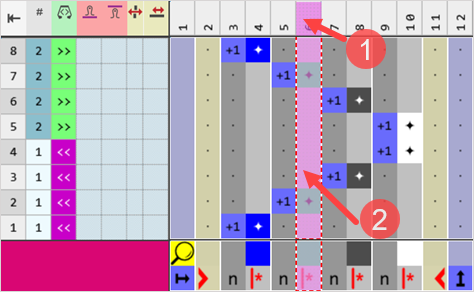
: At the cursor position (2), the RMB opens the context menu only to work with color segments.
- 8
- Open the context menu with RMB.
- The context menu appears.

|
1 |
Sütunu çoğalt |
Copy content of the selected column | |
|
Seçili sütunları çoğalt |
Copy content of the selected column(s)
| ||
|
2 |
Sola boş sütun ekle |
Insertion of columns to the left of the selected column | |
|
Sağa boş sütun ekle |
Insertion of columns to the right of the selected column | ||
|
3 |
|
Delete Column |
Without selection delete a column |
|
|
Delete Selected Column |
With selection delete a column
| |
|
4 |
Options to work with color segments | ||

|
4 |
Options to work with color segments | |||
|
Bölümü çoğalt |
| |||
|
Yeni renk bölümü sol |
> |
Menu for the selection of the quantity of color segments to be inserted (1-10) to the left in relation to the selection | ||
|
Yeni renk bölümü sağ |
> |
Menu for the selection of the quantity of color segments to be inserted (1-10) to the right in relation to the selection | ||
|
|
Bölümü sil |
| ||
|
Bölümü seç |
The color segment at the cursor position is selected | |||
- 9
- Insert / duplicate the desired number of columns to the left and right in relation to the selected color column of the yarn color #5.
- For example:
- 3 additional columns for the structure of the desired Intarsia binding at the left + right: Any quantity of columns is available.
- 10
- Draw the desired structure of the Intarsia binding e.g. in the color segment of the yarn color #5 (green) in the 'Processing area'.
- 11
- In the tool window of the CA editor change to the İğne hareketleri / renkler tab.
- 12
- Select the desired needle actions to draw.
- For example:
- Aktarmalı ön ilmek
- Arkaya aktarmalı atlama
- Atlama
- 13
- Draw-in the structure + color into the color column of the yarn color #5 in the 'Processing area' for the Intarsia binding (border processing) at the color field.
- 14
- Draw-in in the 'search area':
- Add yarn color #5
- Add the
 Fazla genişlik symbol under the yarn color #5
Usage in the Color Arrangement:
In the Search Area:
- Symbol Fazla genişlik
- Any quantity of columns
- The quantity of columns to the left / right can be symmetrical or asymmetrical
- For additional columns to the left and / or right beside the color column marked with
 Sağa doğru tekrarlama
In the 'Processing area':
- The following entries are possible in the columns with the symbol:
- No Entry
- Entry of color and needle action
|
|
Fazla genişlik |
Widening of the color field by the number of columns marked with the
|
|
|
Şekil kenarında fazla genişlik |
Widening of the color field by the number of columns marked with the
|
 Yarn Carrier dialog box.
|
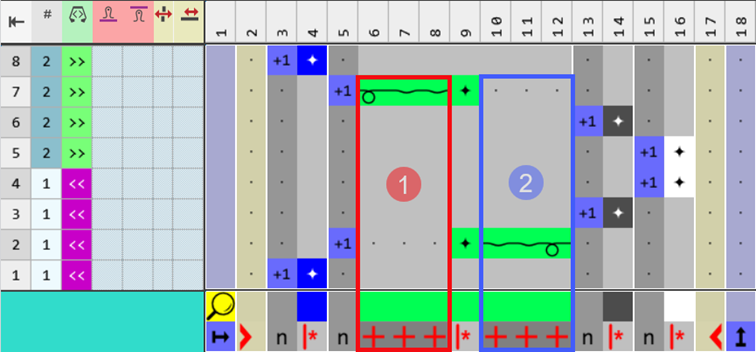
Example: Structure for the Intarsia binding (border processing) in the color segment of the yarn color #5 (green) | |
|
| |
|
1 |
Intarsia binding at the left color field edge knit-in with a width of 3 needles. |
|
2 |
Intarsia binding at the right color field edge knit-in with a width of 3 needles. |
|
Attention: The color field is widened due to working with the | |
|
| |
|
Example: Modification of the Color Arrangement to avoid the entry of the automatic 'feeding' of the yarn carrier | |
|
| |
- 15
- Check the generated Color Arrangement on correct entries with the
 Kontrol et button.: The knitting procedure cannot be checked!
 - 16
- If necessary, in case of a Color Arrangement already used in the design pattern, apply the changes to the basic pattern with the
 Uygula button.
- or -
Close the tool window with button.
 - 17
- Close the prompt with the desired button:
-
Save: Color Arrangement is saved locally in the
 CA tool window.
 - Reject: The changes will not be saved.
-
Copy: The changed Color Arrangement is saved as copy in the CA tool window.
- 18
- Enter the generated Color Arrangement via the
 control column into the desired rows of the design pattern.
Options to enter the Color Arrangement in the 'Color Arrangement' control column:
- Select the desired CA in the tool window in the CA tab
-
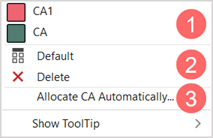
Color Arrangement control column: Open the context menu with RMB.
|
| ||
|
1 |
List of all generated Color Arrangements in the pattern project
| |
|
2 |
|
CA entry is replaced with the default setting |
|
|
CA entry is deleted | |
|
3 |
Assign Color Arrangements Automatically
| |

|
| ||
|
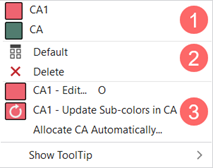
1 |
List of all generated Color Arrangements in the pattern project
| |
|
2 |
|
CA entry is replaced with the default setting |
|
|
CA entry is deleted | |
|
3 |
CA1 - Edit...
| |
|
CA1 - Update sub-colors in CA
| ||
|
Renk aranjmanını otomatik ata
| ||
- 19
-
 Start Technical Processing
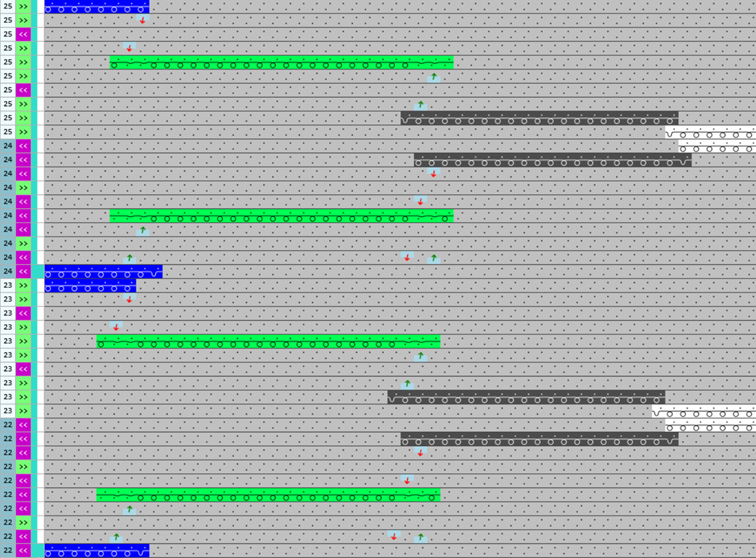
 - The Color Arrangement is expanded by the technical processing.
|
Result with modified CA6 after technical processing |
|
|
|
- 20
- Generate
 Sintral.
 - 21
- Start the
 Sintral Kontrolü.
 - 22
-
 Genişlet the knitting program.
 - 23
- Load knitting program into the machine.