Set docking points
The procedure for setting the connecting lines in the Shape display window is described in the following. Graphically set connection lines have a higher priority than the shape lines defined in the shape editor (Connections tab). Available docking points are not displayed in the Shape display window.
I. Set Sleeve - Body connecting line:
The connecting lines set the first subsequent knitting row after the end of the sleeve / body connection.
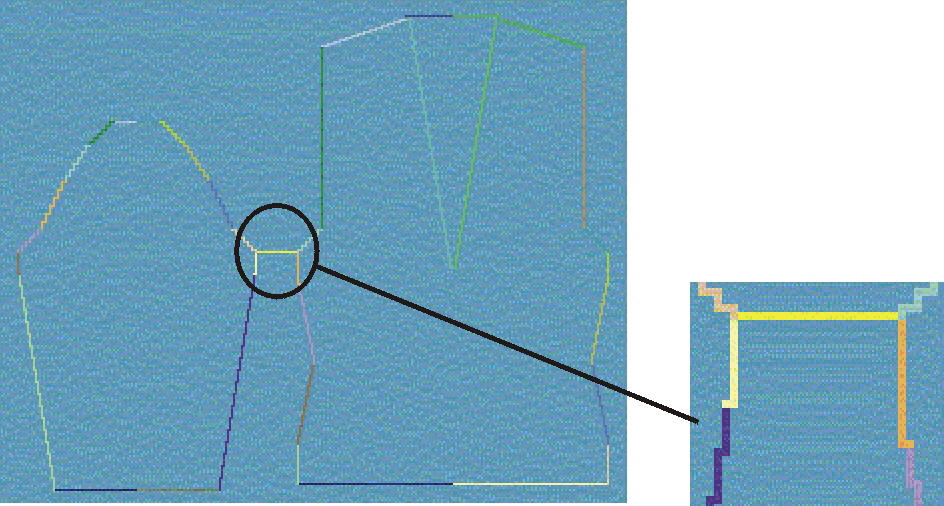
- The Sleeve - Body button is pressed in the Docking points dialog box.
- 1
- Place the mouse pointer on the starting point in the k&w sleeve or body part.
- 2
- Specify the first docking point by pressing the left mouse button.
Hold the key depressed. - 3
- Place the mouse pointer on the end point in the k&w sleeve or body part.
- A thin connecting line appears.
If the mouse button is pressed while the Ctrl key was held down, the end point automatically jumps to the closest edge start.
- 4
- Release the mouse button.
- The connection is shown with a yellow line.
The number of the sleeve and body knitting row is entered in the Docking points dialog box.
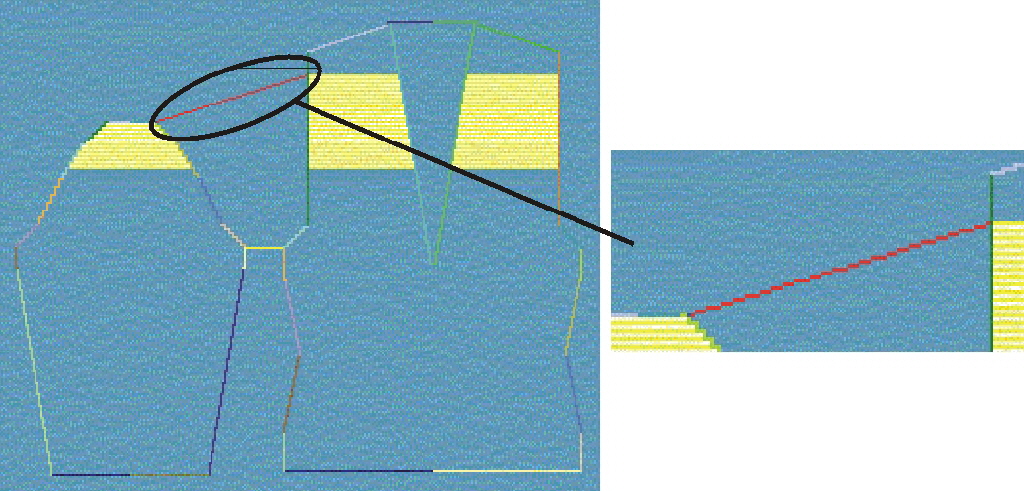
II. Set Compensation connecting line:
Length compensation between sleeve and body.
The connection line of the length compensation determines up to which knitting row the varying number of knitting rows is compensated via suspending.
- The Compensation button is pressed in the Docking points dialog box.
- 1
- Place the mouse pointer on any point in the k&w sleeve part.
Press the left mouse button. Hold the key depressed.
- A thin connecting line is shown between the mouse pointer and the required starting point at the end of the sleeve.
- 2
- Move the mouse pointer to the end point in the k&w body part.
If the mouse button is pressed while the Ctrl key was held down, the end point automatically jumps to the closest edge start.
- 3
- Release the mouse button.
- The connection is shown with a yellow line. The number of the sleeve and body knitting row is entered in the Docking points dialog box.
The starting point in the sleeve is always set automatically. This enables you to generate this connecting line with only one click. Click only in the body on the end point of the connecting line.
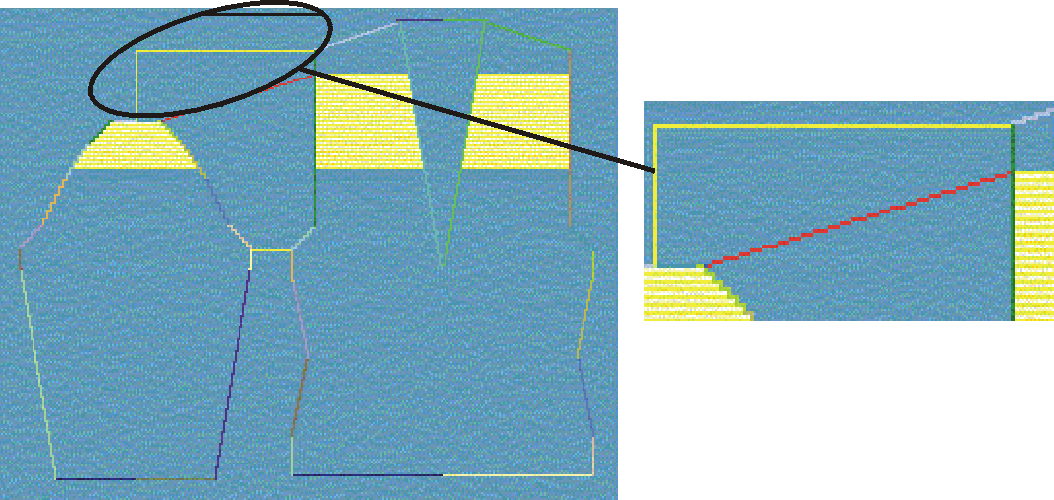
III. Set remaining narrowing connecting line:
Remaining narrowing is the number of knitting rows remaining at the end of a sleeve that are integrated in the body part following narrowing without knitting (end width).
A connection to a position in the body part is set from the end of the arm up to which the end stitches are to be narrowed.
If the remaining narrowing is specified after specifying the body-sleeve connection, then the length compensation is calculated automatically.
The stepping to be used for remaining narrowing can be specified in the Shapewizard in the Stitch number for remaining narrowing list field.
- The Remaining narrowing button is pressed in the Docking points dialog box.
- 1
- Place the mouse pointer on any point in the k&w sleeve part. Press the left mouse button. Hold the key depressed.
- 2
- A thin connecting line is shown between the mouse pointer and the required starting point at the end of the sleeve.
- 3
- Move the mouse pointer to the end point in the k&w body part.
If the mouse button is pressed while the Ctrl key was held down, the end point automatically jumps to the closest edge start.
- 4
- Release the mouse button.
- The connection is shown with a yellow line.
The number of the sleeve and body knitting row is entered in the Docking points dialog box.
The starting point in the sleeve is always set automatically. This enables you to generate this connecting line with only one click. Click only in the body on the end point of the connecting line.
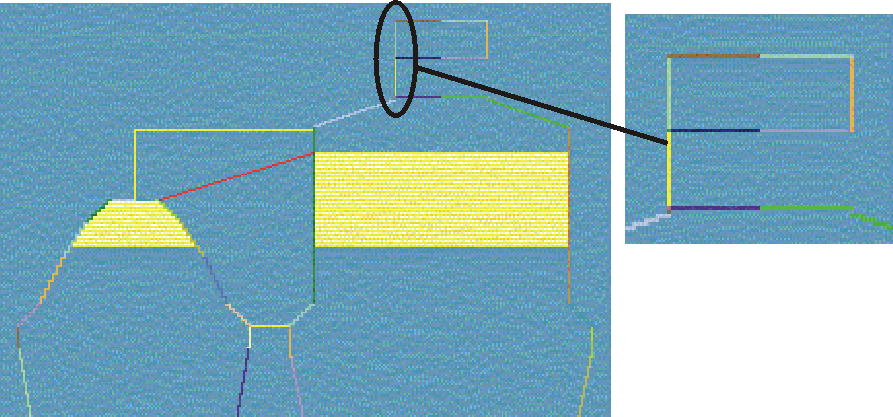
IV. Set collar connecting line:
The collar is connected to the body or sleeve. Specify the width of the collar with the connecting lines.
If a connection line is not determined for the collar, the collar is automatically connected to the body section.
- The Collar button is pressed in the Docking points dialog box.
- 1
- Place the mouse pointer on any point in the k&w collar part. Press the left mouse button. Hold the key depressed.
- A thin connecting line appears between the mouse pointer and the required starting point on the collar.
- 2
- Move the mouse pointer onto the end point in the k&w sleeve part for a collar - sleeve connection.
- or -
Move mouse pointer to k&w body part for a collar - body connection.
If the mouse button is pressed while the Ctrl key was held down, the end point automatically jumps to the closest edge start.
- 3
- Release the mouse button.
- The connection is shown with a yellow line.
The number of the sleeve or body column is entered in the Docking points dialog box.
The starting point in the collar is always set automatically. This enables you to generate this connecting line with only one click. Click only in the sleeve or body on the end point of the connecting line.
Docking points can also be defined for the shape line in the Shape editor ( tab). Please note that existing docking points are not shown in the Shape display window. In addition, graphically set connection lines have higher priority. The docking points at the shape lines are not observed then.