ShapeSizer: Specify the stitch ratio
- 1
- Double click the desired shape in the overview (2) of the main window of the ShapeSizer.
- The selected shape with the Stoll standard attributes is loaded and the next dialog window of the M1plus ShapeSizer appears.
The data of shape elements (Front, Back, Sleeve) are saved in the defaultform_xxx.shp files.
- 2
- Select the type of basic pattern (5).
- 3
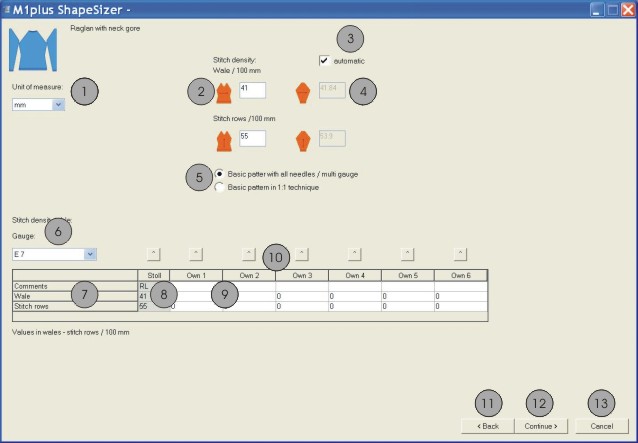
- Make the specifications for the stitch density.
- The specified stitch density is used in the further processing.
|
No. |
Function |
|---|---|
|
1 |
Select the mm or inch measure unit for the stitch ratio. |
|
2 |
Enter the stitch ratio for the front |
|
3 |
Convert automatically the stitch ratio for the sleeve |
|
4 |
Enter the stitch ratio for sleeve manually |
|
5 |
Select the basic pattern with all needles or in 1X1 technique |
|
6 |
Select the gauge of the stitch density table |
|
7 |
Table of the stitch densities |
|
8 |
Stoll default stitch ratio for the back-layer knitting mode |
|
9 |
Define your own stitch ratios for different knitting modes. |
|
10 |
Transfer stitch ratios from the table to the input window (2) |
|
11 |
Switch to the previous dialog window of the ShapeSizer |
|
12 |
Switch to the next dialog window of the ShapeSizer |
|
13 |
Cancel the ShapeSizer |
- 4
- Change to the next dialog window with the Continue> button.