Create the shape in the M1plus Shape Editor
I. Generate a shape:
- 1
- Call up the M1plus Shape Editor via the / menu.
- The dialog box will be opened.
- 2
- Create a new shape in the shp format via / .
- or -
Click the icon.
icon. - 3
- Create a element for a front:
- The checkbox is activated.
Basic element Front Left Edge:

- 4
- Deactivate checkbox.
- 5
- Modify the right edge of the basic element.
Basic element Front Right Edge:

|
Settings in the basic element for the left edge | ||||
|---|---|---|---|---|
|
Line of the edge |
tab |
Tab |
Tab |
Allocated module |
|
No.1-6 |
|
As desired |
As desired |
As desired |
|
Settings in the basic element for the right edge | ||||
|
Line of the edge |
tab |
Tab |
Tab |
Allocated module |
|
No. 1-4 +6 |
|
As desired |
As desired |
As desired |
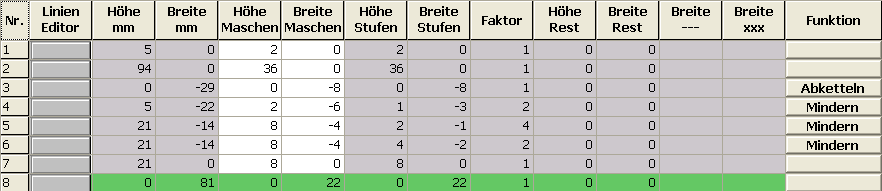
The right side of the basic element is enlarged by 8 needles (= width of the border) in edge line No. 5, as the tubular trimming is transferred outward in the line before.
- 6
- Create a new element with
 button.
 - 7
- Select under via the selection menu Neck opening.
- The checkbox is activated.
Element Neck opening:
|
Settings in the cut-out neck left lines | ||||
|---|---|---|---|---|
|
Line of the edge |
tab |
Tab |
Tab |
Fade-out width |
|
No. 1 |
No entry |
Start of left border |
No entry |
9 |
|
No. 2 |
No entry |
Left border |
No entry |
9 |
|
| ||||
|
Line of the edge |
tab |
Tab |
Tab |
Fade-out width |
|
No. 3 |
Binding-off |
BO-SJ-01 |
No entry |
No entry |
|
No. 4-6 |
Narrowing |
As desired |
L-R separate transfer |
As desired |
|
Settings in the cut-out neck right lines | ||||
|---|---|---|---|---|
|
Line of the edge |
tab |
Tab |
Tab |
Fade-out width |
|
No. 1 |
No entry |
Start of right border |
No entry |
9 |
|
No. 2 |
No entry |
Right border |
No entry |
9 |
|
| ||||
|
Line of the edge |
tab |
Tab |
Tab |
Fade-out width |
|
No. 3 |
Binding-off |
BO-SJ-01 |
No entry |
No entry |
|
No. 4-6 |
Narrowing |
As desired |
L-R separate transfer |
As desired |
- 8
- Deactivate checkbox.
- 9
- Allocate the narrowing and fade-out modules of your own to the edge lines at the left and right.
- 10
- Save the shape via the / or menu.
- The shape will be saved in the .shp format.
- 11
- Close the M1plus Shape Editor with
 .
.