Further possibility of pattern creation
Problem of yarn tensioning at the pattern edge
When using the presser foot, the yarn carriers are not positioned directly at the fabric selvedge. As a consequence, the too long float cannot be returned when knitting-in the weft yarn carrier.
The yarn used in the weft yarn carrier has a great influence on this problem!!
Solutions:
1. The weft yarn carrier is positioned at the fabric selvedge in an autarkic way, in order to give the yarn tensioner more time to keep the yarn tension.
2. The weft yarn carrier always runs leading to the first system by an offset of YCI1= -100.
I. Generate a shape:
This shape contains the necessary border processing (fading-out) for the autarkic shifting of the yarn carriers!!!
- 1
- Via the / menu open the M1plus Shape Editor dialog box.
- The dialog box will be opened.
- 2
- Open an existing shape via the / menu or with the
 button and convert it to shp format.
- or -
Generate a new shape of the shp format in the Shape Editor via
- or -
/ or with the key.
key. - 3
- Create a element for a front:
- The checkbox is deactivated.
Basic element front left lines and front right lines:

- 4
- Create fade-out modules Front Stitch with Transfer with different yarn colors for the left and right edges.
|
Fade-out module for left edges |
Fade-out module for right edges |
|---|---|
|
|
|
Modules for fade-out
In the Fade-out tab, allocate the modules to the lines and activate the setting  .
.
- 5
- Allocate the fade-out width 1 and the corresponding fade-out modules to the edge lines.
- The outer edges are faded-out one stitch wide and with a different yarn color. These additional colors are required for the necessary Color Arrangements.
- 6
- Allocate the other desired shape attributes to the edge lines.
- 7
- Save the shape via the / or menu.
- The shape will be saved in the shp format.
- 8
- Close the M1plus Shape Editor with
 .
.
II. Color Arrangement for the autarkic shifting of the weft yarn carrier:
- 1
- Select an area with the desired height.
- 2
- Click the
 button.
- The Color Arrangement Editor will be opened.
- 3
- Modify the Color Arrangement:
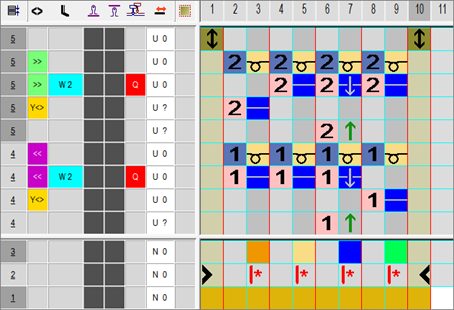
- Change the following in the executing area:
- Change the knitting sequence (the #31 yarn color knits continuously).
- Draw-in additional rows for the weft yarn with yarn color #3 and the needle action Weft yarn/ Transferring to the front with float and Float without transfer.
- Additional row for the system independent knitting-in of the weft yarn carrier at the left and right fabric selvedge
- Insert additional rows for transferring and draw-in transfer symbol.
- 4
- Enter the Color Arrangement in the control column over the entire pattern height.