Create the shape in the ShapeSizer and open it in the pattern
Open shape and work it out in the ShapeSizer:
- 1
- Open the ShapeSizer program via the / menu.
- 2
- Open the desired shape in the overview with double click.
- or -
Select shape and press Continue >.
- The next window of the ShapeSizer appears.
- 3
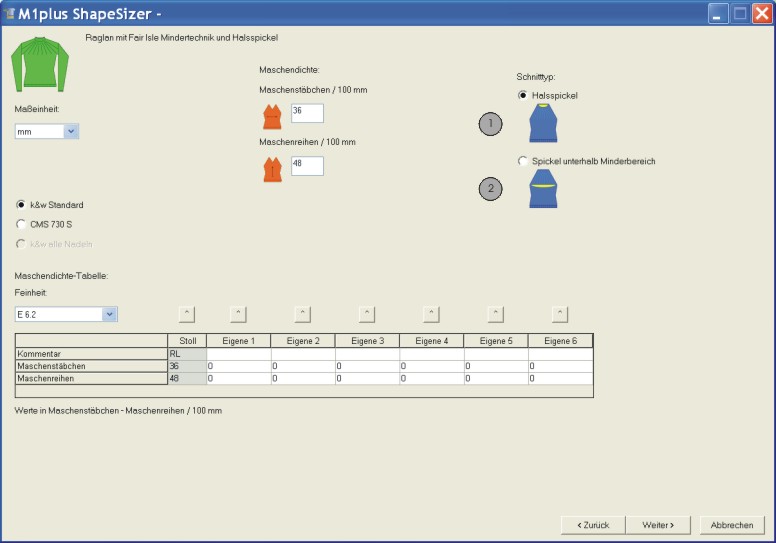
- Set the measure unit and the stitch density.
- The measure unit and the stitch density are used for further editing.
- 4
- Select the desired gore type under .
|
No. |
Function |
|---|---|
|
1 |
A gore in the area of the neck opening (FRONT) is inserted. |
|
2 |
A gore below the Fair Isle area is inserted. |
- 5
- Open the next dialog window with Continue >.
- 6
- Generate basic size in the < * 6 > column.
- 7
- Open the next dialog window with Continue >.
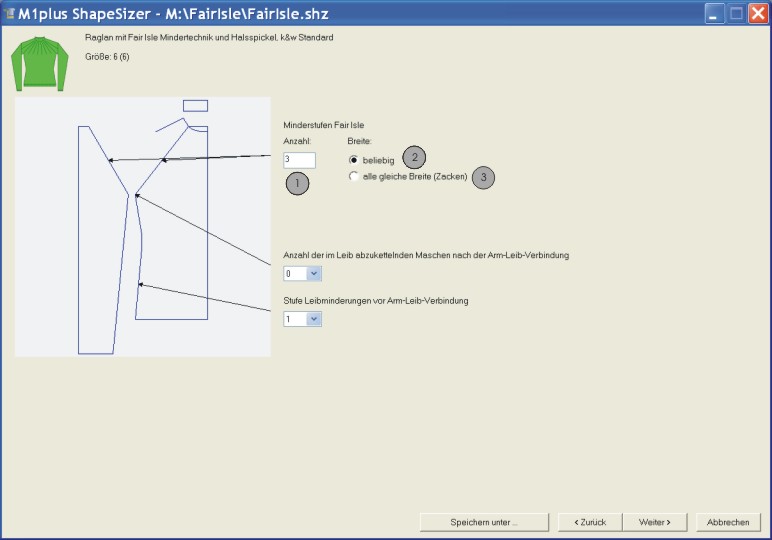
- 8
- Shape specifications and under enter the desired specifications:
|
No. |
Function | |
|---|---|---|
|
Number | ||
|
1 |
Define the number of narrowing steps in the Fair Isle area | |
|
Width | ||
|
2 |
|
The step width of the Fair Isle narrowings have different widths. |
|
3 |
|
The step widths of the Fair Isle narrowings have the same width and are placed in such a way that the spikes result. |

Result: Without spikes
Result: Spikes
With the Fair Isle narrowing technique, only the shape part color Body is used from the sleeve-body connection on.
- 9
- Open the next dialog window with Continue >.
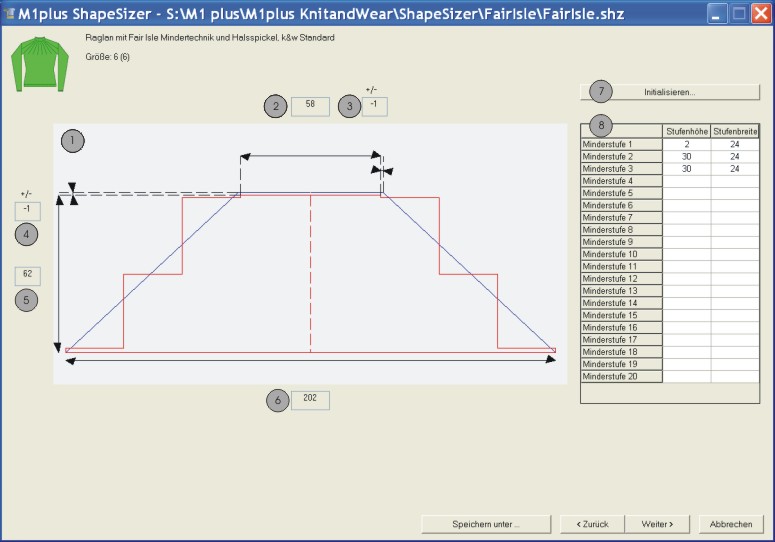
- 10
- Modify the entries in the table (8) if necessary.
- The values in the display window change.
|
|
Function |
|---|---|
|
1 |
Graphic presentation of the Fair Isle stepping calculated by the ShapeSizer. |
|
2 |
Number of needles (width) at end of Fair Isle. |
|
3 |
Display of the width changes (stitches) based on the original width. |
|
4 |
Display of the height changes (rows) based on the original height. |
|
5 |
Actual number of rows in the height. |
|
6 |
Number of needles (width) at the beginning of the Fair Isle. |
|
7 |
Reset changed table (8). |
|
8 |
Table with information on every narrowing step of the Fair Isle in height and width. |
- 11
- Open the next dialog window with Continue >.
- 12
- Open the element to be changed under :
- Front
- Back
- Sleeve
- Collar
- 13
- Carry out changes in the Shape Editor:
A multi-step narrowing narrowing type is inserted in the area of the Fair Isle.
- Narrowing type + narrowing width
- Widening type + widening width
- Fade out + fade out width
- 14
- Select the desired collar type under collar modules.
- 15
- Open the next dialog window with Continue >.
- k&w Arrangements are determined and saved as kaw file in the same directory.
- 16
- Press the
 key with the activated checkbox.
- The kaw file is laid onto the active pattern.