Create shape: Waistcoat with V-neck
I. Generate a front and back in the Shape Editor:
- 1
- Open the shape editor via /.
- 2
- Select in the k&w body front selection menu under .
- 3
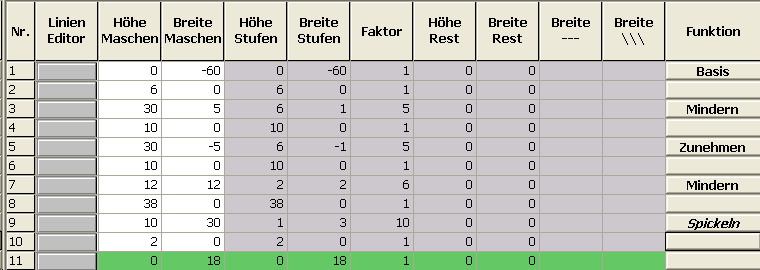
- Open the table with Left Lines and enter the values for the front and the back.
Front / Back
- 4
- Allocate the desired attributes Widening and Narrowing to the edges under .
From the sleeve-body connection up to the beginning of the shoulder, the front and the back may not have any connection laterally.
The following setting is to be made in the front and the back.
- 5
- Activate for the shape edge no. 6 and 7 (arm hole) under the in the Connections tab the checkbox k&w outer edge open e.g. tank top [FRONT/BACK].
- 6
- For the shape edge (no.8) of the shoulder, select the type Gore under .
- 7
- Specify the type of binding-off in the Bind-off tab:
- Shoulder standard - 01
- Shoulder standard - 02
- 8
- Save shape.
II. Insert Neck element in the front:
- The front shape element is open in the Shape editor
- 1
- Generate a new element in the Shape Editor with
 .
. - 2
- Select the entry Neck opening in the selection list.
- 3
- Create the table under Left Lines and enter the values for the neck opening.
V-neck opening

- 4
- Assign narrowing to the base line (No.1) under in the General tab.
- 5
- Specify the narrowing type in the Narrowing tab under .
- V-neck above
- V-neck underneath
- 6
- Specify the position of the V-neck via Distance to end line.
- 7
- Save shape.
III. Insert Opening element in the front:
So that the vest can be opened, it is not knit along the entire length in the front.
- The front shape element is open in the Shape editor
- 1
- Generate a new element in the Shape Editor with .
- 2
- Select the Opening entry in the section list.
- 3
- Create the table under Left Lines and enter the values for the opening.
The height of the opening corresponds to the total height of the front piece.
Opening element

- 4
- Save shape.