Create shape: slipover
I. Generate a front in the Shape Editor:
- 1
- Open the Shape editor via /.
- 2
- Select a k&w... entry under .
- 3
- Set to Stitches.
- 4
- Activate
 under .
 - 5
- Specify starting width.
- 6
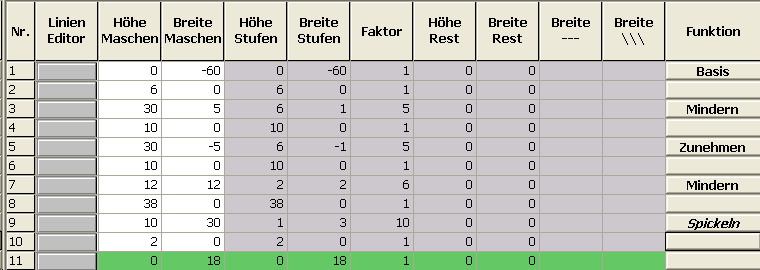
- Create the table under Left Lines and enter the values for the front.
basic shape Front / Back:
- 7
- Allocate the desired attributes to the shape edges under in the and tabs.
From the narrowing in the sleeve area up to the beginning of the shoulder, the front and back piece may not have a side connection.
- 8
- Activate k&w outer edge open e.g. tank top [FRONT/BACK] for the shape edge (no. 7 and 8) from sleeve-narrowing up to start of shoulder, under in the tab.
- The edges will not be closed (armhole).
- 9
- For the shape edge (no.9) of the shoulder, select the type Gore under .
- 10
- Specify the type of binding-off in the tab.
- Shoulder standard - 01
- Shoulder together-01
- Shoulder standard - 02
- Shoulder simultaneous-02
II. Insert the round neck element in the front:
- 1
- Open the shape editor via / .
- 2
- Call-up the shape Tank top Front via / .
- 3
- Generate a new element in the Shape Editor with the
 key.
key. - 4
- Select the entry Neck opening in the selection list.
- 5
- Generate the values for a V-neck under Left lines.
Element Neck opening: Round neck

|
Adjustments | |||
|---|---|---|---|
|
Line 1 |
General information |
Binding-off | |
|
Binding-off |
Binding-off type |
V-neck start L0/L1 | |
|
Line 2 |
Narrowing |
Fade-out width |
As desired |
|
Narrowing width |
As desired | ||
|
Type of narrowing |
| ||
- 6
- Specify the value 0 for Distance to end line.
- The element Neck opening (round neck) will be positioned in the front without distance to end line.
- 7
- Save shape.
III. Generate a back in the Shape editor:
Create the shape for the back in the same way as with the front.
- 1
- Open the tab in the end line (edge no.11) under and enter .
- 2
- Select Neck with draw thread in the selection list in the tab under Module.
- 3
- Save shape.