Create shape: Raglan with V-neck and collar
I. Generate a front and back in the Shape Editor:
The shape elements and the k&w file (shape with k&w Arrangements) must be saved in the same directory.
- 1
- Open the shape editor via /.
- 2
- Select a k&w ... entry under .
- 3
- Set to Stitches.
- 4
- Activate
 under .
 - 5
- Specify starting width.
- 6
- Insert the entry field for edge lines with the
 Add new line at end button.
 - 7
- Open the table with Left Lines and enter the values for the front and the back.
Front / Back
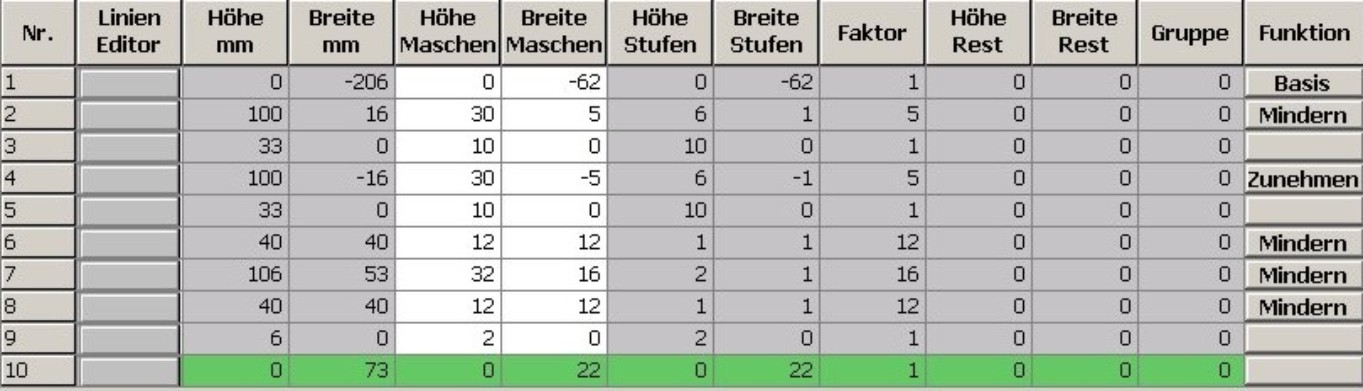
If you change outer dimensions of the front, then you must adapt the back.
- 8
- Allocate the desired attributes Widening and Narrowing to the edges under .
Generate a shape for the back with the same specifications as for the front.
- 9
- Save the shapes in the directory created beforehand with / or .
II. Insert the neck opening element in the front:
- 1
- Open the Raglan Front shape.
- 2
- Generate a new element in the Shape Editor with
 .
. - 3
- Select the entry Neck opening in the selection list.
- 4
- Set the coordinates for the Neck opening:
Neck opening in the front

- 5
- Save shape.
III. Generate the shape for the sleeve in the Shape editor:
- 1
- Open Shape Editor.
- 2
- Generate a new shape / table for the sleeve using the
 key.
key. - 3
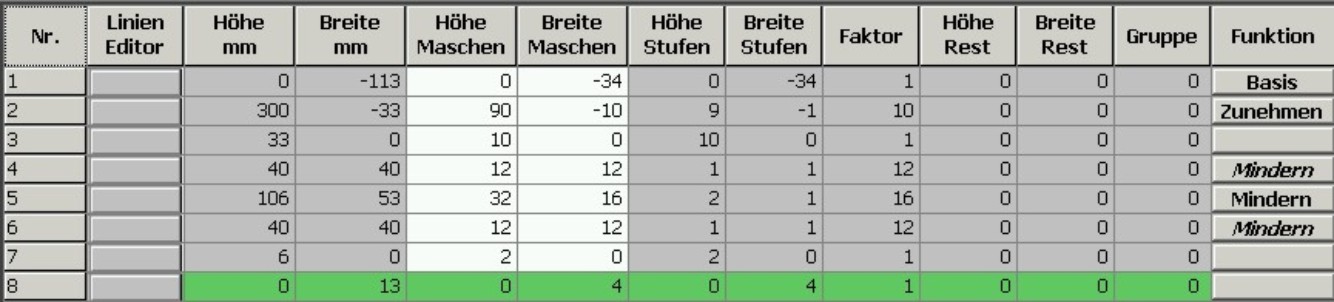
- Create table with values.
Sleeve
- 4
- Allocate the desired attributes Widening and Narrowing to the edges under .
- 5
- Save the shapes in the directory created beforehand with / or .
After the last narrowing, at least two stitches must still be knit, otherwise the last narrowing will not be performed.
IV. Generate the shape for the collar in the Shape editor:
- 1
- Open Shape Editor.
- 2
- Generate a new shape / table for the sleeve using the key.
- 3
- Create a table with values for front of collar and back of collar:
Front of Collar / Back of Collar

- 4
- Make the following settings for the end lines in the front and the back of the collar:
|
Settings for front and back collar | ||
|---|---|---|
|
Line of the edge |
tab |
tab |
|
End line |
Binding-off |
Open cut out L0 |
- 5
- Save the shapes in the directory created beforehand with / or .
The width of the collar:
- is dependent on the cycle width of the module used in the collar 1x1, 2x2 etc.
- must be matched to the end width of front and back, sleeve and V-neck.
If you change the width of the front or back, then you must adjust the front and back of the collar.
V. Insert the opening element in the front of the collar:
- 1
- Call-up the front of collar shape.
- 2
- Generate a new element in the Shape Editor with .
- 3
- Select the Opening entry in the section list.
- 4
- Specify the coordinates for the opening element:
Element for opening in front of collar

- 5
- Save the shapes in the directory created beforehand with / or .
You have to save all shape elements in the same directory.