Create shape: Raglan with neck gore
I. Vorderteil und Rückenteil im Schnitt-Editor erstellen:
- 1
- Den Schnitt-Editor über / öffnen.
- 2
- Unter einen k&w...-Eintrag auswählen.
- 3
- auf Maschen einstellen.
- 4
- Unter
 aktivieren.
 - 5
- Anfangsbreite festlegen.
- 6
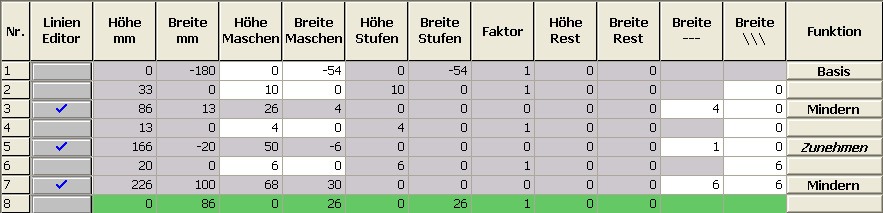
- Unter Linien links die Tabelle anlegen und die Werte für das Vorderteil / Rückenteil eingeben.
Vorderteil / Rückenteil
|
Linien Editor Linie 3 links | ||||||
|---|---|---|---|---|---|---|
|
Faktor |
Gruppe |
Höhe |
Breite |
Faktor |
Breite |
Breite |
|
|
|
26 |
4 |
|
|
|
|
1 |
0 |
6 |
1 |
4 |
4 |
0 |
|
1 |
0 |
2 |
0 |
1 |
4 |
0 |
|
Linien Editor Linie 5 links | ||||||
|---|---|---|---|---|---|---|
|
Faktor |
Gruppe |
Höhe |
Breite |
Faktor |
Breite |
Breite |
|
|
|
50 |
-6 |
|
|
|
|
1 |
0 |
8 |
-1 |
6 |
1 |
0 |
|
1 |
0 |
2 |
0 |
1 |
1 |
0 |
|
Linien Editor Linie 7 links | ||||||
|---|---|---|---|---|---|---|
|
Faktor |
Gruppe |
Höhe |
Breite |
Faktor |
Breite |
Breite |
|
|
|
68 |
30 |
|
|
|
|
1 |
0 |
4 |
2 |
15 |
6 |
0 |
|
1 |
0 |
8 |
0 |
1 |
6 |
0 |
- 7
- Unter den Linien Zunehmen und Mindern die gewünschten Attribute zuordnen.
- 8
- Container-Modul Spiegelung für das Ausblenden ab der Arm-Leib-Verbindung bis Anfang Kragen erstellen.
Struktur für das Container-Modul Spiegelung Ausblenden:

- 9
- Unter den Linien 6+7 in der Registerkarte das eigen erstellte Container-Modul Spiegelung zuordnen.
Generate a shape for the back with the same specifications as for the front.
II. Element für den Ärmel im Schnitt-Editor erstellen:
- 1
- Den Schnitt-Editor über / öffnen.
- 2
- Unter in der Auswahlliste den Eintrag k&w Ärmel auswählen.
- 3
- Werte in Tabelle eingeben.
Arm

|
Linien Editor Linie 4 links | ||||||
|---|---|---|---|---|---|---|
|
Faktor |
Gruppe |
Höhe |
Breite |
Faktor |
Breite |
Breite |
|
|
|
68 |
30 |
|
|
|
|
1 |
0 |
4 |
2 |
15 |
6 |
0 |
|
1 |
0 |
8 |
0 |
1 |
6 |
0 |
- 4
- Unter den Linien Zunehmen und Mindern die gewünschten Attribute zuordnen.
- 5
- Unter den Linien 3+4 in der Registerkarte das eigen erstellte Container-Modul Spiegelung zuordnen.
- 6
- Über / oder den Schnitt in das angelegte Verzeichnis speichern.
III. Element Kragen im Schnitt-Editor erstellen:
- 1
- Den Schnitt-Editor öffnen über / .
- 2
- Unter in der Auswahlliste den Eintrag k&w Kragen auswählen.
- 3
- Unter Linien links die Werte für den Kragen in der Tabelle eintragen:
Kragenvorderteil / Kragenrückteil

- 4
- Der Abschlusslinie unter in der Registerkarte Abketteln zuordnen.
- 5
- Der Strickart einflächig entsprechend der Kragenform Ausschnitt oder Ausschnitt schnell zuordnen.
- 6
- Über / oder den Schnitt in das zuvor angelegte Verzeichnis speichern.
Two more stitch rows has to follow the last narrowing otherwise it will not be narrowed.