Working with the stitch length table
I. Call up the stitch length table and change the entry:
- Pattern is loaded into the Basic Pattern
 state of pattern.
- 1
- Place the cursor on the control column for the front or rear stitch length
 in the Symbol View and press the right mouse button.
- or -
Open the Stitch Length context menu with next to
  or
or  in the Needle Actions - Stitch Lengths toolbar.
- The Stitch Lengths context menu with the stitch lengths in use and the favorites appears.
- 2
- Place the cursor on the changed entry and press the right mouse button.
- 3
- Click in the context menu.
- or -
Click in the stitch length context menu.
- The Stitch length table appears.
You can call up the Stitch length table via as well.
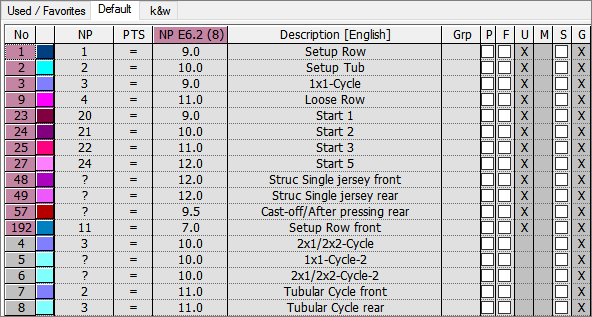
Designations in the stitch length table
|
Column | Display |
|---|---|
No. | Consecutive numbering of the entries |
Color | Color of the entry in the control columns |
NP | Display of the index for the indirect / direct stitch length allocation |
PTS | Specification for NPJ or PTS (Power Tension Setting). |
Stitch tension value for gauge E | List of stitch length values depending on the gauges of the selected machine |
Description | Comments for the entry |
Status columns | Display the status of the entry |
The status columns
|
Column | Designation | Use |
|---|---|---|
Grp | Group | Combine stitch length values to form a group |
P | Protect | Protect stitch length values |
F | Favorites | The selected entries will be displayed in the selection dialog of the control column. |
U | Used (Used) | The entries marked with an x are used in the pattern. |
M | Modified | The entries marked with an x have been changed in relation to the global pattern data. Entries newly added or set to favorites will also be marked with an X. This can be reset with the function in the context menu of the table. |
S | Sintral | A x appears here if the value has been copied from the Sintral function. |
Setup2 | The entries marked with an x will be applied to the file (.setx). Example: | |
E | Global | An x appears here when the value has been applied from the global stitch length table. |
You can configure the display of the table columns via the context menu.
Therefore click the right mouse button in the table header and select the desired columns in the dialog box.
II. Specify favorites in the stitch length table:
- 1
- Call up the Stitch length table.
- 2
- Click the desired entry in the status column .
- 3
- Close the table with
 .
.
- The selected entry will be displayed in the selection menu and can be inserted in the pattern.
In the process, the entry is automatically set to .
The status can be reset in the context menu of the Stitch length table with .
III. Add a new entry in the stitch length table:
- 1
- Call up the Stitch length table.
- 2
- Open the context menu.
- 3
- Select in the context menu.
- A new entry will be added at the end of the table.
- 4
- Define specifications in the columns of the new entry.
- 5
- Close the table with .
- The changes will be saved in the table.
The changes will be saved in the mdv file when saving the pattern.
IV. Apply entry from stitch length table in pattern:
- Pattern is loaded into the Basic Pattern state of pattern.
- 1
- Call up the Stitch length table.
- 2
- Select an entry in the table via the column number or the color.
- 3
- Click on the corresponding control column and row of the Symbol view [Basic].
- The stitch length will be entered in the control column.
Change of stitch length in a local module
You can change the stitch length of a local module.
In case of a following data transfer into the pattern, then there will be different stitch lengths in one pattern row.
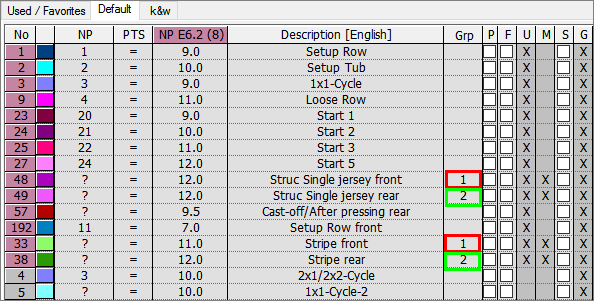
V. Combine stitch length values to form a group:
Combining different stitch length values into a group is helpful if you want to change the stitch length values on the machine jointly.
Therefore, the stitch length values of a group should have similarities, which are used in different areas of a pattern.
- The status column appears in the stitch length table.
- 1
- Allocate the same index to all stitch length values of the status column which you want to form a group.
- With it, these stitch length values will form a NPGK group and can be modified (corrected) in common.
Example:
- 2
- Complete the pattern.
- 3
- Open Setup2 Editor.
By the / menu
- or -
By the / / menu - 4
- Select Stitch Length.
- 5
- Show the NP tab.
- Two groups are created:
NPGK 1 and NPGK 2 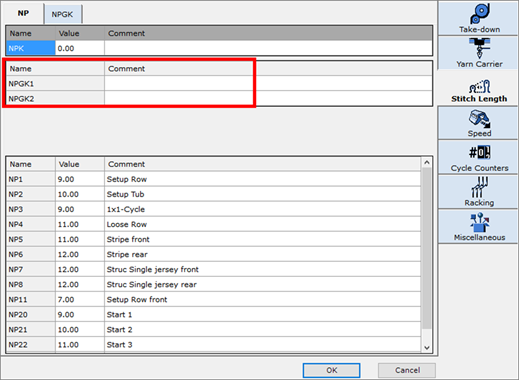
- 6
- Make a note under if necessary.
- 7
- Show the NPGK tab.
- Both groups with the corresponding NP indexes are displayed.
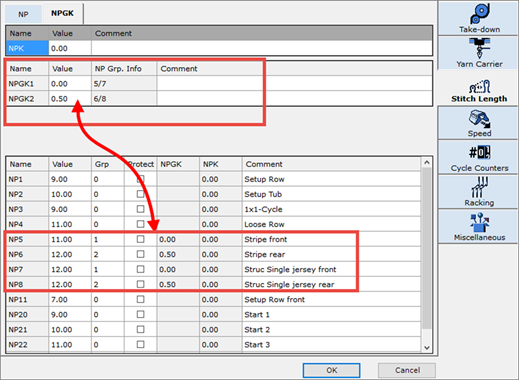
- 8
- You can enter a negative or positive value into the column of the upper area.
- 9
- Press the Apply key.
- The value entered will be applied to the column of the lower area and will be added or subtracted from the stitch length value column.
You can protect individual table entries via the column.
With it, the entries under the NPK and NPGKn groups in the upper area will not be applied to the lower area.
- 10
- Close the Setup2 Editor.