Draw structure with yarn colors
Draw the whole pattern with yarn colors only.
It is not recommended to use yarn colors and yarn carrier colors in one pattern.
I. Draw the single jersey structure with colored stripes:
- 1
- Set the in the Pattern Presentations toolbar.
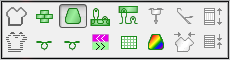
- The yarn colors drawn-in are displayed.
- 2
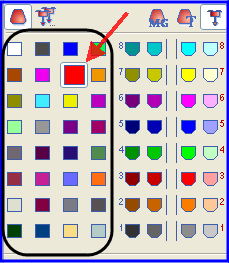
- Select the desired Yarn color in the Symbol View [Basic] via the Pattern Colors toolbar.
By default, the M1plus defines a yarn carrier for each color drawn-in.
- 3
- Enter the yarn color for the colored stripes via the control columns
 or
or  of the symbol view.
- or -
Create a row selection via the control columns and fill the selection with the drawing tool
  .
.
Recommendation:
Draw-in only an even number of rows of the color into the pattern.
II. Call up the Yarn Field Allocation dialog box.
- 1
- In the Pattern Presentations toolbar click on the
 key.
key.
- The Yarn field allocation dialog box and the Yarn field view with all the yarn fields existing in the pattern will be opened.
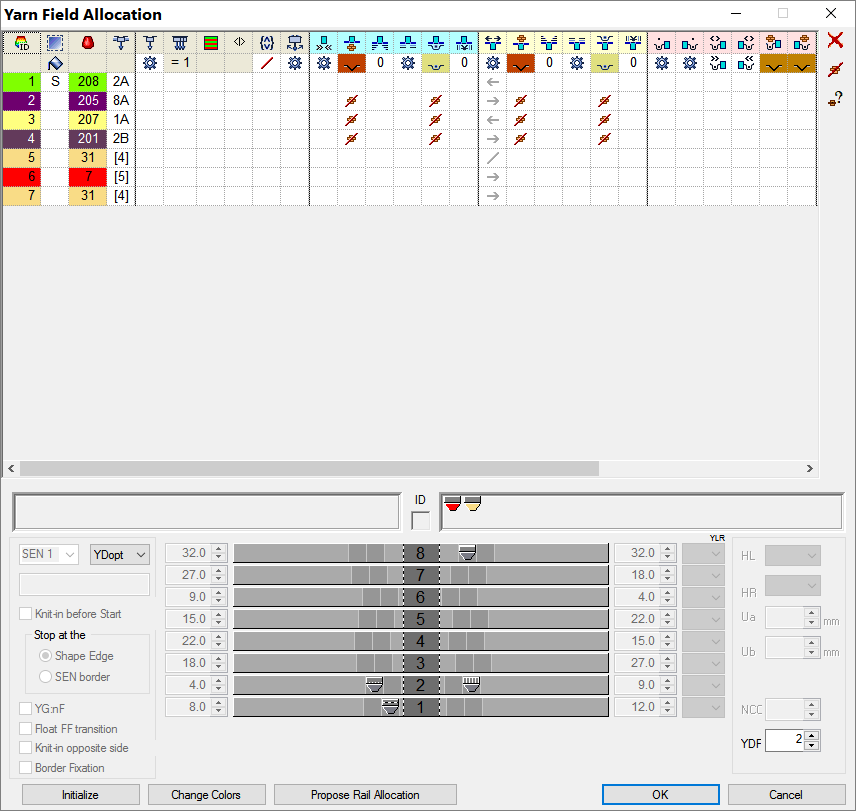
III. Default columns in the Yarn Field Allocation dialog box:
Table header:
- 1st row:
all the symbols for identification of the table columns - 2nd row:
Default settings for the respective column (settings from globalparameters.mdv)
|
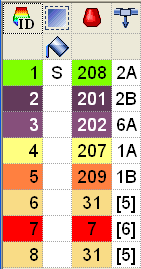
Column | Meaning | ||||
|---|---|---|---|---|---|
| Yarn Field ID | Show all yarn fields with number and color
| |||
| Select Yarn Fields | Select individual or several yarn fields Multiple selection:
| |||
* | Identification for new yarn fields which result from changing the basic pattern. | ||||
/ | Separator character | ||||
S | Identification for yarn fields which are not yet visible | ||||
| Filling a selection with the selected value | ||||
| Yarn Color | List of the yarn or yarn carrier colors with the corresponding color number which are in use in the pattern
| |||
| Yarn carrier number | Designation of the yarn carrier or allocated yarn carrier number (ID) | |||
Designation of the yarn carrier | 1A, 2A,.. | The yarn carriers are allocated to a rail | |||
Undefined | [n] | The yarn carriers are not allocated to any rail. n = Display of the yarn carrier number (ID) | |||

 : Lost & Found yarn fields

 : Plating colors are displayed with background and foreground colors.
All further columns can be displayed or hidden.
IV. Use of more than one yarn carrier per yarn field:
|
Column | Meaning | Function |
|---|---|---|
| Multi-system Knitting | Define the number of yarn carriers per yarn field |
- 1
- Select the yarn carrier.
- or -
select the desired yarn field in the column of the table.
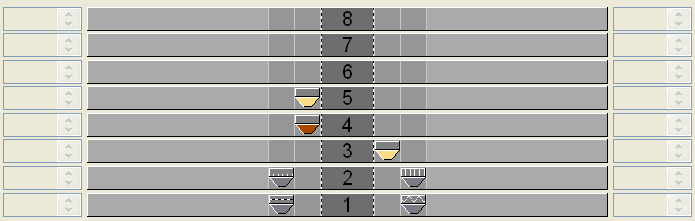
- The selected row will be shown on a light blue background (= selection).
In the yarn field view you can identify a selected yarn field by a circulatory frame and the double hatch lines.
All simply hatched yarn fields are allocated to the same yarn carrier number.
- 2
- Place the cursor in the selected row of the
 column and call up the context menu.
 - 3
- Select the desired number of yarn carriers in the pick list.
Example: Set the number .
. - 4
- Click with the cursor on the menu item Value and then on the desired cell.
- The selected number is inserted in the cell and a new yarn carrier field is created for the second yarn carrier.
- 5
- Confirm the Yarn Field Allocation dialog box with OK.
- The settings are applied.
V. Change the yarn carrier allocation:
Possibilities:
- Allocate a yarn carrier to an existing yarn carrier number
- Generate a new yarn carrier number (ID)
Example: Allocate a yarn carrier from the pattern to a rib yarn carrier.
|
Column | Meaning | Function |
|---|---|---|
| Yarn carrier number | Change a yarn carrier number of a yarn field or generate a new one. |
Position the cursor on a yarn carrier symbol and the yarn carrier number (ID) will be displayed in the ID display field.
- 1
- Select the yarn carrier.
- The row is shown on a light blue background
- 2
- Position the cursor in the
 column and call up the context menu with the right mouse button.
- A pick list with all the existing yarn carrier numbers (ID) is displayed.
Selection | Meaning |
|---|---|
[n] |
|
[n] Designation of the yarn carrier |
|
New | Generate a new yarn carrier number (ID) |
- 3
- Select the desired rib yarn carrier (2B or 6A).
- 4
- Confirm the Yarn Field Allocation dialog box with OK.
- The settings are applied.
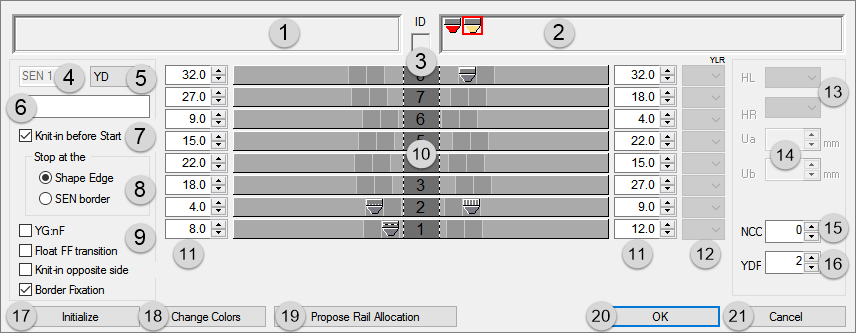
VI. The yarn carrier allocation in the Yarn Field Allocation dialog box:
|
No. | Meaning | ||||
|---|---|---|---|---|---|
1 |
| Display of the needed but undefined yarn carriers on the left fabric selvedge | |||
2 |
| Display of the needed but undefined yarn carriers on the right fabric selvedge | |||
3 | ID | Display of the yarn carrier number ID with the cursor positioned on the yarn carrier symbol | |||
4 | SEN | Yarn carrier home position in the SEN areas | |||
5 | YD | Display of the different yarn carrier staggerings
| |||
6 | Comment | Allocate a comment (label) to a selected yarn carrier | |||
7 | Knit-in before the Start |
| Yarn carriers will not be knitted-in before the draw thread | ||
| Yarn carriers will be knitted-in before the draw thread | ||||
8 | Stop at | Only possible with | |||
| Shape Edge | Yarn carriers will be knitted-in before the draw thread and positioned at the (#L / #R) shape edge. | |||
| SEN edge | Yarn carriers will be knitted-in before the draw thread and positioned at the SEN edge. | |||
9 | YG:nF |
| The yarn carrier will not be positioned at the counters #L and #R. | ||
| The yarn carrier will be positioned at the counters #L and #R and follows the shape. | ||||
Float FF transition |
| At the end a yarn carrier is moved to the home position according to the setting in the Yarn Field Allocation. | |||
| At the end a yarn carrier is moved to its home position without knitting.
| ||||
Knit-in opposite side |
| A yarn carrier remains on the corresponding side based on its home position. | |||
| A yarn carrier is knitted before the start to the opposite side of its home position.
| ||||
Border Fixation |
| Default setting: The border fixation is active for all yarn carriers in the pattern
| |||
| Border fixation disabled for selected yarn carrier. | ||||
10 | Graphic presentation of the yarn carrier rails | Rail allocation of yarn carriers of the left and right fabric selvedge (YG) | |||
11 |
| Tables for the definition of the yarn carrier distances at the left / right fabric selvedge
| |||
12 | YLR | Interchange of the yarn carriers of the left and right carriage (tandem) | |||
13 | Parking position of the yarn carriers | HL | Specification for the left home position | The displayed value range is dependent on the available home positions for this yarn carrier. | |
HR | Specification for the right home position | ||||
14 | Engaging Value | Ua | Engaging value from the center of the yarn carrier sliding block up to the stop point of the yarn carrier plunger on the left side | Enter values for the variable engaging width of the Plating yarn carrier type U+/-. Minimum value 11.5 mm
| |
Ub | Engaging value from the center of the yarn carrier sliding block up to the stop point of the yarn carrier plunger on the right-hand side |
| |||
15 | NCC | Enter the clamping depth of the clamping / cutting needle for the selected yarn carrier | |||
16 | YDF | Additional yarn carrier distance for fully fashion knitting | |||
17 | Initialize | Restore default setting
| |||
18 | Change Colors | Yarn colors of yarn carriers, which have been positioned on bars will be replaced by yarn carrier colors and displayed in the yarn field view | |||
19 | Propose Rail Allocation | Open the dialog box for the calculation of the yarn carrier allocation
| |||
20 | OK | Close the dialog box with saving | |||
21 | Cancel | Close dialog box without saving. | |||


- 1
- Let the Technical Processing allocate automatically the yarn carriers to the yarn carrier rails and define the yarn carrier type.
- or -
Allocate manually the yarn carriers to the yarn carrier rails.
VII. Use of automatic yarn carrier staggering YDopt:
YDopt only possible on OKC machines from V 2.5 on.
The technical processing determines optimized stopping positions at the fabric selvedge. Frequently used yarn carriers are positioned as close as possible to the fabric selvedge less used somewhat distant.
- 1
- Via the / open the Configuration dialog box.
- 2
- Make settings in the tab under .
YD Yarn Carrier Distance from the Fabric Selvedge | |||
|---|---|---|---|
Optimize YD per row (YDopt) | |||
| No automatic yarn carrier staggering | ||
| Automatic yarn carrier staggering activated | ||
Input field | 1/16" distance of first yarn carrier | Adjust the distance between parked yarn carriers and the fabric selvedge. Range 0-20 1/16 inch (NIC) Default setting: 4 | |
1/16" distance of staggering | Adjust the distance between the stopped yarn carriers. Value range 1-20 1/16 inch (NIC) Default setting: 6 | ||
- 3
- Confirm setting with OK.
- The setting is displayed in the Yarn Field Allocation dialog box.