Cómo instalar la nueva licencia a la Smart Card

- Correo electrónico con código de crédito

- STOLL KM.ON Smart Card en el ordenador
- 1
- Iniciar CREATE PLUS CREATE DESIGN CREATE LITE.
- 2
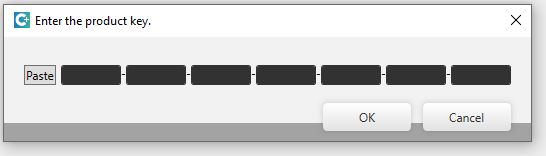
- Si su STOLL KM.ON Smart Card no tiene una licencia o tiene una licencia inválida, aparece esta ventana de entrada.
- o -
Abrir la ventana de entrada deliberadamente.
Cinta de opciones Archivo / Soporte / botón Entrar clave del producto - 3
- Comparar el Nº de serie de la Smart Card en la ventana de entrada y del correo electrónico.
- 4
- Copiar el código de crédito al portapapeles.
- 5
- Hacer clic en el botón Paste anterior a los cuadros de edición.
- 6
- Hacer clic en el botón Aceptar.
- La carga exitosa de la tarjeta le es confirmada.
En caso de que los créditos todavía no hayan expirado o para funciones adicionales:
- 7
- Iniciar CREATE.
- 8
- Abrir la ventana de entrada deliberadamente.
Cinta de opciones Archivo / Soporte / botón Entrar clave del producto - 9
- Comparar el número de serie de la Smart Card en la ventana Soporte y del correo electrónico.
- 10
- Copiar el código de crédito al portapapeles.
- 11
- Hacer clic en el botón Paste anterior a los cuadros de edición.
- 12
- Hacer clic en el botón Aceptar.
- La carga exitosa de la tarjeta le es confirmada.

- E-mail with credit code
- The knitelligence Smart Card is connected to the current M1plus workstation.
- No other Smart Card is connected to the current M1plus workstation.
- 1
- Compare the serial number of the Smart Card with the one in the e-mail.

- 2
- Start the .

- 3
- Change to the disk drive of the M1plus installation.
- 4
- Enter the file path to the M1.exe application file.
Example: "C:\Program Files (x86)\Stoll\M1plus\6.10.021\bin\m1.exe" - 5
- Add –EVP to the input.
"C:\Program Files (x86)\Stoll\M1plus\6.10.021\bin\m1.exe" -EVP - 6
- Copy the Charge Code to the clipboard.
- 7
- Add the Charge Code from the clipboard to the input.
- 8
- Confirm the entry with the Enter key.
- The successful loading of the card is confirmed to you after a short time.

- 9
- Exit the Command Prompt.
If the credit is already expired:
- E-mail with credit code
- STOLL KM.ON Smart Card at the computer
- No other Smart Card is connected to the current M1plus workstation.
- 1
- Start the M1plus .
-
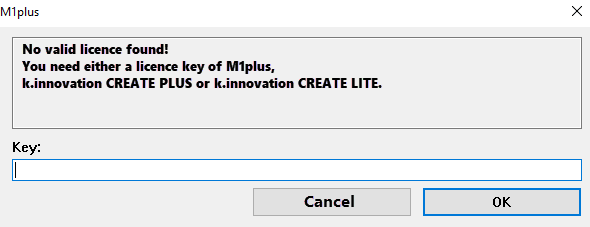
- 2
- Copy the Charge Code to the clipboard.
- 3
- Paste Charge Code from the clipboard into the edit box.
- 4
- Confirm input with OK.
- The successful loading of the card is confirmed to you after a short time.
If the credit is not yet expired or for additional features.
- E-mail with credit code
- STOLL KM.ON Smart Card at the computer
- No other Smart Card is connected to the current M1plus workstation.
- 1
- Start the .
- 2
- Change to the disk drive of the M1plus installation.
- 3
- Enter the file path to the M1.exe application file.
Example: "C:\Program Files (x86)\Stoll\M1plus\6.10.021\bin\m1.exe" - 4
- Add –EVP to the input.
"C:\Program Files (x86)\Stoll\M1plus\6.10.021\bin\m1.exe" -EVP - 5
- Copy the Charge Code to the clipboard.
- 6
- Add the Charge Code from the clipboard to the input.
- 7
- Confirm the entry with the Enter key.
- The successful loading of the card is confirmed to you after a short time.
- 8
- Exit the Command Prompt.
En caso de que los créditos todavía no hayan expirado o para funciones adicionales:
- 1
- Iniciar CREATE.
- 2
- Abrir la ventana de entrada deliberadamente.
Cinta de opciones Archivo / Soporte / botón Entrar clave del producto - 3
- Comparar el número de serie de la Smart Card en la ventana Soporte y del correo electrónico.
- 4
- Copiar el código de crédito al portapapeles.
- 5
- Hacer clic en el botón Paste anterior a los cuadros de edición.
- 6
- Hacer clic en el botón Aceptar.
- La carga exitosa de la tarjeta le es confirmada.