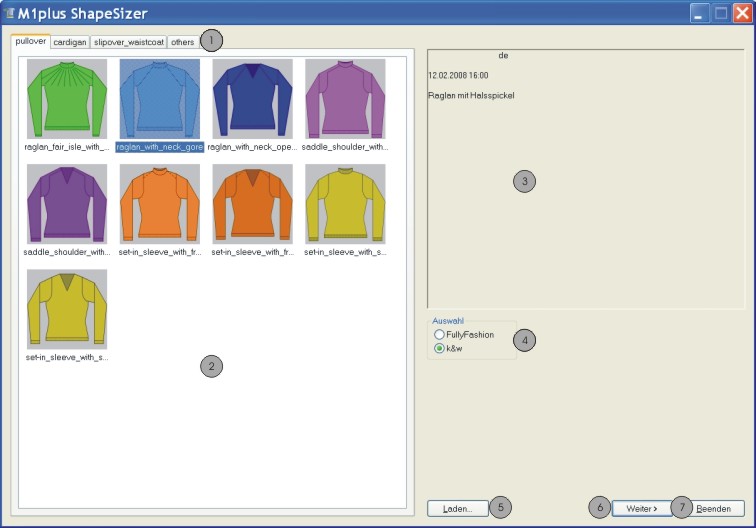
Create the shape in the ShapeSizer and open it in the pattern
- 1
- Open the ShapeSizer program via the / menu.
|
No. |
Function |
|---|---|
|
1 |
Tabs of the different directories |
|
2 |
Overview of the different Stoll default shapes of the selected directory |
|
3 |
Display field |
|
4 |
Select directory for: |
|
5 |
Load the saved ShapeSizer file (*.shz) |
|
6 |
Continue to the next page of the ShapeSizer |
|
7 |
Close the ShapeSizer |


- 2
- Open the desired shape in the overview with double click.
- or -
Select shape and press Continue >.
- The next window of the ShapeSizer appears.
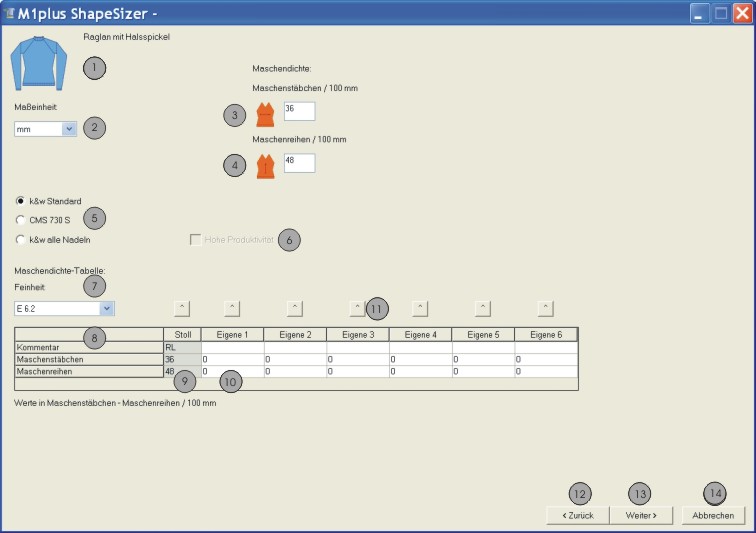
The default attributes are saved with the (FRONT / BACK / SLEEVE / COLLAR) shape elements in the files .
- 3
- Set the measure unit and the stitch density.
- The measure unit (2) and the stitch density (3) + (4) will be used for further processing.
|
No. |
Function | |
|---|---|---|
|
1 |
Graphic presentation of the selected shape | |
|
2 |
Select the measure unit.
| |
|
3 |
Stitch density |
Number of stitches in the width (stitch rods) |
|
4 |
Number of stitches in the height (stitch rows) | |
|
5 |
| |
|
| ||
|
| ||
|
6 |
k&w Arrangements without empty rows are used Result: higher production | |
|
7 |
Selection list for the machine gauge | |
|
8 |
Gauge-dependent stitch density table | |
|
9 |
Stoll default stitch ratio for the back-layer knitting mode | |
|
10 |
Input fields Own 1-6: | |
|
11 |
Transfer of the stitch ratio from the column to the input fields for the stitch density (3) + (4) | |
|
12 |
Back to the previous page of the ShapeSizer | |
|
13 |
Continue to the next page of the ShapeSizer | |
|
14 |
Cancel the editing in the ShapeSizer | |
- 4
- Open the next dialog window with Continue >.
|
No. |
Function | |
|---|---|---|
|
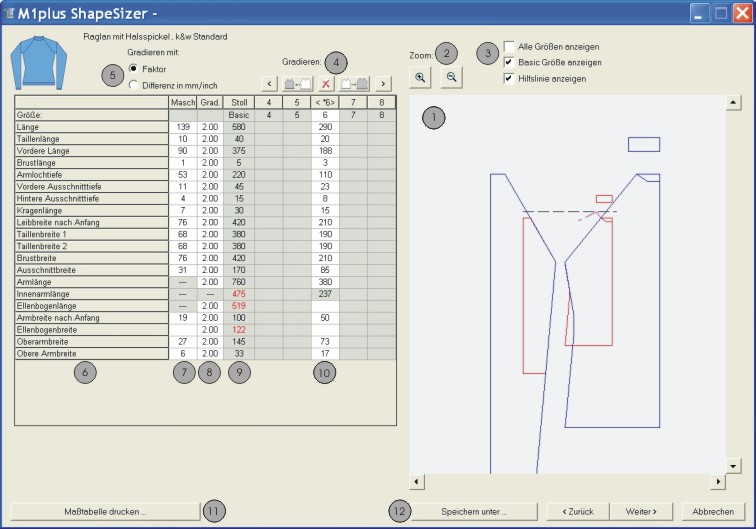
1 |
Graphic presentation of the shape | |
|
2 |
Decrease or increase the graphic display | |
|
3 |
Options of the graphic display | |
|
4 |
Calculating sizes according to the grading factor | |
|
|
Call up the previous column of the measure table. | |
|
|
Calculation of the next smaler size | |
|
|
Delete the values in the selected column. | |
|
|
Call up the next column of the measure table. | |
|
|
Calculation of the next larger size | |
|
5 |
Grading of the sizes with a factor or a difference | |
|
6 |
List of edge lines | |
|
7 |
Measures in stitches referring to the selected size. | |
|
8 |
Factor or difference in mm/inch for the grading | |
|
9 |
Dimensions of the basic size: | |
|
10 |
Dimensions of the basic size in the < * 6 > column: | |
|
11 |
Display and print measure table. | |
|
12 |
Save all the ShapeSizer data in one file (*.shz). | |


If the other sizes are generated based on the basic size < * 6 >, then the attributes are applied.
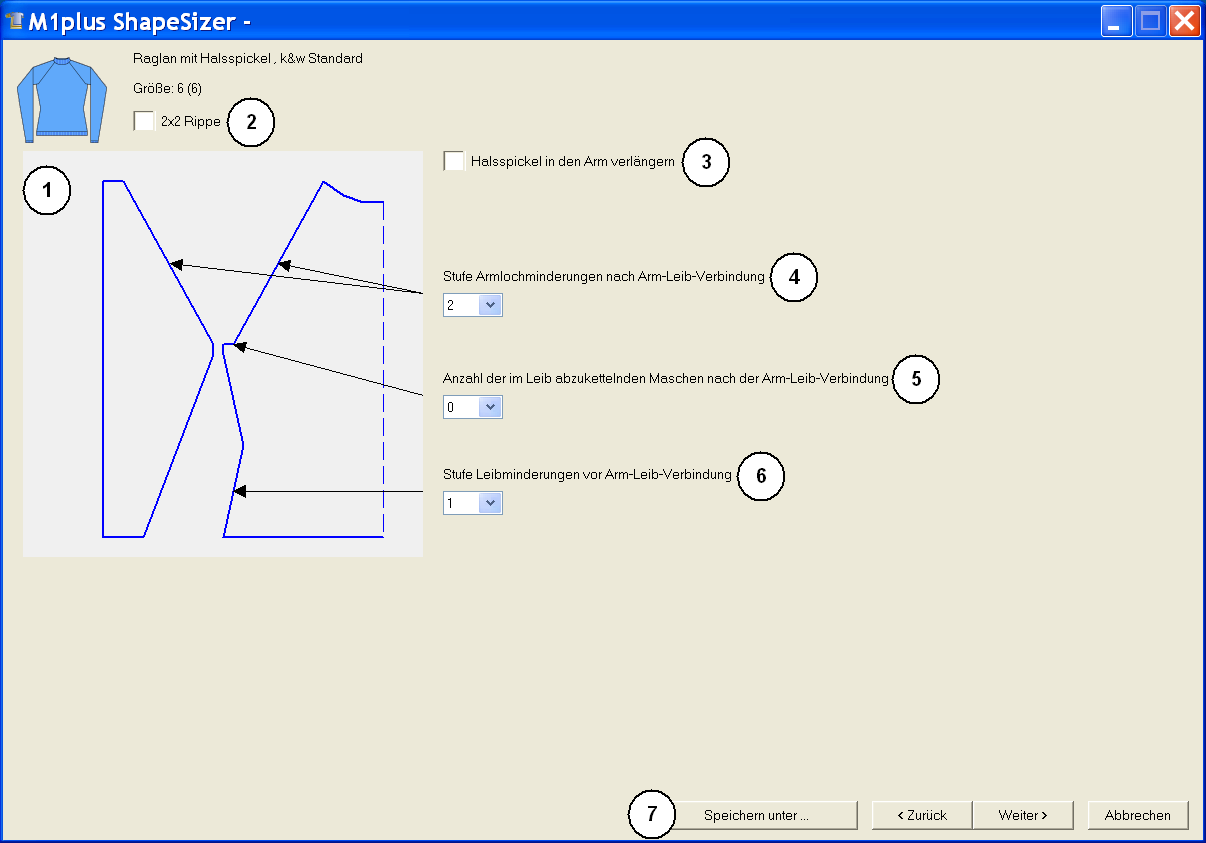
- 5
- Open the next dialog window with Continue >.
|
No. |
Function |
|---|---|
|
1 |
Graphic presentation of shape edges |
|
2 |
Shape specifications for 2x2 rib as basic pattern |
|
3 |
Definition of the step width for the narrowings after the sleeve-body connection |
|
4 |
Number of stitches in the sleeve hole to be bound-off in the body. |
|
5 |
Definition of the step width of the narrowings before the sleeve-body connection |
|
6 |
Save size table as *.shz file |
- 6
- Open the next dialog window with Continue >.
- If the size table is not yet saved as *.shz file, the Save as dialog box appears.
When saving, ensure the proper path!
- 7
- Save the size table.
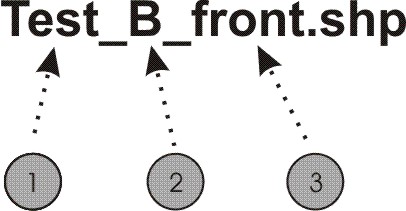
- The selected size will be saved as shp file in the directory and the data is displayed in the next dialog window.
Designation of the automatically generated files:
|
No. |
Meaning |
|---|---|
|
1 |
Name of shape |
|
2 |
B = Basic shape (corresponds to basic size <*6>) |
|
3 |
Type of shape element: |
|
No. |
Function |
|---|---|
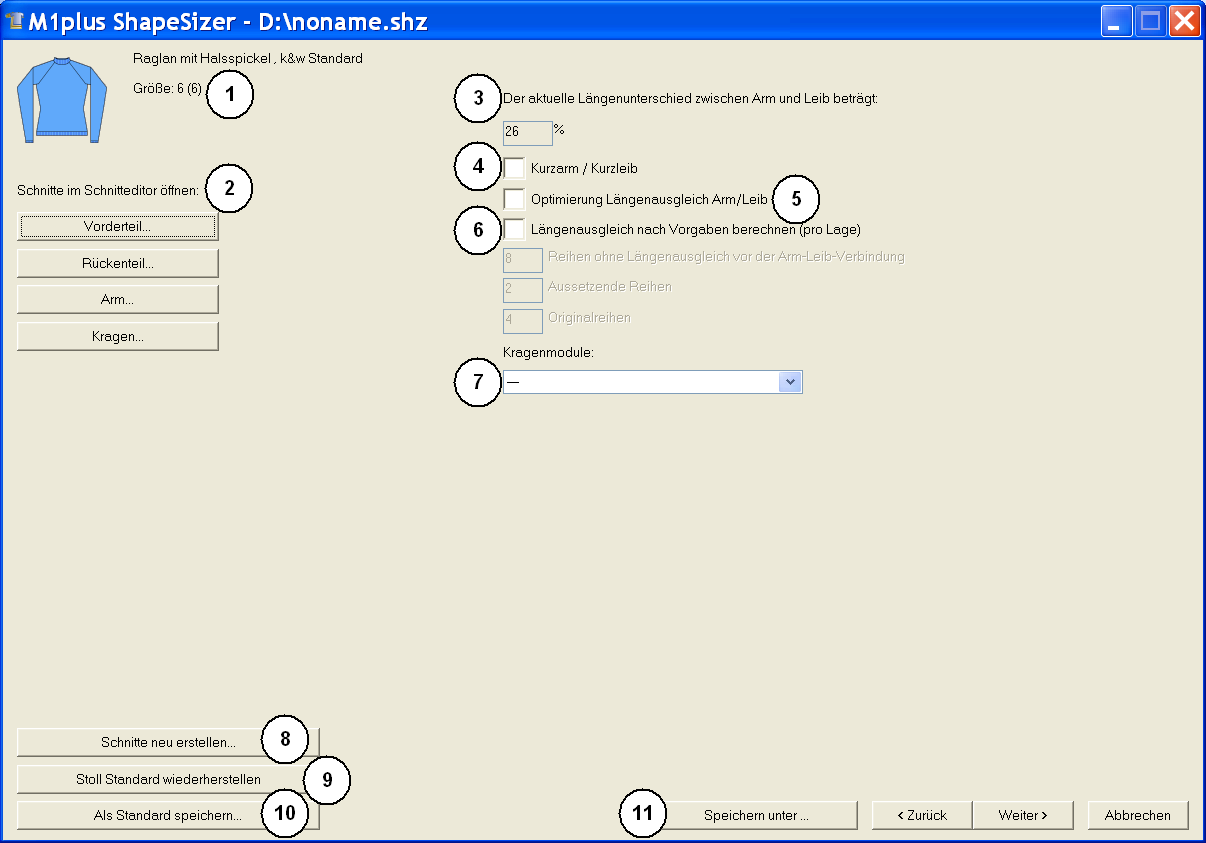
|
1 |
Graphic presentation of the selected shape with size specification |
|
2 |
Open shape elements of the selected size in the shape editor. |
|
3 |
Percentage of length difference between body and sleeve. |
|
4 |
Selection short sleeve/short body |
|
5 |
Optimize the running time alternating the knitting of the sleeve and the body. |
|
6 |
Selection of the knitting mode for the collar element. |
|
7 |
The shape files changed in the shape editor (*.shp) will be deleted and new shape files (*.shp) will be generated based on the data from the shz file. |
|
8 |
Own defaults (defaultuser files) are deleted from the directory and the defaultform files are used. |
|
9 |
Save attribute changes as own default . |
|
10 |
Save size table as *.shz file |
- 8
- Open the next dialog window with Continue >.
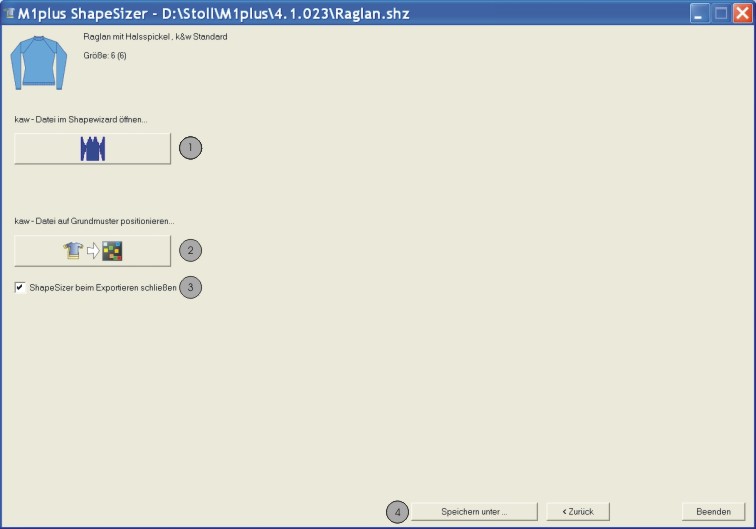
- k&w Arrangements are determined and saved as kaw file in the same directory.
|
No. |
Function | |
|---|---|---|
|
1 |
Open the kaw file in the ShapeWizard. | |
|
2 |
Lay the kaw file onto the M1plus basic pattern already generated. | |
|
3 |
|
The ShapeSizer is closed after positioning the kaw file on the basic pattern |
|
|
The ShapeSizer is not closed after positioning the kaw file on the basic pattern | |
|
4 |
Save size table as *.shz file | |
 : If no basic pattern is generated yet, then the

The size selected in the table will be saved under the same name in the same directory of the files (*shz).
- 9
- Press the
 key with the activated checkbox (3).
- The kaw file is laid onto the active pattern.
When opening and positioning a kaw file, the k&w Arrangements are displayed as local k&w Arrangements in the Modules dialog box under  .
.