Create shape: Raglan with neck gore
I. Generate a front and back in the Shape Editor:
- 1
- Open the shape editor via /.
- 2
- Select a k&w... entry under .
- 3
- Set to Stitches.
- 4
- Activate
 under .
 - 5
- Specify starting width.
- 6
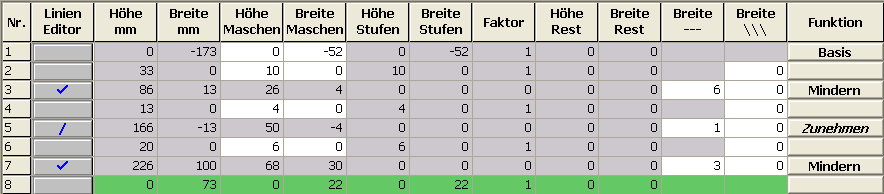
- Open the table with Left Lines and enter the values for the front and the back.
Front / Back
|
Line Editor Line 3 left | ||||||
|---|---|---|---|---|---|---|
|
Factor |
Group |
Height |
Width |
Factor |
Width |
Width |
|
|
|
26 |
4 |
|
|
|
|
1 |
0 |
6 |
1 |
4 |
6 |
0 |
|
1 |
0 |
2 |
0 |
1 |
6 |
0 |
|
Line Editor Line 7 left | ||||||
|---|---|---|---|---|---|---|
|
Factor |
Group |
Height |
Width |
Factor |
Width |
Width |
|
|
|
68 |
30 |
|
|
|
|
1 |
0 |
4 |
2 |
15 |
3 |
0 |
|
1 |
0 |
8 |
0 |
1 |
3 |
0 |
- 7
- Allocate the desired attributes Widening and Narrowing to the lines under .
Generate a shape for the back with the same specifications as for the front.
II. Insert the neck gore element in the front:
- 1
- Open the Raglan Front shape.
- 2
- Generate a new element in the Shape Editor with the
 button.
 - 3
- Select the Gore entry in the section list.
- 4
- Create the table under Left Lines and enter the values for the element.
Neck gore in the front

|
Line Editor Line 2 left | ||||||
|---|---|---|---|---|---|---|
|
Factor |
Group |
Height |
Width |
Factor |
Width |
Width |
|
|
|
14 |
-16 |
|
|
|
|
1 |
0 |
2 |
-4 |
1 |
|
0 |
|
1 |
0 |
2 |
-3 |
2 |
|
0 |
|
1 |
0 |
2 |
-2 |
3 |
|
0 |
|
1 |
0 |
2 |
0 |
1 |
|
0 |
- 5
- Define the distance to the or to the .
Example: 2 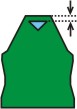
- 6
- Save the shape in the directory created beforehand with / or .
Do not connect the gore element to the end line.
III. Generate the element for the sleeve in the Shape Editor:
- 1
- Open the shape editor via /.
- 2
- Select the k&w Sleeve entry in the selection menu under .
- 3
- Enter the values in the table.
Sleeve

|
Line Editor Line 4 left | ||||||
|---|---|---|---|---|---|---|
|
Factor |
Group |
Height |
Width |
Factor |
Width |
Width |
|
|
|
68 |
30 |
|
|
|
|
1 |
0 |
4 |
2 |
15 |
6 |
0 |
|
1 |
0 |
8 |
0 |
1 |
6 |
0 |
- 4
- Allocate the desired attributes Widening and Narrowing to the lines under .
- 5
- Save the shape in the directory created beforehand with / or .
Two more stitch rows has to follow the last narrowing otherwise it will not be narrowed.
IV. Generate the element for the collar in the Shape Editor:
- 1
- Open the shape editor via / .
- 2
- Select the k&w collar entry in the selection menu under .
- 3
- Enter the values for the collar in the table under Left lines:
Front of Collar / Back of Collar

- 4
- Allocate bind-off to the end line under in the tab.
- 5
- Allocate the single-jersey knitting mode in accordance with the collar shape cut-out or fast cut-out.
- 6
- Save the shape in the directory created beforehand with / or .
You have to save all shape elements in the same directory.