Position and cut-out the shape and expand the pattern
I. Position the shape:
- The shape with k&w Arrangements is located on the pattern after Open k&w shapes.
- 1
- Position the Sleeve and / or Body shape elements on the motif with the
 symbol selected and the left mouse button pressed.
- The 2x2 cable stitch with ribs structure runs in the center of the front.
- 2
- Select the desired k&w presentation.
II. Allocate the fading out modules to the edges of the front:
- 1
- Open the Shape editor, load the front and deactivate .
- or -
Open the shape view with and call-up the Shape Attributes dialog box.
 - 2
- Allocate the fade-out modules to the shape edges of the V-neck and the sleeve opening edges with Drag & Drop.
- 3
- Adapt fade-out width and narrowing width.
(Value settings correspond to stitches).
No fading out might be present in the area of the remaining narrowing.
- 4
- Delete manually the fading out in the areas of the remaining narrowing in the Shape view.
III. Move the fade-out modules at the shape edges:
The positioning of the fade-out modules can only be influenced in the Shape view using the Offset value.
- 1
- Call up the shape view with the button.
- 2
- Select the desired shape edge with F6.
- 3
- Open the Shape Attributes dialog box.
- 4
- Select the tab.
- 5
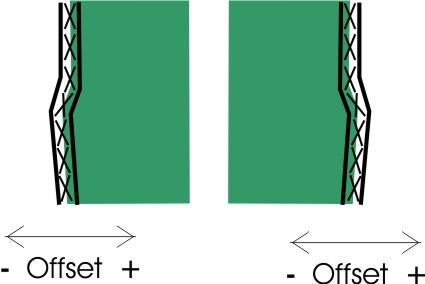
- Enter the + / - value with offset
 .
. - The fade-out module will be moved by the specified number of stitches to the right or left.
Example:
Fade-out module width: 12 stitches
Narrowing width: 6 stitches
Offset value: -6 / 6
Specifications with offset
|
Without offset |
With offset | |
|---|---|---|
|
|
Left edge / Right edge | |
|
The edge of the module is placed at the fabric edge so that the module is always completely positioned within the shape. |
Negative value: |
Positive value: |

- 6
- Click on the Apply in shape view button.
- The changed attributes are applied to the shape view.
Save the changes as shk file so that the changes do not get lost when removing the shape.
- 7
- Close the Shape attributes dialog box and the Shape view.
- 8
- Save the changes via the / menu.
- A shk file is generated.
IV. Cut-out the shape:
You can make pattern related settings in the Configuration k&w dialog box before cutting out.
- 1
- Cut out the shape with
 in the Steps of Processing toolbar.
- The k&w Options for Cut out dialog box appears.
- 2
- Confirm with OK.
- The Replace modules cut into dialog box is opened.
- 3
- Select the desired knitting mode for the front layer and the back layer.
- 4
- Confirm the specifications in the dialog box with Replace or Do not replace.
- The Insert/Replace k&w Start dialog box appears.
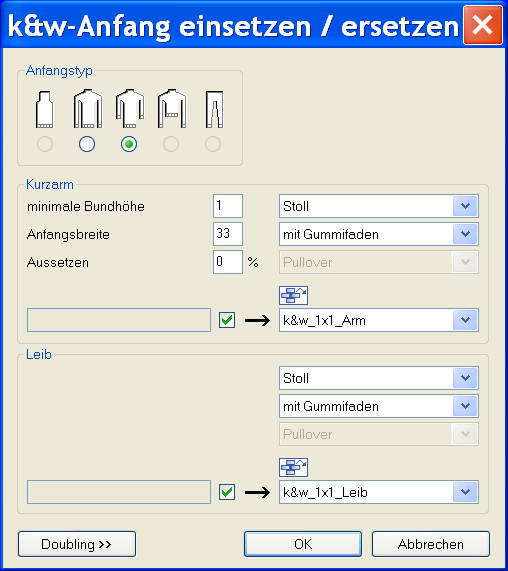
- 5
- Make the setting for Short sleeve:
- 6
- Select the desired start for body and sleeve.
- 7
- Confirm with OK.
- The selected starts are inserted.
V. Expand the pattern:
- 1
- Expand the pattern with
 of the Steps of Processing toolbar.
 - The Correction of Widening dialog box appears.
- 2
- Confirm with Yes.
- The shape edges with the Widening attribute are corrected.
The bind-off modules for binding-off the shoulder and the neck are inserted.