Pattern and Color Arrangement with the # symbol
 Symbol
You can influence the bindings at the shape edge (outside shape) by the symbol in the Color Arrangement.
I. Generate New Pattern, draw in areas and create shr shape:
- 1
- Create a new pattern with setting.
- 2
- Draw two areas with different yarn colors into the pattern.
- 3
- Select the dialog box in the menu.
- 4
- Draw the shape by the
 Outside Shape symbol in the pattern area.
 - 5
- Allocate the shape attributes by the / menu.
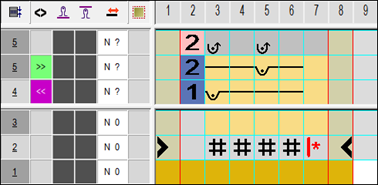
II. Generate Color Arrangement CA#1 for the border processing with the symbol:
- Two color areas are drawn in the pattern.
- A shape is open in the pattern.
- 1
- Select the corresponding pattern rows of the first color area via the row selection bar.
- 2
- Click the
 icon in the toolbar.
- The color sequence present in the selection will be displayed in the Color Arrangement Editor.
- 3
- Add the desired quantity of columns in the CA at the search color which is used at the shape edge.
- 4
- Draw-in the desired binding with Stitch Structures and yarn color into the columns for the Border Processing.
In the columns with the symbol you always have to enter color and needle action or no entry.
The width of the widening is defined in the CA by the number of columns marked with the symbol.
- 5
- Insert the icon below the search color in the columns for the Border Processing.
- The columns marked with the icon will be inserted in the defined width at the shape edge once.
Example CA#1: Binding by symbol
Meaning of the symbols:
| Function | Meaning |
|---|---|---|
| Excess Width also at the Shape Edge | Excess width (widening) of the color field directly at the shape edge by the number of columns marked with the Effect:
|
| Excess width also at the shape edge, alignment at the left pattern edge | Excess width of the color field directly at the shape edge by the number of columns marked with the Effect: |
| Excess width also at the shape edge, alignment at the right pattern edge | Excess width of the color field directly at the shape edge by the number of columns marked with the Effect: |
 : The # symbol deactivates the
- 6
- Close the Color Arrangement Editor with
 .
. - 7
- Confirm the query with Yes.
- The Color Arrangement will be automatically entered in the control column of the selected pattern area and saved as Local CA in the Module Bar.
- 8
- Expand the selected rows.
- The preview window will be opened.
Result:
The quantity of columns marked with the icon will be added next to the shape edge (Outside Shape). The border processing follows the changes of the shape, meaning the structure at the border is constant.
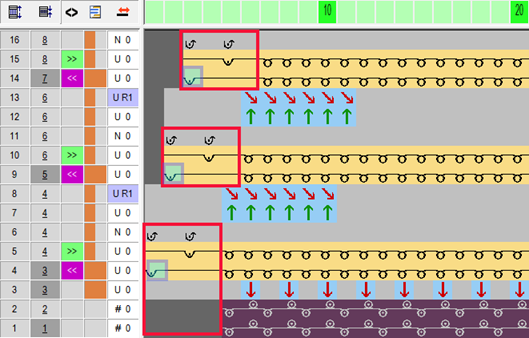
- 9
- Close the preview with .
- 10
- Delete selection.
- 11
- Continue editing the pattern.
The data not influenced by the Color Arrangement will be entered during expanding.
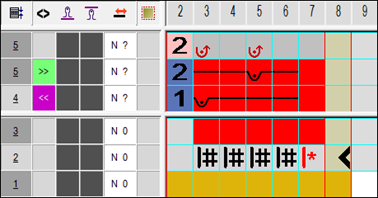
II. Generate Color Arrangement CA#2 for the border processing with the  symbol:
- Two color areas are drawn in the pattern.
- A shape is open in the pattern.
- 1
- Select the corresponding pattern rows of the second color area via the row selection bar.
- 2
- Click the icon in the toolbar.
- The color sequence present in the selection will be displayed in the Color Arrangement Editor.
- 1
- Add the desired quantity of columns in the CA at the search color which is used at the shape edge.
- 2
- Draw-in the desired binding with Stitch Structures and yarn color into the columns for the Border Processing.
- 3
- Insert the icon below the search color in the columns for the Border Processing.
- The columns marked with the icon will be inserted in the defined width at the shape edge once.
Example CA#2: Binding by symbol
- 1
- Close the Color Arrangement Editor with .
- 2
- Confirm the query with Yes.
- The Color Arrangement will be automatically entered in the control column of the selected pattern area and saved as Local CA in the Module Bar.
- 1
- Expand the selected rows.
- The preview window will be opened.
Result:
The quantity of columns marked with the icon will be added next to the shape edge (Outside Shape), but be placed starting from the left pattern border. The border processing does not follow the changes of the shape, meaning the structure at the border is not constant.
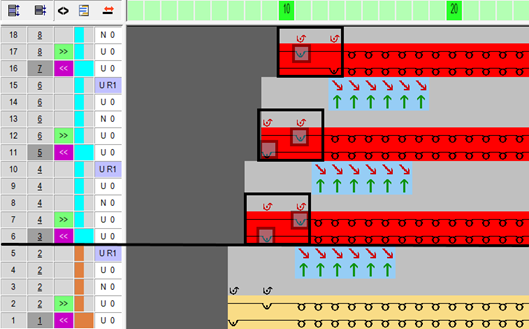
- 1
- Close the preview with .
- 2
- Delete selection.
- 3
- Continue editing the pattern.