Working with modules: Module with limit conditions and limit module
Exercise example:
Generation of a module for multi gauge front stitch with transfer to the right (VR1)
The stitch will be transferred to the left (VL1) with all Stoll multi gauge modules.
Characteristics of a limit module:
- Label of limit modules

- Limit modules contain a situation-related transfer cycle
- Information of the module(s) will be inserted related to the situation when using modules with limit conditions
I. Generate limit module:
- 1
- Call up the dialog box via the / / menu.
- The New Module dialog box appears.
- 2
- Define in the dialog box:
- Module name
- Type of Pattern
- Width and height of the module (for necessary transfer rows)
- Basic structure of the module: No needle action
- 3
- Close the dialog box with OK.
- The Module Editor appears.
- 4
- Make further settings under Properties of: xx for the behavior of the module.
Further information about module properties can be found under Further topics in the chapter Module properties.
- 5
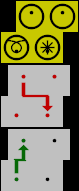
- Draw in the transfer procedure with VR1 racking in the Module Editor.
- 6
- Select the rows and group them to one pattern row.
- 7
- Call up the / menu.
- An empty row marked in yellow will be inserted.

- 8
- Draw in the needle actions to be checked in these rows with symbols of the Needle Actions - Stitch Lengths toolbar.
|
Needle Actions |
Meaning |
|---|---|
|
|
Needle allocated |
|
|
Do not check the needle assignment |
|
|
Needle not allocated |
|
|
Transparent |


- 9
- Close the Module Editor with
 .
.
- The module is saved to the New Modules module group of the Module Explorer of Database.
Characteristics of a module with limit condition:
- Label of a module with limit condition(s)

- Modules with limit conditions contain information to check knitting situations
- Module is used to draw it in
II. Generate module with limit condition(s):
- 1
- Call up the / / menu.
- The New Module dialog box appears.
- 2
- Define in the dialog box:
- Module name
- Type of Pattern
- Width and height of the module (for necessary knitting rows)
- Basic structure of the module: No needle action
- 3
- Close the dialog box with OK.
- The Module Editor appears.
- 4
- Make further settings under Properties of: xx for the behavior of the module.
- 5
- Draw-in the desired knitting sequence in the Module Editor.
- 6
- Call up the / menu.
- A row marked in red will be inserted.
Example:
The knitting sequence for multi gauge is drawn with the color of the table.
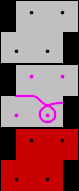
- 7
- Do not close the opened Module Editor.
- The created limit module must be linked to the module with limit condition(s).
III. Link the limit module to the module with limit condition(s):
- 1
- Select the limit module in the Module Explorer of Database in the New Modules directory.
- 2
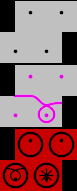
- Put the cursor in the row marked in red.
- A frame in light green appears.
- 3
- Click on the row marked in red with the LMB.
- Specifications of the limit module (yellow row) will be applied to the module with limit condition(s).
- 4
- Close the module with limit condition(s) with .
- The module will be saved in the Module Explorer of Database in the New Modules module group.