Position and cut-out the shape and expand the pattern
I. Position the shape:
- The shape with k&w Arrangements is located on the pattern after the ShapeSizer is closed.
- 1
- Position the shape elements Sleeve and / or Body with collar on the motif with the
 symbol selected and the left mouse button pressed.
- or -
Select the desired shape element with the symbol selected.
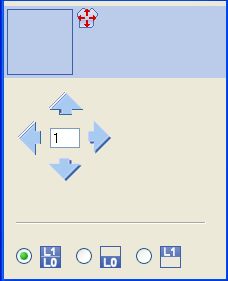
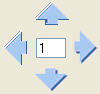
Position the selected shape element with the arrow keys of the keyboard or of the Tool properties toolbar.
Settings in the Tool properties dialog box for the Drawing Tool:
|
Symbol |
Function |
|---|---|
|
|
Input of a number (factor): Moving the selected element with each click on a direction arrow by the factor entered |
|
Direction arrows: Moving the selected element in the different directions | |
|
|
Move front layer (L0) and back layer (L1) of the selected element |
|
|
Move only the front layer (L0) of the selected element |
|
|
Move only the back layer (L1) of the selected element |


Select the shape elements:
- Selection by left clicking in the shape element
- Multiple selection of shape elements with Ctrl + LMB in the individual shape elements.
- Delete selection via LMB outside a shape element
Different presentations of the shape elements laid on:
|
Symbol |
Function | |
|---|---|---|
|
|
Display Pattern Cut-out |
k&w symbol preview only possible in the processing step Result:
|
|
|
Display Pattern Folded out |
Presentation of the shape with shape attributes (narrowing, fade-out, aligning symbols) and sleeves folded out.
|
|
|
Display Pattern Collapsed |
Presentation of the shape with shape attributes without the Suspend symbols.
|


 : Allocation of CA and MA.

Click on the selected symbol and the k&w presentation is reset.
II. Cut-out the shape:
You can make pattern related settings in the Configuration k&w dialog box before cutting out.
- 1
- Cut out the shape with
 in the Steps of Processing toolbar.
- The k&w Options for Cut out dialog box appears.

|
Options |
|
Function |
|---|---|---|
|
|
|
No correction when |
|
|
|
Activated automatically with odd-numbered edge widths. |
|
|
With even-numbered edge widths | |
|
|
|
The specifications in the tab of the shape attributes will be entered. |
|
|
The specifications in the tab of the shape attributes will not be entered. | |
|
|
|
Selection only active, if settings for stitch length on shape edge are present in the shape. |
|
|
Specifications are inserted | |
|
|
Specifications are not inserted | |
|
|
|
The yarn carrier colors specified for the different shape elements in the k&w Arrangement are applied to the pattern. |
|
|
The yarn carrier colors specified for the different shape elements in the k&w Arrangement are not applied to the pattern.
| |
|
|
|
Only active when loading old M1 k&w patterns. |


- 2
- Confirm the settings in the dialog box with OK.
- The Insert/Replace k&w Start dialog box appears.
- 3
- Select the desired start for body.
- 4
- Confirm with OK.
- The selected start is inserted.
III. Expand the pattern:
- 1
- Expand the pattern with
 of the Steps of Processing toolbar.
- The Correction of Widening dialog box appears.
- 2
- Confirm with Yes.
- The shape edges with the Widening attribute are corrected.
- The bind-off module for the collar is inserted.
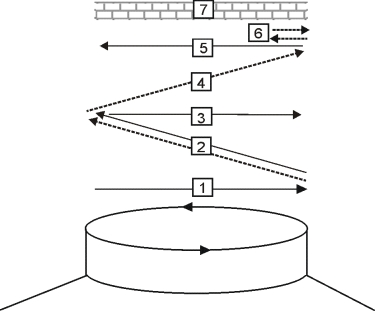
|
No. |
Meaning |
|---|---|
|
1 |
Knitting-in draw thread in front. |
|
2 |
Bind-off layer 1 (back) the draw thread is carried along. |
|
3 |
Knit draw thread to the right. |
|
4 |
Bind-off front. |
|
5 |
Knit out the draw thread at the front. |
|
6 |
Fix the bind-off stitch. |
|
7 |
Protection rows. |