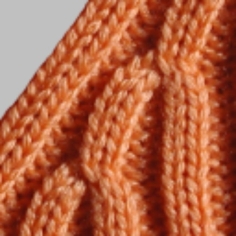
Create shape: Saddle shoulder with 2x2 rib
I. Generate a front and back in the Shape Editor:
All the shape elements and the k&w file (shape with k&w Arrangements) must be saved in the same directory.
- 1
- Open the Shape editor via /.
- 2
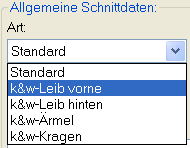
- Select a k&w... entry under .
- 3
- Set to Stitches.
- 4
- Activate
 under .
 - 5
- Specify starting width.
- 6
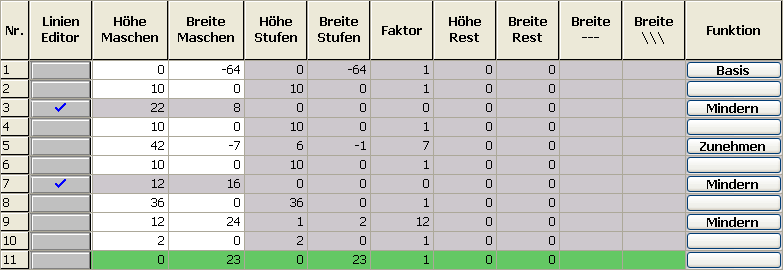
- Create the table under Left Lines and enter the values for the front and the back.
Front / Back element
|
Line Editor Line 3 left | ||||||
|---|---|---|---|---|---|---|
|
Factor |
Group |
Height |
Width |
Factor |
Width |
Width |
|
|
|
22 |
8 |
|
|
|
|
2 |
1 |
10 |
2 |
1 |
|
|
|
0 |
1 |
1 |
2 |
1 |
|
|
|
Line Editor Line 7 left | ||||||
|---|---|---|---|---|---|---|
|
Factor |
Group |
Height |
Width |
Factor |
Width |
Width |
|
|
|
12 |
16 |
|
|
|
|
4 |
1 |
2 |
2 |
1 |
|
|
|
0 |
1 |
1 |
2 |
1 |
|
|
- 7
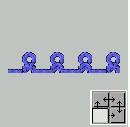
- Allocate the desired attributes Narrowing and Widening to the edges under .
|
Adjustments | |||
|---|---|---|---|
|
Line 3 | |||
|
Narrowing |
Fade-out width |
5 (odd-numbered) |
|
|
Fade-out type |
2x2 RL rib | ||
|
Narrowing width |
5 |
| |
|
Type of narrowing |
Body-rib | ||
|
Line 5 | |||
|
Widening |
Fade-out width |
1 |
|
|
Fade-out type |
Jersey | ||
|
Widening width |
1 |
| |
|
Widening type |
Standard | ||
|
Line 7 | |||
|
Narrowing |
Fade-out width |
4 |
|
|
Fade-out type |
Private 2x2-Rib-^^vv | ||
|
Narrowing width |
4 |
| |
|
Type of narrowing |
Body Rib Layers apart | ||


- 8
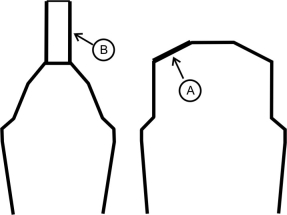
- Allocate the Narrowing function to the shoulder edge (A) under in the tab.
|
Setting | ||
|---|---|---|
|
Line 9 | ||
|
Narrowing |
Fade-out width |
0 |
|
Narrowing width |
0 | |
|
Type of narrowing |
Perform narrowing in sleeve | |
Generate a shape for the back with the same specifications as for the front without the gore element.
II. Generate the neck gore element in the Shape editor:
- 1
- Open the shape Saddle shoulder-2x2 front part.
- 2
- Generate a new element in the Shape Editor with
 .
. - 3
- Select the Gore entry in the section list.
- 4
- Set the coordinates for the gore.
Gore in front element

- 5
- Define the distance to the or to the .
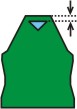
Do not connect the gore element to the end line.
III. Generate the element for the sleeve in the Shape Editor:
- 1
- Open the shape editor via /.
- 2
- Select the k&w Sleeve entry in the selection menu under .
- 3
- Enter the values in the table.
Sleeve

|
Line Editor Line 4 left | ||||||
|---|---|---|---|---|---|---|
|
Factor |
Group |
Height |
Width |
Factor |
Width |
Width |
|
|
|
12 |
16 |
|
|
|
|
4 |
1 |
2 |
2 |
1 |
|
|
|
0 |
1 |
1 |
2 |
1 |
|
|
|
Line Editor Line 5 left | ||||||
|---|---|---|---|---|---|---|
|
Factor |
Group |
Height |
Width |
Factor |
Width |
Width |
|
|
|
36 |
24 |
|
|
|
|
6 |
1 |
5 |
2 |
1 |
|
|
|
0 |
1 |
1 |
2 |
1 |
|
|
- 4
- Allocate the attribute for Narrowing and Widening under .
|
Adjustments | |||
|---|---|---|---|
|
Line 2 | |||
|
Widening |
Widening width |
1 |
|
|
Widening type |
Standard | ||
|
Fade out |
Fade-out width |
1 |
|
|
Fade-out type |
Jersey | ||
|
Line 4 + line 5 | |||
|---|---|---|---|
|
Narrowing |
Fade-out width |
6 |
|
|
Fade-out type |
2x2 RL- rib (vv^^) |
| |
|
Narrowing width |
6 |
| |
|
Type of narrowing |
Sleeve Rib Layers apart |
| |

- 5
- Allocate the Narrowing function to the sleeve element on the saddle edge (B) under in the tab.
|
Line 6 | ||
|---|---|---|
|
Narrowing |
Fade-out type |
no |
|
Fade-out width |
0 | |
|
Type of narrowing |
| |
|
Narrowing width |
Narrow entire width of sleeve | |
III. Generate the Collar shape element:
- 1
- Open the shape editor via / .
- 2
- Select the k&w collar entry in the selection menu under .
- 3
- Specify the information for the collar under Left Lines.
Collar

- 4
- Set bind-off for the end line and allocate the attributes under in the tab.
|
Adjustments | |||
|---|---|---|---|
|
Line 1-3 | |||
|
Fade out |
No fading-out | ||
|
Line 3 | |||
|
Binding-off |
Directory |
Standard | |
|
Module |
| ||