Create shape: Saddle shoulder with V-neck and narrowed collar
I. Generate a front and back in the Shape Editor:
- 1
- Open the Shape editor via /.
- 2
- Select a k&w... entry under .
- 3
- Set to Stitches.
- 4
- Activate
 under .
 - 5
- Specify starting width.
- 6
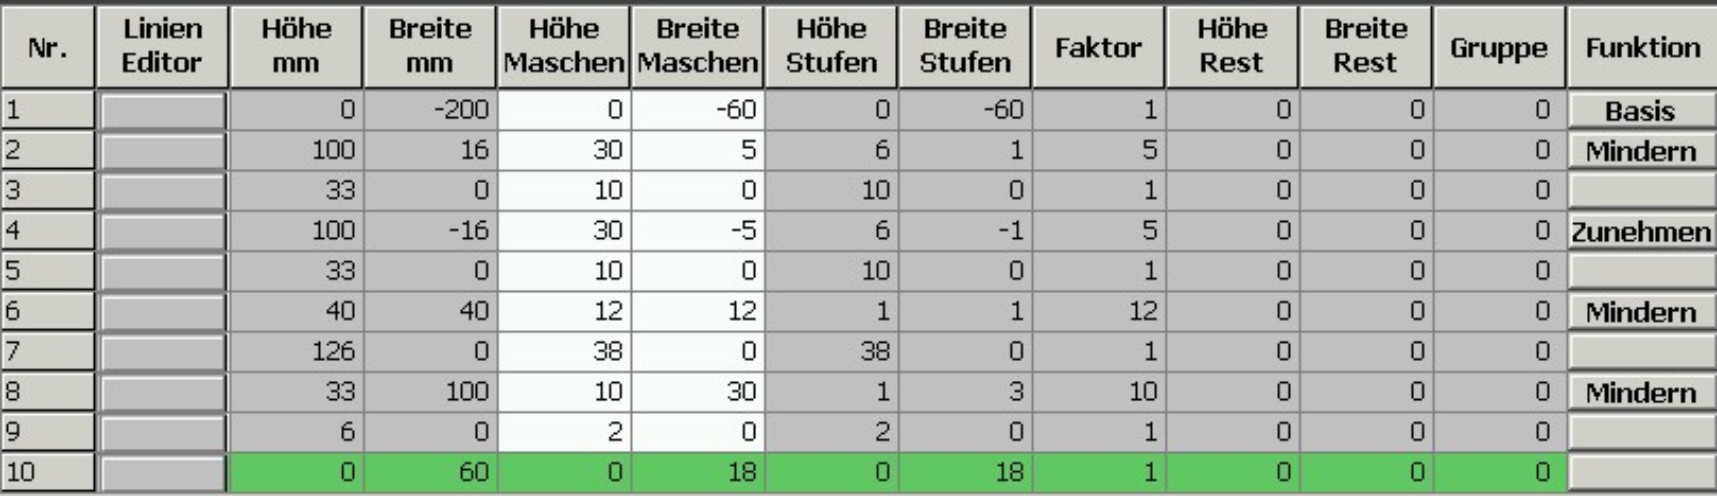
- Create the table under Left Lines and enter the values for the front.
Basic element Front / Back
- 7
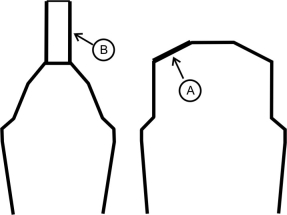
- Allocate the desired attributes Narrowing and Widening to the edges under .
- 8
- Allocate the Narrowing function to the shoulder edge (A) under in the tab.
|
Setting | ||
|---|---|---|
|
Line 8 | ||
|
Narrowing |
Fade-out width |
0 |
|
Narrowing width |
0 | |
|
Type of narrowing |
Perform narrowing in sleeve | |
Generate a shape for the back with the same specifications as for the front but without the neck opening element.
II. Generate the element for the neck opening in the Shape editor:
- 1
- Open the shape Saddle shoulder front part.
- 2
- Generate a new element in the Shape Editor with
 .
. - 3
- Select the entry Neck opening in the selection list.
- 4
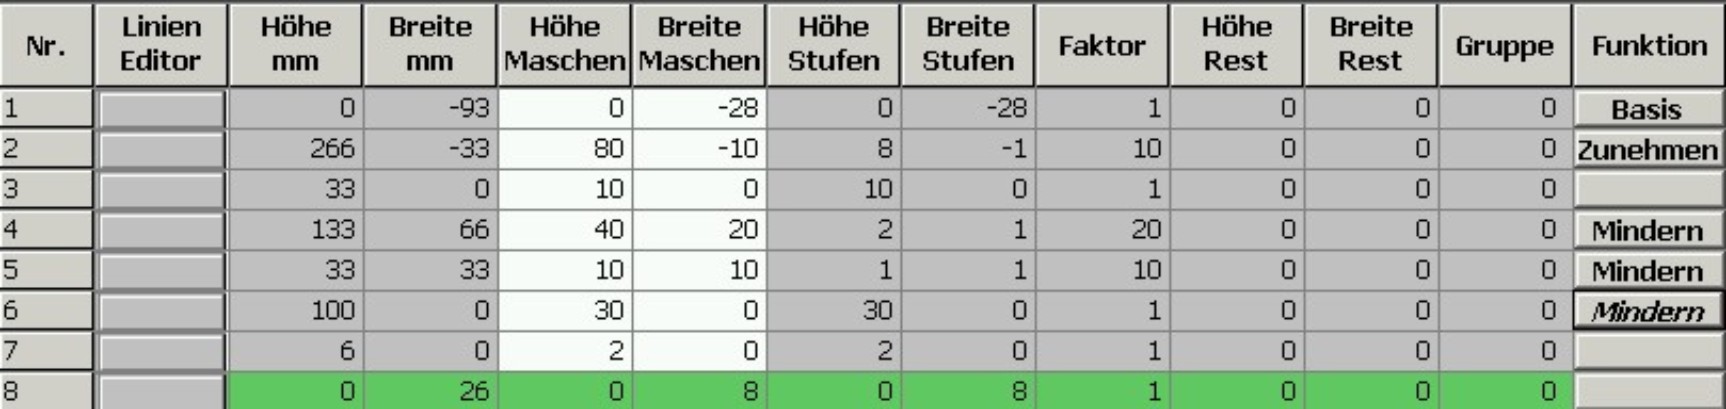
- Create the table under Left Lines and enter the values for the neck opening element.
Neck opening element

The end line of the V-neck has to be shorter than the end line of the front by two stitches at least.
- 5
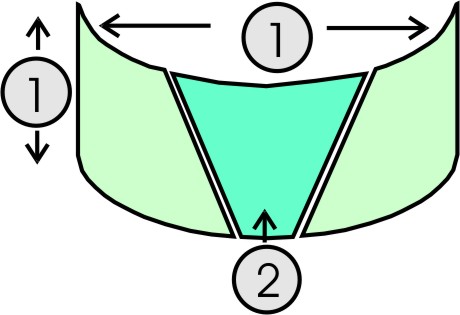
- Assign narrowing to the base line (No.1) under in the tab.
- 6
- Specify the narrowing type in the tab under .
- V-neck above
- V-neck underneath
- 7
- Specify the position of the V-neck via (Value:0).
- The neck opening element will be placed on the end line of the basic element.
- 8
- Save shape.
III. Generate the element for sleeve in the Shape editor:
- 1
- Open the shape editor via /.
- 2
- Select the k&w Sleeve entry in the selection menu under .
- 3
- Enter the values in the table:
Sleeve
- 4
- Allocate the desired attributes Widening and Narrowing to the edges under .
- 5
- Allocate the Narrowing function to the saddle edge (no.6) under in the tab.
|
Line 6 | ||
|---|---|---|
|
Narrowing |
Fade-out type |
no |
|
Fade-out width |
0 | |
|
Type of narrowing |
| |
|
Narrowing width |
Narrow entire width of sleeve | |
- 6
- Save shape.
IV. Generate the element for a narrowed collar.
Different collar shapes must be produced for the front and for the back.
|
No. |
Meaning |
|---|---|
|
| |
|
1 |
Height and width of front and back of the collar are the same |
|
2 |
Shape element for front collar as the element Neck |
- 1
- Open the shape editor via / .
- 2
- Select the k&w collar entry in the selection menu under .
- 3
- Enter the values for the collar in the table under Left lines.
Front of Collar / Back of Collar

- 4
- Allocate bind-off to the end line under in the General tab.
- 5
- Select the Bind-off tab and choose the Type of binding-off Neckline open L0.
- 6
- Save the Front of collar elements.
Create and save the Back of collar element with the same values and attributes.
V. Generate a non-knitting element for front of collar in the Shape editor:
- The front of collar element is open in the Shape editor
- 1
- Generate a new element in the Shape Editor with .
- 2
- Select the entry Neck opening in the selection list.
- 3
- Create the table under Left Lines and enter the values for the neck opening (2) element.
Neck opening element (non-knitting area)

The height of the Neck opening element must be the same as the Collarbasic element.
- 4
- Save front of collar.
You have to save all shape elements in the same directory.