Draw structure with yarn carrier colors
Draw the whole pattern with yarn carrier colors only.
It is not recommended to use yarn colors and yarn carrier colors in one pattern.
Table with the yarn carrier colors
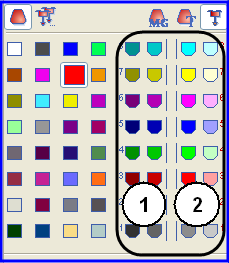
The numbering of the colors in the table matches the yarn carrier bar numbering 1 - 8
|
No. | Meaning |
|---|---|
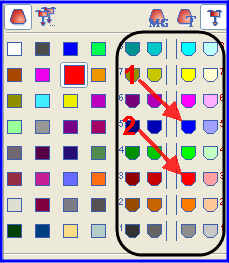
1 | The yarn carrier (yarn carrier colors) are positioned at the left fabric selvedge |
2 | The yarn carriers (yarn carrier colors) are positioned at the right fabric selvedge |
If colors (=yarn carriers) are drawn in, which cannot be used according to the machine type, they will be changed automatically.
I. Draw the single jersey structure with colored stripes:
- 1
- Set the in the Pattern Presentations toolbar.
- 2
- Select the yarn carrier color (1) for the basic pattern in the Pattern colors toolbar.
- 3
- Fill the basic pattern with the selected yarn carrier color with the
 drawing tool.
- The basic pattern will be knitted with yarn carrier 5 in the right home position
- 4
- Select the yarn carrier color (2) for the colored stripe in the Pattern colors toolbar.
- 5
- Enter the yarn carrier color for the colored stripes via the control columns
 or
or  of the symbol view.
- or -
Create a row selection via the control columns and fill the selection with the
  drawing tool.
- The colored stripe will be knitted with yarn carrier 3 in the right home position
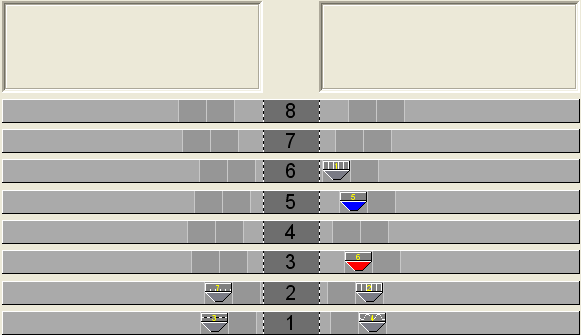
The yarn carrier (yarn carrier colors) in use are positioned on yarn carrier bars.
Draw-in an even number of rows of a color into the pattern.
II. Use of more than one yarn carrier per yarn field:
- 1
- Select the yarn carrier.
- or -
select the desired yarn field in the column of the table.
- The selected row will be shown on a light blue background (= selection).
- 2
- Place the cursor in the selected row of the
 column and call up the context menu.
 - 3
- Select the desired number of yarn carriers in the pick list.
Example: Set the number .
. - 4
- Click with the cursor on the menu item Value and then on the desired cell.
- The selected number is inserted in the cell and a new yarn carrier field is created for the second yarn carrier.
- One yarn carrier is positioned on the yarn carrier rail and the second yarn carrier stands in the Undefined field.
- 5
- Position the undefined yarn carrier on the desired yarn carrier rail.
- 6
- Press the Change Colors key.
- According to the bar position, the yarn carrier colors will be adapted in the Yarn field allocation and the Yarn field view dialog box.
Initialize is no longer available after Exchange Color.
- 7
- Confirm the Yarn Field Allocation dialog box with OK.
- The settings are applied.
III. Change the yarn carrier allocation:
Possibilities:
- Allocate a yarn carrier to an existing yarn carrier number
- Generate a new yarn carrier number (ID)
Example: Allocate a yarn carrier from the pattern to a rib yarn carrier.
Position the cursor on a yarn carrier symbol and the yarn carrier number (ID) will be displayed in the ID display field.
- 1
- Select the yarn carriers.
- The row is shown on a light blue background
- 2
- Position the cursor in the
 column and call up the context menu with the right mouse button.
- A pick list with all the existing yarn carrier numbers (ID) is displayed.
- 3
- Select the desired rib yarn carrier (2B or 6A) in the pick list.
- 4
- Confirm the Yarn Field Allocation dialog box with OK.
- The settings are applied.
IV. The yarn carrier allocation in the Yarn Field Allocation dialog box:
By using yarn carrier colors when creating the motif, the yarn carrier home position will be defined manually.
The Technical Processing can and will not make any changes.
You have to check the yarn carrier home position.