Pattern Related Settings in the Control Columns
Possible settings for Intarsia in the control columns:
- Yarn Carrier Distance to Fabric Selvedge YDI

- Swiveling Yarn Carriers

- Intarsia binding

- No Knitting-out

I. Index (YDI) for the yarn carrier distance to the fabric selvedge:
In the control column the YD index is entered by the M1plus for the entire pattern by default.
This YD index contains a predefined table with default values for the staggering process of the yarn carriers at the fabric selvedge.
- The pattern is loaded into the basic
 pattern state.
- 1
- Display the control column in the symbol view.
- 2
- Click the control column by the RMT.
- The context menu appears.
Yarn carrier distance from the fabric selvedge | ||
|---|---|---|
| YDI | 20 indirect tables for the yarn carrier staggering process (index) are possible at the fabric selvedge
|
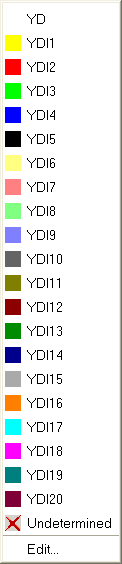
 : Tables in use will be set back.
- 3
- Select the desired index (color).
- 4
- Enter the selected index (color) in the desired area of the control column .
Enter different indices (colors) in to areas of the control column if different distance tables are necessary in the pattern.
- 5
- Complete the pattern.
- For the different areas in the pattern, tables with Don’t Care (without values) are entered in the Setup2 Editor.
II. Enter values for a YDI index in the table:
- 1
- Place the cursor on the YDI index to be edited in the control column .
- 2
- Open the context menu with the RMB.
- 3
- Call up the function.
- The Setup2 Editor appears with opened YDI tab.
- 4
- Edit the table of the YDI index.
Enter values only for the yarn carriers which have to get another distance to the fabric selvedge.
III. Influence the swiveling of yarn carriers for an entire pattern row:
The settings in the control column has a higher priority than the settings of the Yarn Field Allocation dialog box.
In the Yarn Field Allocation dialog box  is active for the Intarsia yarn carrier.
- The pattern is loaded into the basic pattern state.
- 1
- Display the control column in the symbol view.
- 2
- Click the control column by the RMT.
- The context menu appears.
| Function | Target |
|---|---|---|
| Swivel | Allow swiveling to the left or right |
| Do Not Swivel | Do not allow swiveling. |
| Undetermined | Delete the entry from the control column |

- 3
- For example select
 .
. - 4
- Draw-in in the desired pattern rows.
- In the pattern rows with the entry all the used Intarsia yarn carriers are not swiveled.
IV. Influence the Intarsia binding for an entire pattern row:
The information in the control column has a higher priority than the specifications from the Yarn Field Allocation dialog box.
In the Yarn Field Allocation dialog box the Intarsia binding left / right is active and the type of binding (Module) is allocated.
- The pattern is loaded into the basic pattern state.
- 1
- Display the control column in the symbol view.
- 2
- Click the control column by the RMT.
- The context menu appears.
| Function | Target |
|---|---|---|
|
| Allow Intarsia binding
|
|
| Do not allow Intarsia binding. |
|
| Delete the entry from the control column |
- 3
- Select
 , for example.
 - 4
- Draw-in in the desired pattern rows.
- In the pattern rows with the entry no Intarsia binding is entered in all the yarn fields.
V. Influence No knitting-out for an entire pattern row:
- The pattern is loaded into the basic pattern state.
- 1
- Display the control column in the symbol view.
- 2
- Click the control column by the RMT.
- The context menu appears.
|
| Function |
|---|---|---|
| No knitting-out | Do not allow knitting-out. |
| Undetermined | Delete the entry from the control column |
- 3
- For example select .
- 4
- Draw-in in the desired pattern row.
- In these marked pattern rows the yarn carriers will not be knitted-out.